Servlet2.5 规范之前,Java Web应用的绝大部分组件都通过 web.xml 文件来配置管理。
Servlet3.0 规范可通过 Annotation 来配置管理Web组件,极大简化了原有的配置信息。
在Servlet3.0 以后,我们可以不需要在 web.xml 里面配置 servlet,只需要加上 @WebServlet 注解就可以修改该 Servlet 的属性了。
1. 文件配置:WEB_INF/web.xml
1
2
3
4
5
6
7
8
9
10
11
12
13
14
15
16
17
18
19
20
21
22
23
24
25
26
27
28
29
30
31
32
33
34
35
36
37
38
39
40
41
42
43
44
45
46
47
48
49
50
| <?xml version="1.0" encoding="UTF-8"?>
<web-app xmlns="http://xmlns.jcp.org/xml/ns/javaee"
xmlns:xsi="http://www.w3.org/2001/XMLSchema-instance"
xsi:schemaLocation="http://xmlns.jcp.org/xml/ns/javaee http://xmlns.jcp.org/xml/ns/javaee/web-app_4_0.xsd"
version="4.0">
<servlet>
<servlet-name>demo01</servlet-name>
<servlet-class>com.demo.servlet.DemoServlet</servlet-class>
<load-on-startup>0</load-on-startup>
</servlet>
<servlet-mapping>
<servlet-name>demo01</servlet-name>
<url-pattern>/demo</url-pattern>
</servlet-mapping>
<context-param>
<param-name>username</param-name>
<param-value>root</param-value>
</context-param>
<context-param>
<param-name>password</param-name>
<param-value>1234</param-value>
</context-param>
<welcome-file-list>
<welcome-file>demo.html</welcome-file>
<welcome-file>demo.htm</welcome-file>
<welcome-file>demo.jsp</welcome-file>
</welcome-file-list>
<error-page>
<error-code>404</error-code>
<location>/error/404.html</location>
</error-page>
</web-app>
|
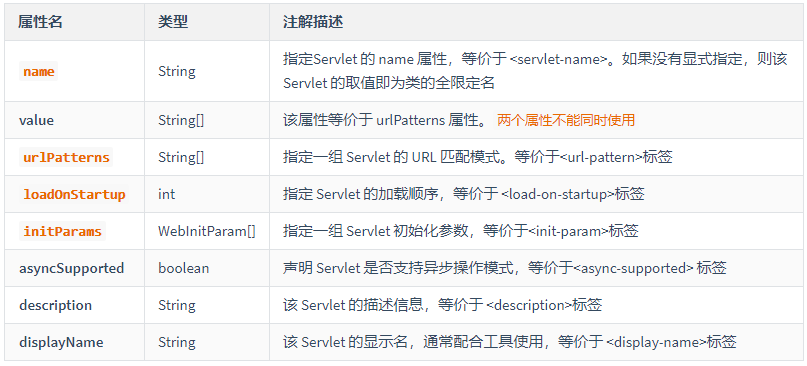
2. 注解配置:@WebServlet
@WebServlet 的属性列表:
注解配置代码示例:
1
2
3
4
5
6
7
8
9
10
11
12
13
14
15
16
17
18
19
| @WebServlet(
name = "TestWebServlet",
/*value = {"/demo", "/web"},*/
urlPatterns = {"/demo01", "/web01"},
loadOnStartup = 1,
initParams = {
@WebInitParam(name = "username", value = "root"),
@WebInitParam(name = "password", value = "123456"),
}
)
public class TestWebServlet extends HttpServlet {
protected void doPost(HttpServletRequest request, HttpServletResponse response) throws ServletException, IOException {
System.out.println("TestWebServlet 执行...");
}
protected void doGet(HttpServletRequest request, HttpServletResponse response) throws ServletException, IOException {
doPost(request, response);
}
}
|
3. 两者同时使用注意事项
如果使用@WebServlet Annotation(注解)来配置Servlet,需要注意:
① 不要在 web.xml 文件的根元素(<web-app—/>)中指定 metadata-complete=”true”;
② 不要在 web.xml 文件中再次配置该 Servlet 相关属性。