JavaScript = ECMAscript + BOM + DOM
BOM:Browser Object Model,浏览器对象模型。
DOM:Document Object model,文档对象模型。
1. BOM 参考资料:https://www.w3school.com.cn/jsref/index.asp
1.1 window 属性
document 对 Document 对象的只读引用。history 对 History 对象的只读引用。location 用于窗口或框架的 Location 对象。可以设置页面跳转路径Navigator 对 Navigator 对象的只读引用。Screen 对 Screen 对象的只读引用。
方法
alert(message) 显示带有一段消息和一个确认按钮的警告框。confirm(message) 显示带有一段消息以及确认/取消对话框。prompt([text], [defaultText]) 显示可提示用户输入对话框。close() 关闭浏览器窗口 - 必须是新开的页面窗口才能关闭。
clearInterval(重复对象) 清除由 setInterval() 设置的调用。clearTimeout(延迟对象) 清除由 setTimeout() 方法设置的调用。setInterval(code, millisec[, “lang”]) 按照间隔的周期(毫秒)来调用函数或计算表达式。返回值是重复对象setTimeout(code, millisec) 在延迟毫秒数后调用函数或计算表达式。返回值是延迟对象
示例
1 2 3 4 5 6 7 8 9 10 11 12 13 14 15 16 17 18 19 20 21 22 23 24 25 26 27 28 29 30 31 32 33 34 35 36 37 38 39 40 41 42 43 44 45 46 47 48 49 50 51 52 53 54 55 56 57 58 59 60 <script > function fn1 ( window .location = "${pageContext.request.contextPath}/index.jsp" ; } function fn2 ( window .alert ("删除失败1~~!" ); alert ("删除失败2!!!" ); } function fn3 ( var result = confirm ("确认删除该用户吗?" ); console .log (result); } function fn4 ( var content = prompt ("请输入密码:" , "abc" ); console .log (content); } var interval; function f1 ( interval = setInterval ("showNum1()" , 1000 ); } var num = 1 ; function showNum1 ( var currTimeStr = new Date ().toLocaleString (); console .log (currTimeStr); } function f2 ( if (interval !== undefined ) { clearInterval (interval); } } var timeout; function f3 ( setTimeout ("showNum()" , 1000 ); } function showNum ( var currTimeStr = new Date ().toLocaleString (); console .log (currTimeStr); timeout = setTimeout ("showNum()" , 1000 ); } function f4 ( if (timeout !== undefined ) { clearTimeout (timeout); } } </script > <button onclick ="fn1()" > 跳转</button > <button onclick ="fn2()" > 删除</button > <button onclick ="fn3()" > 确认</button > <button onclick ="fn4()" > 提交消息</button > <br > <button onclick ="f1()" > 开始</button > <button onclick ="f2()" > 停止</button > <br > <button onclick ="f3()" > 倒计时</button > <button onclick ="f4()" > 停止倒计时</button >
示例:时钟显示实时当前时间(动态刷新时间)
1 2 3 4 5 6 7 8 9 10 11 12 13 14 15 16 17 18 <html > <head > <title > JS BOM showTime</title > <script > function startShowTime ( setInterval ("showTime()" , 0 ); } function showTime ( var showTimeId = document .getElementById ("showTime" ); showTimeId.innerHTML = new Date ().toLocaleString (); } </script > </head > <body onload ="startShowTime()" > <span id ="showTime" style ="color: dodgerblue" > </span > </body > </html >
1.2 location 属性
hash 设置或返回从井号 (#) 开始的 URL(锚)。host 设置或返回主机名和当前 URL 的端口号。hostname 设置或返回当前 URL 的主机名。href 设置或返回完整的 URL。pathname 设置或返回当前 URL 的路径部分。port 设置或返回当前 URL 的端口号。protocol 设置或返回当前 URL 的协议。search 设置或返回从问号 (?) 开始的 URL(查询部分)。
方法
assign() 加载新的文档。reload() 重新加载当前文档。replace() 用新的文档替换当前文档。
示例
1 2 3 4 5 6 7 8 9 10 11 12 <script > function fn1 ( location.href = "index.jsp" ; } function fn2 ( location.reload (); } </script > <button onclick ="fn1()" > 跳转</button > <button onclick ="fn2()" > 刷新</button >
1.3 history 属性
length 返回浏览器历史列表中的 URL 数量。
方法
back() 加载 history 列表中的前一个 URL。相当于 上一页forward() 加载 history 列表中的下一个 URL。相当于 下一页go() 加载 history 列表中的某个具体页面。上一页 go(-1); 下一页 go(1);
示例
1 2 3 4 5 6 7 8 9 10 11 12 13 14 15 <head > <title > BOM对象之History对象</title > <script > function fn1 ( history.forward (); } </script > </head > <body > <br > <a href ="demo11.jsp" > 跳转到demo11</a > <br > <button onclick ="fn1()" > 下一页</button > </body >
demo11.jsp
1 2 3 4 5 6 7 8 9 10 11 12 13 14 15 16 17 18 19 20 <head > <title > BOM对象之History对象</title > <script > function fn1 ( history.go (-1 ) } function fn2 ( history.go (1 ) } </script > </head > <body > <br > <button onclick ="fn1()" > 上一页</button > <br > <a href ="demo12.jsp" > 跳转到demo12</a > <br > <button onclick ="fn2()" > 下一页</button > <br > </body >
demo12.jsp
1 2 3 4 5 6 7 8 9 10 11 12 13 <head > <title > BOM对象之History对象</title > <script > function fn1 ( history.back (); } </script > </head > <body > <br > <button onclick ="fn1()" > 上一页</button > <br > </body >
1.4 screen Screen(屏幕)对象,包含有关客户端显示屏幕的信息。
Screen 对象是由 JavaScript runtime engine 自动创建的,包含有关客户机显示屏幕的信息。
1.5 navigator 包含有关浏览器的信息。
2. xml DOM 参考资料:https://www.w3school.com.cn/xmldom/xmldom_reference.asp
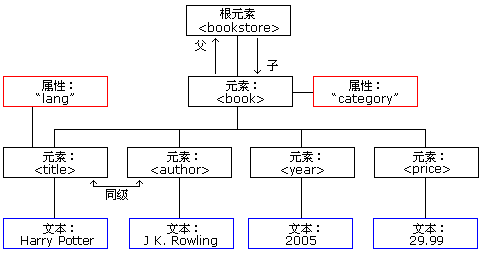
树形结构图
2.1 document 文档对象 一棵xml文档树的根,访问文档对象最顶层的入口。
常用方法
document.createElement() 创建元素节点。
document.createTextNode() 创建文本节点。
document.getElementById() 查找具有指定的唯一 ID 的元素。
document.getElementsByTagName() 返回所有具有指定名称的元素节点。
…
2.2 element 元素对象 xml文档中的元素。
常用方法
element.setAttribute(name, value) 添加新属性。
element.getAttribute() 返回属性的值。- 获取对应属性值时,该属性必须显式的定义在标签上时才能正确获取到。
element.hasAttribute() 返回元素是否拥有指定的属性。
element.removeAttribute() 删除指定的属性。
element.appendChild() 操作子节点(元素、属性、文本)。
element.getElementsByTagName() 找到具有指定标签名的子孙元素。- 可通过 document 获取即可。
…
2.3 node 节点对象 Node 对象是整个 DOM 的主要数据类型,节点对象代表文档树中的一个单独的节点。
常用属性
childNodes 返回节点到子节点的节点列表。firstChild 返回节点的首个子节点。lastChild 返回节点的最后一个子节点。nodeType 返回节点的类型。(节点类型值:元素1,属性2,文本3(含换行符#text),注释8,文档9)nodeValue 设置或返回节点的值,根据其类型。parentNode 返回节点的父节点。…
常用方法
nodeObject.appendChild() 向节点的子节点列表的结尾添加新的子节点。
nodeObject.removeChild() 删除(并返回)当前节点的指定子节点。
nodeObject.replaceChild() 用新节点替换一个子节点。
…
2.4 xml DOM 使用案例 × 3 demo(获取子节点类型):
1 2 3 4 5 6 7 8 9 10 11 12 13 14 15 16 17 18 19 20 21 <script > function fn1 ( var parent = document .getElementById ("parent" ); var childNodes = parent.childNodes ; console .log (childNodes.length ); for (var i = 0 ; i < childNodes.length ; i++) { console .log (childNodes[i].nodeName + "," + childNodes[i].nodeType ); if (childNodes[i].nodeName === "#text" ) { console .log ("这是个换行符!!!" ); } } } </script > <div id ="parent" > <div > 这是一个div2</div > <div > 这是一个div3</div > </div > <button onclick ="fn1()" > 获取子节点</button >
注意:从父节点获取子节点的 nodeObjects 时,其中包含了 #text 换行符。
demo(添加/删除子div):
1 2 3 4 5 6 7 8 9 10 11 12 13 14 15 16 17 18 19 20 21 22 23 24 25 26 27 <script > function fn1 ( var parentDiv = document .getElementById ("parentDiv" ); var childDiv = document .createElement ("div" ); childDiv.setAttribute ("id" , "childDiv" ); var textNode = document .createTextNode ("创建的文本" ); childDiv.appendChild (textNode); parentDiv.appendChild (childDiv); } function fn2 ( var parentDiv = document .getElementById ("parentDiv" ); var childDiv = document .getElementById ("childDiv" ); parentDiv.removeChild (childDiv); } </script > <button onclick ="fn1()" > 添加子div</button > <button onclick ="fn2()" > 删除子div</button > <div id ="parentDiv" > 父 div </div >
demo(移除父div中首尾子div):
1 2 3 4 5 6 7 8 9 10 11 12 13 14 15 16 17 18 19 20 21 22 23 24 25 26 27 28 29 30 31 32 33 34 <script > function fn1 ( var childDiv = document .getElementById ("child1" ); var parentDiv = childDiv.parentNode ; var childDiv2 = document .createElement ("div" ); var textNode = document .createTextNode ("hello dom" ); childDiv2.appendChild (textNode); parentDiv.appendChild (childDiv2); } function fn2 ( var parentDiv = document .getElementsByTagName ("div" )[0 ]; var childDivs = parentDiv.getElementsByTagName ("div" ); var firstDiv = childDivs[0 ]; parentDiv.removeChild (firstDiv); } function fn3 ( var parentDiv = document .getElementsByTagName ("div" )[0 ]; var childNodes = parentDiv.getElementsByTagName ("div" ); var lastDiv = childNodes[childNodes.length - 1 ]; parentDiv.removeChild (lastDiv); } </script > <button onclick ="fn1()" > 添加</button > <button onclick ="fn2()" > 移除第1个div</button > <button onclick ="fn3()" > 移除后1个div</button > <div > <div id ="child1" > 子div</div > </div >
3. html DOM 参考资料:https://www.w3school.com.cn/jsref/index.asp
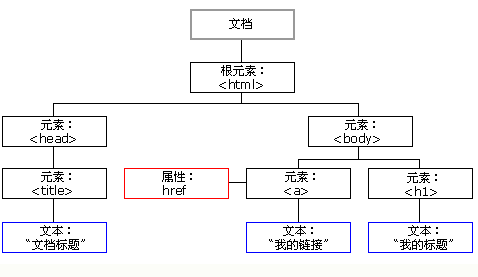
树形结构图
3.1 document 文档对象 常用方法
document.getElementById() 获取具有指定的唯一 id 的元素。
document.getElementsByName() 根据属性name获取一组元素。
document.getElementsByClassName() 根据属性class获取一组元素。
document.getElementsByTagName() 根据标签名称获取一组元素。
3.2 innerHTML 和 innerText 两个均为属性。内容,innerText 设置/获取标签纯文本。
1 2 3 4 5 6 7 8 9 10 11 12 13 14 15 16 17 18 19 20 <script > function fn1 ( var parent = document .getElementById ("parent" ); var text = document .createTextNode ("你好,世界!" ); parent.appendChild (text); } function fn2 ( var parent = document .getElementById ("parent" ); parent.innerHTML = "<font style=\"color: red\">你好,世界!(覆盖了)</font>" ; } </script > <button onclick ="fn1()" > 添加内容1</button > <button onclick ="fn2()" > 添加内容2</button > <div id ="parent" > </div >
常用对象
Input Button
Input Checkbox
Input File
Input Hidden
Input Password
Input Radio
Input Reset
Input Submit
Input Text
Input Text 对象。即 每个<input type=”text”>对应1个 Text 标签。
1 2 3 4 5 6 7 8 9 <script > function fn1 ( var ele = document .getElementsByName ("username" )[0 ]; console .log (ele.value ); } </script > <input type ="text" name ="username" onchange ="fn1()" />
3.4 style 控制元素样式 核心对象
格式:元素对象.style.样式名 = "样式值";
1 2 3 4 5 6 7 8 9 10 11 12 13 14 <script > function fn1 ( var ele = document .getElementById ("div1" ); ele.style .border = "1px solid red" ; ele.style .width = "300px" ; ele.style .fontSize = "30px" ; ... } </script > <button onclick ="fn1()" > 改变样式</button > <br > <br > <div id ="div1" > </div >
3.5 tbody标签-表格增删
tbody.insertBefore() 参数1:插入的对象 参数2:在谁之前
1 2 3 4 5 6 7 8 9 10 11 12 13 14 15 16 17 18 19 20 21 22 23 24 25 26 27 28 29 30 31 32 33 <script > var tbody = document .getElementsByTagName ("tbody" )[0 ]; function addFile ( var tr = document .createElement ("tr" ); tr.innerHTML = "<td><input type=\"file\" /></td><td><a href=\"javascript:void(0)\" onclick=\"del(this)\">删除附件</a></td>" var lastrow = document .getElementById ("lastrow" ); tbody.insertBefore (tr, lastrow); } function del (delFile ) { var del = delFile.parentNode .parentNode ; tbody.removeChild (del); } </script > <table > <tbody > <tr > <td > <input type ="file" /> </td > <td > <a href ="javascript:void(0)" onclick ="del(this)" > 删除附件</a > </td > </tr > <tr id ="lastrow" > <td colspan ="2" > <input type ="button" onclick ="addFile()" value ="添加附件" /> </td > </tr > </tbody > </table >
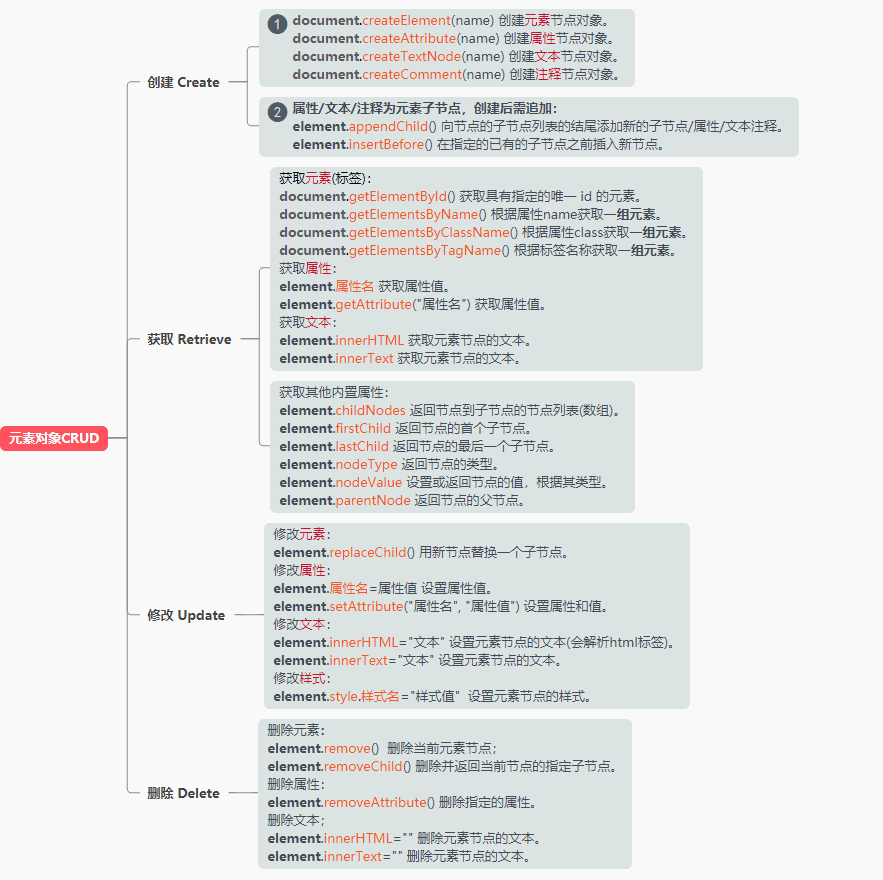
4. 元素标签CRUD
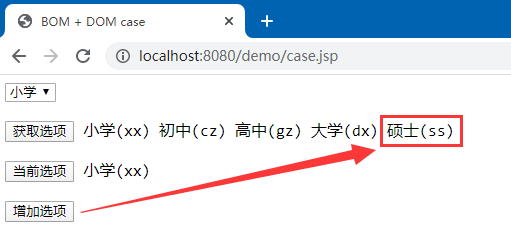
5. BOM + DOM 使用案例 × 5 5.1 获取下拉框所有选项文本 5.2 获取下拉框被选中文本和属性 5.3 新增下拉框选项 三合一 源码示例:
1 2 3 4 5 6 7 8 9 10 11 12 13 14 15 16 17 18 19 20 21 22 23 24 25 26 27 28 29 30 31 32 33 34 35 36 37 38 39 40 41 42 43 44 <script > function getOptions ( var options = document .getElementById ("selectId" ).options ; var text = "" ; for (var i = 0 ; i < options.length ; i++) { text = text + " " + options[i].text + "(" + options[i].value + ")" ; } document .getElementById ("span1" ).innerHTML = text; } function currSelected ( var select = document .getElementById ("selectId" ); var options = select.options ; var selectedIndex = select.selectedIndex ; document .getElementById ("span2" ).innerHTML = options[selectedIndex].text + "(" + options[selectedIndex].value + ")" ; } function addOption ( var select = document .getElementById ("selectId" ); var option = document .createElement ("option" ); option.value = "ss" ; option.text = "硕士" ; select.add (option); } </script > <select id ="selectId" > <option value ="xx" > 小学</option > <option value ="cz" > 初中</option > <option value ="gz" > 高中</option > <option value ="dx" > 大学</option > </select > <br > <br > <button onclick ="getOptions()" > 获取选项</button > <span id ="span1" > </span > <br > <br > <button onclick ="currSelected()" > 当前选项</button > <span id ="span2" > </span > <br > <br > <button onclick ="addOption()" > 增加选项</button >
5.4 全选 & 全不选 & 反选 1 2 3 4 5 6 7 8 9 10 11 12 13 14 15 16 17 18 19 20 21 22 23 24 25 26 27 28 29 30 31 32 33 34 35 36 37 38 39 <script > function selectAllOrNot ( var hobbys = document .getElementsByClassName ("hobbys" ); for (var i = 0 ; i < hobbys.length ; i++) { hobbys[i].checked = (hobbys[i].checked ) ? false : true ; } } function selectAll ( var hobbys = document .getElementsByClassName ("hobbys" ); var all = document .getElementById ("all" ); for (var i = 0 ; i < hobbys.length ; i++) { hobbys[i].checked = all.checked ; } } function fn3 ( var hobbys = document .getElementsByClassName ("hobbys" ); for (var i = 0 ; i < hobbys.length ; i++) { hobbys[i].checked = !(hobbys[i].checked ); } } </script > <input type ="checkbox" onchange ="selectAll()" id ="all" > 全选/全不选<br > <br > <input type ="checkbox" class ="hobbys" name ="lq" > 篮球<input type ="checkbox" class ="hobbys" name ="zq" > 足球<input type ="checkbox" class ="hobbys" name ="pq" > 排球<input type ="checkbox" class ="hobbys" name ="qq" > 铅球<br > <br > <button onclick ="fn1()" > 全选</button > <button onclick ="fn2()" > 全不选</button > <button onclick ="fn3()" > 反选</button >
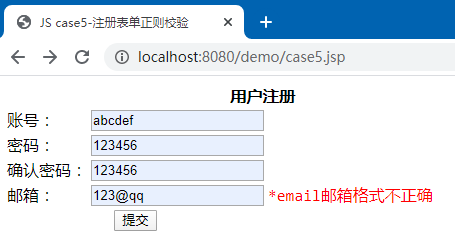
5.5 注册表单的校验 1 2 3 4 5 6 7 8 9 10 11 12 13 14 15 16 17 18 19 20 21 22 23 24 25 26 27 28 29 30 31 32 33 34 35 36 37 38 39 40 41 42 43 44 45 46 47 48 49 50 51 52 53 54 55 56 57 58 59 60 61 62 63 64 65 66 67 68 69 70 71 72 73 74 75 76 77 78 79 80 81 82 83 84 85 86 87 88 89 90 91 92 93 94 95 96 97 98 99 100 101 102 103 104 105 106 107 108 109 110 111 112 113 114 115 116 117 118 119 <script > function checkInfo ( cleanSpan (); return checkNull ("username" ) && checkLength ("username" ) && checkNull ("password" ) && checkLength ("password" ) && checkNull ("repassword" ) && checkLength ("repassword" ) && checkEquals () && checkNull ("email" ) && checkEmail ("email" ); } function checkNull (id ) { var reg = /^\s*$/ ; var val = document .getElementById (id).value ; if (reg.test (val)) { errorInfo (id, "不能为空" ); return false ; } else { return true ; } } function cleanSpan ( var spans = document .getElementsByTagName ("span" ); for (var i = 0 ; i < spans.length ; i++) { spans[i].innerHTML = "" ; } } function checkLength (id ) { var reg = /^.{6,}$/ ; var val = document .getElementById (id).value ; if (reg.test (val)) { return true ; } else { errorInfo (id, "长度不满足6位以上" ); return false ; } } function checkEquals ( var pwd1 = document .getElementById ("password" ).value ; var pwd2 = document .getElementById ("repassword" ).value ; if (pwd1 === pwd2) { return true ; } else { errorInfo ("repassword" , "两次密码不一致" ); return false ; } } function checkEmail (emailId ) { var reg = /^(\w)+@(\w)+(.\w+)+$/ ; var val = document .getElementById (emailId).value ; if (reg.test (val)) { return true ; } else { errorInfo (emailId, "邮箱格式不正确" ); return false ; } } function errorInfo (id, msg ) { var span = document .getElementById (id + "_error" ); span.setAttribute ("style" , "color:red" ); span.innerHTML = "*" + id + msg; } </script > <form action ="index.jsp" onsubmit ="return checkInfo()" > <table > <tr > <th colspan ="3" > 用户注册</th > </tr > <tr > <td > 账号:</td > <td > <input type ="text" name ="username" id ="username" <%--onblur ="cleanSpan()" -- %> ></td > <td width ="250px" > <span id ="username_error" > </span > </td > </tr > <tr > <td > 密码:</td > <td > <input type ="text" name ="password" id ="password" <%--onblur ="cleanSpan()" -- %> ></td > <td width ="250px" > <span id ="password_error" > </span > </td > </tr > <tr > <td > 确认密码:</td > <td > <input type ="text" name ="repassword" id ="repassword" <%--onblur ="cleanSpan()" -- %> ></td > <td width ="250px" > <span id ="repassword_error" > </span > </td > </tr > <tr > <td > 邮箱:</td > <td > <input type ="text" name ="email" id ="email" <%--onblur ="cleanSpan()" -- %> ></td > <td width ="250px" > <span id ="email_error" > </span > </td > </tr > <tr > <td colspan ="2" align ="center" > <input type ="submit" value ="提交" /> </td > </tr > </table > </form >

