官方网址:https://oauth.net/2/
参考资料:http://www.ruanyifeng.com/blog/2014/05/oauth_2_0.html
1. 简介
OAuth 2.0是用于授权的行业标准协议目前行业主流的授权协议。
OAuth(开放授权)是一个开放标准,允许用户授权第三方网站访问他们存储在另外的服务提供者上的信息,而不需要将用户名和密码提供给第三方网站或分享他们数据的所有内容。
1.1 应用场景
对内授权:内部有多个系统,可以实现授权式操作
对外授权:可以让外部第三方应用,进行授权操作
1.2 授权模式
- 授权码模式 - 目前行业的标准方案
- 隐式模式
- 密码模式
- 客户端模式
授权码模式 Authorization-code:

涉及到三种角色:
1.应用程序:第三方程序系统 ,需要在开放平台的主站进行申请
2.授权程序:实现基于Oauth2.0的授权交互
3.资源程序:最终要开放的接口资源
通俗:
需要根据应用的ip和秘钥获取授权码
oauth/authorize?client_id=应用的ID&client_secret=应用的秘钥&response_type=code&redirect_uri=回调地址
(获取授权服务返回的信息:可以获取授权码,也可以获取令牌等信息)
再次请求授权服务,通过授权码去获取令牌
oauth/token?client_id=应用的ID&client_secret=应用的秘钥&response_type=code&redirect_uri=回调地址&code=授权码
eg: oauth/token?client_id=app1001&client_secret=654321&response_type=code&code=a3cepW 回调地址传递:token、refresh_token(刷新令牌一次性)
有了令牌就可以操作资源
2. Spring Security
RBAC系统:基于角色的权限控制系统
Java的权限框架:Shiro( http://shiro.apache.org/ )、Spring Security( https://spring.io/projects/springsecurity/ )
Spring Security是一个功能强大且高度可定制的身份验证和访问控制框架。
1
2
3
4
5
6
7
8
| <dependency>
<groupId>org.springframework.boot</groupId>
<artifactId>spring-boot-starter-web</artifactId>
</dependency>
<dependency>
<groupId>org.springframework.cloud</groupId>
<artifactId>spring-cloud-security</artifactId>
</dependency>
|
1
2
3
4
5
6
7
8
9
10
11
12
13
14
15
16
17
18
19
20
21
22
23
24
25
26
27
28
29
30
31
32
33
34
35
36
37
38
39
40
41
42
43
44
|
@Configuration
@Order(1)
@EnableWebSecurity
public class SecurityConfig extends WebSecurityConfigurerAdapter {
@Bean
@Override
public AuthenticationManager authenticationManagerBean() throws Exception {
AuthenticationManager am= super.authenticationManagerBean();
return am;
}
@Override
protected void configure(HttpSecurity http) throws Exception {
http
.formLogin().permitAll()
.and().logout().logoutUrl("/logout").logoutSuccessUrl("/")
.and().authorizeRequests().antMatchers("/api/hello/**").hasRole("admin")
.anyRequest().authenticated()
.and().csrf().disable();
}
@Override
protected void configure(AuthenticationManagerBuilder auth) throws Exception {
auth.inMemoryAuthentication().withUser("laowang").password("{noop}13579").roles("admin").and()
.withUser("wangsi").password("{noop}111").roles("user");
}
}
|
1
2
3
4
5
6
7
8
9
10
11
12
13
14
15
16
17
18
19
20
21
22
23
|
@RestController
public class OrderController {
@GetMapping("api/order/detail.do")
public String detail(int id){
return "欢迎---"+id;
}
}
@RestController
public class HiController {
@GetMapping("/api/hi.do")
public String hi(){
return "OK";
}
@GetMapping("/api/hello/hi.do")
public String hello(){
return "OK";
}
}
|
1
2
3
4
5
6
7
| @SpringBootApplication
public class OauthServerApplication {
public static void main(String[] args) {
SpringApplication.run(OauthServerApplication.class,args);
}
}
|
3. OAuth2.0整合授权码模式
1
2
3
4
5
| <dependency>
<groupId>org.springframework.cloud</groupId>
<artifactId>spring-cloud-starter-oauth2</artifactId>
<version>2.2.4.RELEASE</version>
</dependency>
|
1
2
3
4
5
6
7
8
9
10
11
12
13
14
15
16
17
18
19
20
21
22
23
24
25
26
27
28
29
30
31
32
33
34
35
36
37
38
39
40
|
@Configuration
@EnableAuthorizationServer
public class OauthConfig extends AuthorizationServerConfigurerAdapter {
@Autowired
private AuthenticationManager authenticationManager;
@Override
public void configure(ClientDetailsServiceConfigurer clients) throws Exception {
clients.inMemory().withClient("app1001").secret("{bcrypt}654321").
redirectUris("http://localhost:8080/api/hello.html").
autoApprove(true).scopes("all")
.refreshTokenValiditySeconds(1800).accessTokenValiditySeconds(600).
authorizedGrantTypes("authorization_code");
}
@Override
public void configure(AuthorizationServerSecurityConfigurer security) throws Exception {
ClientDetails details;
security.tokenKeyAccess("permitAll()").
checkTokenAccess("permitAll()").
allowFormAuthenticationForClients();
}
@Override
public void configure(AuthorizationServerEndpointsConfigurer endpoints) throws Exception {
endpoints.authenticationManager(authenticationManager).tokenStore(createTS());
}
@Bean
public TokenStore createTS(){
return new InMemoryTokenStore();
}
}
|
4. OAuth2.0 授权 - 基于GitHub
Oauth2.0模式:授权码的模式
请求需求的内容:
1.获取授权码 code
2.获取令牌 access_token
3.刷新令牌获取新令牌 refresh_token
4.校验令牌 check_token
Oauth2.0默认提供的接口:
get /oauth/authorize 获取授权码
需求参数:
client_id: 客户端id
response_type: 类型 code
state: 随机签名 时间戳
scope: 范围 /oauth/token
1
2
3
4
5
6
7
8
9
10
11
12
| <dependency>
<groupId>org.springframework.boot</groupId>
<artifactId>spring-boot-starter-web</artifactId>
</dependency>
<dependency>
<groupId>org.springframework.cloud</groupId>
<artifactId>spring-cloud-starter-oauth2</artifactId>
</dependency>
<dependency>
<groupId>org.springframework.boot</groupId>
<artifactId>spring-boot-starter-data-redis</artifactId>
</dependency>
|
1
2
3
4
5
6
7
8
9
10
11
12
13
14
15
16
17
18
19
20
21
22
23
24
25
26
27
28
29
| @EnableWebSecurity
public class WebSecurityConfig extends WebSecurityConfigurerAdapter {
@Bean
public PasswordEncoder passwordEncoder() {
return new BCryptPasswordEncoder();
}
@Bean
@Override
public AuthenticationManager authenticationManagerBean() throws Exception {
return super.authenticationManagerBean();
}
@Override
protected void configure(HttpSecurity http) throws Exception {
http.authorizeRequests()
.antMatchers("/**").permitAll().
and().httpBasic().
and().csrf().disable();
}
}
|
1
2
3
4
5
6
7
8
9
10
11
12
13
14
| @Configuration
public class RedisTokenStoreConfig {
@Autowired
private RedisConnectionFactory redisConnectionFactory;
@Bean
public TokenStore redisTokenStore (){
return new RedisTokenStore(redisConnectionFactory);
}
}
|
1
2
3
4
5
6
7
8
9
10
11
12
13
14
15
16
17
18
19
20
21
22
23
24
25
| @Slf4j
@Service
public class UserDetailsService implements UserDetailsService {
@Autowired
private PasswordEncoder passwordEncoder;
@Override
public UserDetails loadUserByUsername(String username) throws UsernameNotFoundException {
log.info("username---:" + username);
if(!username.equals("admin")){
throw new UsernameNotFoundException("the user is not found");
}else{
String role = "ROLE_ADMIN";
List<SimpleGrantedAuthority> authorities = new ArrayList<>();
authorities.add(new SimpleGrantedAuthority(role));
String password = passwordEncoder.encode("123456");
return new org.springframework.security.core.userdetails.User(username,password, authorities);
}
}
}
|
1
2
3
4
5
6
7
8
9
10
11
12
13
14
15
16
17
18
19
20
21
22
23
24
25
26
27
28
29
30
31
32
33
34
35
36
37
38
39
40
41
42
43
44
45
46
47
48
49
50
| @Configuration
@EnableAuthorizationServer
public class OAuth2Config extends AuthorizationServerConfigurerAdapter {
@Autowired
public PasswordEncoder passwordEncoder;
@Autowired
private AuthenticationManager authenticationManager;
@Autowired
public UserDetailsService detailsService;
@Autowired
private TokenStore redisTokenStore;
@Override
public void configure(final AuthorizationServerEndpointsConfigurer endpoints) throws Exception {
endpoints.authenticationManager(authenticationManager)
.userDetailsService(detailsService)
.tokenStore(redisTokenStore);
}
@Override
public void configure(ClientDetailsServiceConfigurer clients) throws Exception {
clients.inMemory()
.withClient("app001")
.secret(passwordEncoder.encode("123456"))
.authorizedGrantTypes("refresh_token", "authorization_code")
.accessTokenValiditySeconds(3600).
redirectUris("http://localhost:8011/call.html")
.scopes("all")
.and()
.withClient("app002")
.secret(passwordEncoder.encode("123456"))
.authorizedGrantTypes("refresh_token", "authorization_code")
.accessTokenValiditySeconds(3600).
redirectUris("http://localhost:8011/call.html")
.scopes("all");
}
@Override
public void configure(AuthorizationServerSecurityConfigurer security) throws Exception {
security.allowFormAuthenticationForClients();
security.checkTokenAccess("permitAll()");
security.tokenKeyAccess("isAuthenticated()");
}
}
|
1
2
3
4
5
6
7
8
9
10
| server:
port: 8011
spring:
application:
name: oauthserver
redis:
database: 0
host: 39.105.189.141
port: 6380
password: 123456
|
测试:
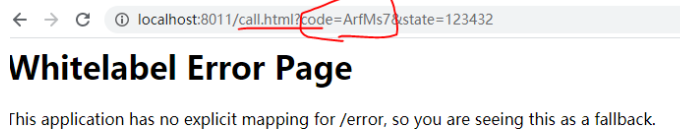
测试授权:
请求接口
http://localhost:8011/oauth/authorize?response_type=code&client_id=app001&state=123432
调用登录页面,输入账号信息,成功之后,将授权码回调到指定的页面

取到对应的授权码:code=u8cCJ0
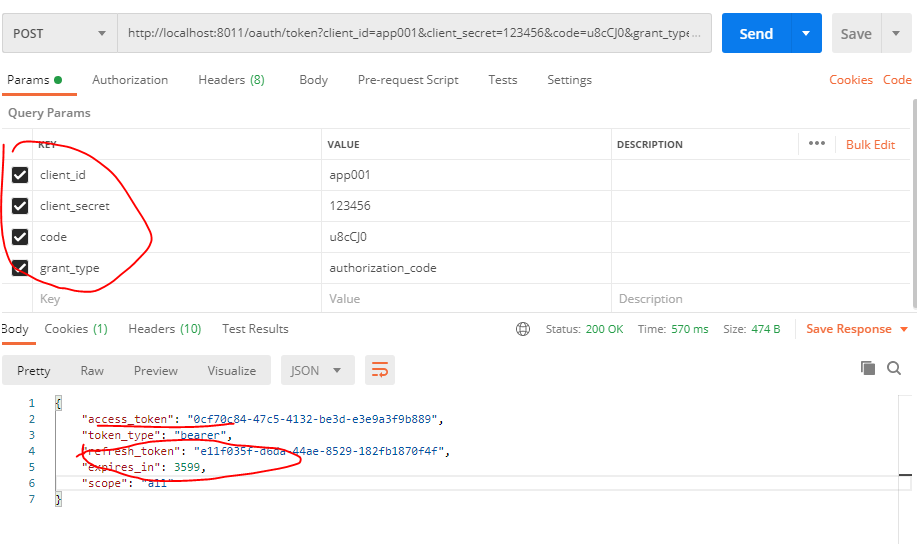
postman进行接口请求 获取令牌
http://localhost:8011/oauth/token
需求的参数:post请求
请求示例:http://localhost:8011/oauth/token?client_id=app001&client_secret=123456&code=u8cCJ0&grant_type=authorization_code
3.校验令牌是否有效
http://localhost:8011/oauth/check_token
需求参数:token:令牌
请求示例:http://localhost:8011/oauth/check_token?token=0cf70c84-47c5-4132-be3d-e3e9a3f9b889