
参考资料:https://lfvepclr.gitbooks.io/spring-framework-5-doc-cn/content/
1. Spring 事务特性
事务 : 是逻辑上一组操作,要么全都成功,要么全都失败.
事务特性 : ACID
- 原子性 : 事务不可分割
- 一致性 : 事务执行的前后,数据完整性保持一致
- 隔离性 : 一个事务执行的时候,不应该受到其他事务的打扰
- 持久性 : 一旦结束,数据就永久的保存到数据库
如果不考虑隔离性:
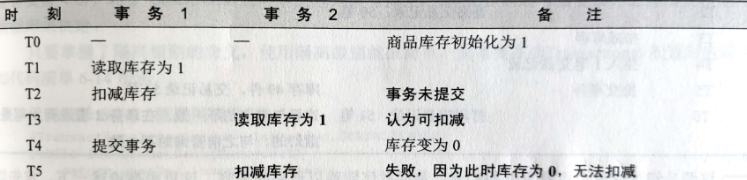
脏读 : 一个事务读到另一个事务未提交数据
不可重复读 : 一个事务读到另一个事务已经提交数据(update)导致一个事务多次查询结果不一致
幻读/虚读 : select 某记录是否存在,结果是不存在,准备插入此记录,但执行 insert 时发现此记录已存在(因刚好被另一个事务 insert),无法插入,此时 select 过程发生幻读。
| 事务隔离级别 |
脏读 |
不可重复读 |
幻读 |
| 读未提交(read-uncommitted) |
是 |
是 |
是 |
| 读已提交(read-committed) |
否 |
是 |
是 |
| 可重复读(repeatable-read) |
否 |
否 |
是 |
| 串行化/序列化(serializable) |
否 |
否 |
否 |
mySQL 数据库存储引擎:innoDB(支持事务)、MyISAM(不支持事务)
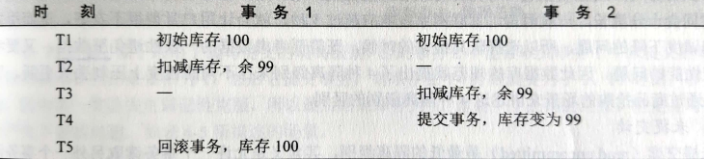
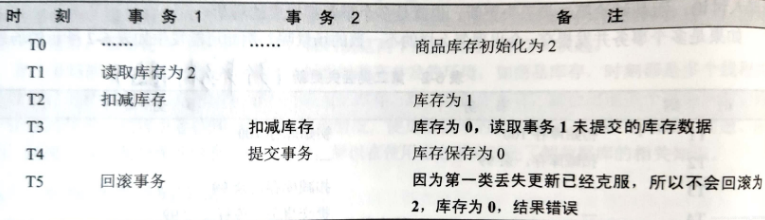
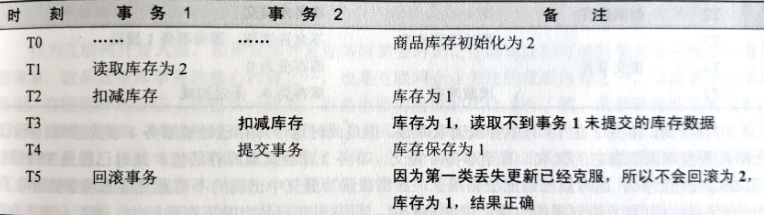
一般,存在两种类型的丢失更新,对于一个事务回滚另外一个事务提交而引发的数据不一致的情况称为第一类丢失更新。如:
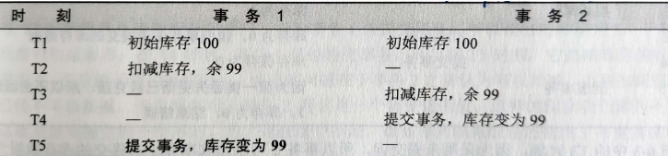
目前大部分数据库已经克服了第一类丢失更新的问题。如果多个事务并发提交,就会导致第二类丢失更新的情况:
为了克服这类问题,数据库提出了事务之间的隔离级别。共有4类隔离级别:
(1)未提交读(最低隔离级别)
允许一个事务读取另外一个事务没有提交的数据,可能发生脏读场景。
(2)读写提交
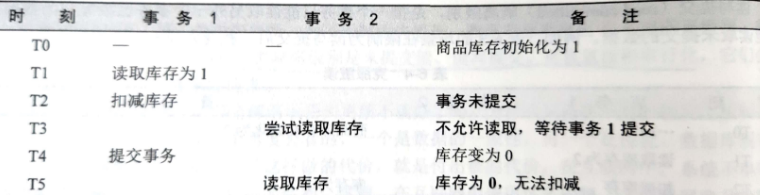
指一个事务只能读取另外一个事务已经提交的数据,不能读取未提交的数据。
但是读写提交也会产生下面问题(不可重复读):
为了克服这个不足,数据库的隔离级别还提出了可重复度的隔离级别,能够消除不可重复度问题。
(3)可重复读
目标是克服读写提交中出现的不可重复读现象:
(4)串行化
数据库最高的隔离级别,它会要求所有的SQL都会按照顺序执行,这样可以克服上述隔离级别中出现的所有问题,能够完全保证数据的完整性。但追求更高的隔离性,也要付出锁的代价。有了锁,意味着性能的丢失,而且隔离级别越高,性能越是直线下降。
配置默认的隔离级别(在application.properties属性文件中):
1
2
3
4
5
6
7
8
|
spring.datasource.tomcat.default-transaction-isolation=2
|
代码配置事务的隔离级别和传播行为:
1
2
3
|
@Transactional(isolation= Isolation.REPEATABLE_READ, propagation= Propagation.REQUIRED, readOnly=false)
public void transfer(Integer from, Integer to, Double money) {...}
|
2. Spring 事务API
PlatformTransactionManager : 平台事务管理器
- getTransaction(TransactionDefinition definition)
- rollback(TransactionStatus status)
- commit(TransactionStatus status)
TransactionDefinition : 事务定义
- ISOLation_XXX:事务隔离级别(isolation)
- ISOLATION_DEFAULT : 默认级别,Mysql –>
repeatable_read | Oracle –>> read_commited
- ISOLATION_READ_UNCOMMITTED
- ISOLATION_READ_COMMITTED
- ISOLATION_REPEATABLE_READ
- ISOLATION_SERIALIZABLE
- PROPAGATION_XXX:事务的传播行为
TransactionStatus : 事务状态
是否有保存点
是否是一个新的事务
事务是否已经提交
关系 :
PlatformTransactionManager 通过 TransactionDefinition 设置事务相关信息管理事务,管理事务过程中,产生一些事务状态,状态由 TransactionStatus 记录。
API详解:
PlatformTransactionManager : 接口
Spring为不同的持久化框架提供了不同 PlatformTransactionManager 接口实现。
使用Spring JDBC或iBatis 进行持久化数据时使用(★):
- org.springframework.jdbc.datasource.DataSourceTransactionManager
使用Hibernate进行持久化数据时使用:
- org.springframework.orm.hibernate.HibernateTransactionManager
使用JPA进行持久化时使用:
- org.springframework.orm.jpa.JpaTransactionManager
当持久化机制是Jdo时使用:
- org.springframework.jdo.JdoTransactionManager
使用一个JTA实现来管理事务,在一个事务跨越多个资源时必须使用:
- org.springframework.transaction.jta.JtaTransactionManager
3. Spring 事务传播行为
不是JDBC事务管理,用来解决实际开发的问题。
传播行为:解决业务层之间调用的事务的关系 (ServiceA.m() 方法与 ServiceB.m() 方法)
PROPAGATION_REQUIRED : 支持当前事务,如果不存在 就新建一个
A,B——如果A有事务,B使用A的事务,如果A没有事务,B就开启一个新的事务(A,B是在一个事务中)
PROPAGATION_SUPPORTS : 支持当前事务,如果不存在,就不使用事务
A,B——如果A有事务,B使用A的事务,如果A没有事务,B就不使用事务
PROPAGATION_MANDATORY : 支持当前事务,如果不存在,抛出异常
A,B——如果A有事务,B使用A的事务,如果A没有事务,抛出异常
PROPAGATION_REQUIRES_NEW : 如果有事务存在,挂起当前事务,创建一个新的事务
A,B——如果A有事务,B将A的事务挂起,重新创建一个新的事务(A,B不在一个事务中,事务互不影响)
PROPAGATION_NOT_SUPPORTED : 以非事务方式运行,如果有事务存在,挂起当前事务
A,B——非事务的方式运行,A有事务,就会挂起当前的事务
PROPAGATION_NEVER : 以非事务方式运行,如果有事务存在,抛出异常
PROPAGATION_NESTED : 如果当前事务存在,则嵌套事务执行。基于 SavePoint 技术
A,B——A有事务,A执行之后,将A事务执行之后的内容保存到SavePoint;B事务有异常的话,用户需要自己设置事务提交还是回滚。
常用:
PROPAGATION_REQUIRED
PROPAGATION_REQUIRES_NEW
PROPAGATION_NESTED
4. Spring 事务分类
4.1 编程式事务 - 手动挡
在 doIntransaction 里处理逻辑。如果出异常了,就执行 isRollbackOnly 方法进行回滚。
1
2
3
4
5
6
7
8
9
10
11
12
| @Autowired
TransactionTemplate transactionTemplate;
transactionTemplate.execute((TransactionStatus transactionStatus) -> {
try {
} catch (Exception e) {
transactionStatus.isRollbackOnly();
throw e;
}
return null;
});
|
手动 commit,异常就 rollback
1
2
3
4
5
6
7
8
| TransactionStatus status = transactionManager.getTransaction(new DefaultTransactionDefinition());
try {
userRepository.save(user);
transactionManager.commit(status);
} catch (Exception e) {
transactionManager.rollback(status);
e.printStackTrace();
}
|
1
2
3
4
5
6
7
8
9
10
11
12
13
14
15
16
17
18
19
20
21
22
23
24
25
26
27
28
29
30
31
32
33
34
35
36
37
38
39
40
41
42
43
44
45
46
47
48
49
50
51
52
53
54
| import org.springframework.beans.factory.annotation.Autowired;
import org.springframework.jdbc.datasource.DataSourceTransactionManager;
import org.springframework.lang.Nullable;
import org.springframework.stereotype.Component;
import org.springframework.transaction.TransactionDefinition;
import org.springframework.transaction.TransactionException;
import org.springframework.transaction.TransactionStatus;
import org.springframework.transaction.support.DefaultTransactionDefinition;
import org.springframework.transaction.support.TransactionCallback;
import org.springframework.transaction.support.TransactionTemplate;
@Component
public class TransactionService {
@Autowired
private DataSourceTransactionManager transactionManager;
@Autowired
private TransactionTemplate transactionTemplate;
public TransactionStatus begin() {
DefaultTransactionDefinition def = new DefaultTransactionDefinition();
def.setIsolationLevel(TransactionDefinition.ISOLATION_REPEATABLE_READ);
def.setPropagationBehavior(TransactionDefinition.PROPAGATION_REQUIRED);
return transactionManager.getTransaction(def);
}
public void commit(TransactionStatus transaction) {
transactionManager.commit(transaction);
}
public void rollback(TransactionStatus transaction) {
transactionManager.rollback(transaction);
}
@Nullable
public <T> T execute(TransactionCallback<T> action) throws TransactionException {
return transactionTemplate.execute(action);
}
}
|
4.2 声明式事务 - 自动挡
Spring 事务的本质是数据库对事务的支持。
支持方式:
@EnableTransactionManagement 注解方式,开启对事务注解的解析<tx:annotation-driven /> XML配置方式,开启 spring 对注解事务的支持
使用时:
@Transaction 注解加在方法上(基于AOP,规避失效场景)
5. Spring 事务操作转账
5.1 无事务操作
- 创建表
1
2
3
4
5
6
7
8
9
| CREATE TABLE `account` (
`id` int(11) NOT NULL AUTO_INCREMENT,
`name` varchar(20) NOT NULL,
`money` double DEFAULT NULL,
PRIMARY KEY (`id`)
) ENGINE=InnoDB AUTO_INCREMENT=3 DEFAULT CHARSET=utf8;
INSERT INTO `account` VALUES ('1', 'aaa', '1000');
INSERT INTO `account` VALUES ('2', 'bbb', '1000');
|
- 创建项目,导入依赖
1
2
3
4
5
6
7
8
9
10
11
12
13
14
15
16
17
18
19
20
21
22
23
24
25
26
27
28
29
30
31
32
33
34
35
36
37
38
39
40
41
42
43
| <dependencies>
<dependency>
<groupId>org.springframework</groupId>
<artifactId>spring-context</artifactId>
<version>5.0.2.RELEASE</version>
</dependency>
<dependency>
<groupId>org.springframework</groupId>
<artifactId>spring-tx</artifactId>
<version>5.0.2.RELEASE</version>
</dependency>
<dependency>
<groupId>org.aspectj</groupId>
<artifactId>aspectjweaver</artifactId>
<version>1.8.13</version>
</dependency>
<dependency>
<groupId>org.springframework</groupId>
<artifactId>spring-jdbc</artifactId>
<version>5.0.2.RELEASE</version>
</dependency>
<dependency>
<groupId>com.alibaba</groupId>
<artifactId>druid</artifactId>
<version>1.0.9</version>
</dependency>
<dependency>
<groupId>mysql</groupId>
<artifactId>mysql-connector-java</artifactId>
<version>5.1.32</version>
</dependency>
<dependency>
<groupId>junit</groupId>
<artifactId>junit</artifactId>
<version>4.12</version>
</dependency>
</dependencies>
|
- 创建接口和类 Dao & Service
1
2
3
4
5
6
7
8
9
10
11
12
13
14
15
16
17
18
19
20
21
22
23
24
25
26
27
28
29
30
31
32
33
34
35
36
37
38
39
40
41
42
43
|
public interface AccountDao {
void increaseMoney(Integer id, Double money);
void decreaseMoney(Integer id, Double money);
}
public class AccountDaoImpl extends JdbcDaoSupport implements AccountDao {
@Override
public void increaseMoney(Integer id, Double money) {
getJdbcTemplate().update("update account set money = money+? where id = ? ", money,id);
}
@Override
public void decreaseMoney(Integer id, Double money) {
getJdbcTemplate().update("update account set money = money-? where id = ? ", money,id);
}
}
public interface AccountService {
void transfer(Integer from,Integer to,Double money);
}
public class AccountServiceImpl implements AccountService {
private AccountDao accountDao;
@Override
public void transfer(Integer from, Integer to, Double money) {
accountDao.decreaseMoney(from, money);
accountDao.increaseMoney(to, money);
}
public void setAccountDao(AccountDao accountDao) {
this.accountDao = accountDao;
}
}
|
- 创建 applicationContext.xml 引入事务
tx 约束
1
2
3
4
5
6
7
8
9
10
11
12
13
14
15
16
17
18
19
20
21
22
23
24
25
26
27
28
29
| <?xml version="1.0" encoding="UTF-8"?>
<beans xmlns:xsi="http://www.w3.org/2001/XMLSchema-instance"
xmlns="http://www.springframework.org/schema/beans" xmlns:context="http://www.springframework.org/schema/context"
xmlns:aop="http://www.springframework.org/schema/aop" xmlns:tx="http://www.springframework.org/schema/tx"
xsi:schemaLocation="http://www.springframework.org/schema/beans
http://www.springframework.org/schema/beans/spring-beans-4.2.xsd
http://www.springframework.org/schema/context
http://www.springframework.org/schema/context/spring-context-4.2.xsd
http://www.springframework.org/schema/aop
http://www.springframework.org/schema/aop/spring-aop-4.2.xsd
http://www.springframework.org/schema/tx
http://www.springframework.org/schema/tx/spring-tx-4.2.xsd ">
<bean name="dataSource" class="com.alibaba.druid.pool.DruidDataSource">
<property name="url" value="jdbc:mysql://localhost:3306/数据库名"></property>
<property name="driverClassName" value="com.mysql.jdbc.Driver"></property>
<property name="username" value="root"></property>
<property name="password" value="root"></property>
</bean>
<bean name="accountDao" class="com.AccountDaoImpl">
<property name="dataSource" ref="dataSource"></property>
</bean>
<bean name="accountService" class="com.AccountServiceImpl">
<property name="accountDao" ref="accountDao"></property>
</bean>
</beans>
|
5.测试
1
2
3
4
5
6
7
8
| public class Demo {
@Test
public void test(){
ApplicationContext context = new ClassPathXmlApplicationContext("applicationContext.xml");
AccountService accountService = (AccountService)context.getBean("accountService");
accountService.transfer(1, 2, 100d);
}
}
|
5.2 XML 配置事务
无事务操作时,如果在转账方法中出现异常后,数据前后会产生不一致,此时,我们需要用 Spring 的事务管理来解决这一问题。
手动编码的方式完成事务管理,缺点 : 代码量增加,代码有侵入性。
1
2
3
4
5
6
7
8
9
10
11
12
13
14
15
16
17
18
19
20
21
22
23
24
25
26
27
28
29
|
public class AccountServiceImpl implements AccountService {
private AccountDao accountDao;
private TransactionTemplate transactionTemplate;
@Override
public void transfer(Integer from, Integer to, Double money) {
transactionTemplate.execute(new TransactionCallbackWithoutResult() {
@Override
protected void doInTransactionWithoutResult(TransactionStatus transactionStatus) {
accountDao.decreaseMoney(from, money);
int i = 1 / 0;
accountDao.increaseMoney(to, money);
}
});
}
public void setAccountDao(AccountDao accountDao) {
this.accountDao = accountDao;
}
public void setTransactionTemplate(TransactionTemplate transactionTemplate) {
this.transactionTemplate = transactionTemplate;
}
}
|
1
2
3
4
5
6
7
8
9
10
11
12
13
14
15
16
17
18
19
20
21
22
23
24
25
26
27
|
<bean name="dataSource" class="com.alibaba.druid.pool.DruidDataSource">
<property name="url" value="jdbc:mysql://localhost:3306/mydb" />
<property name="driverClassName" value="com.mysql.jdbc.Driver" />
<property name="username" value="root"></property>
<property name="password" value="root"></property>
</bean>
<bean name="transactionManager" class="org.springframework.jdbc.datasource.DataSourceTransactionManager">
<property name="dataSource" ref="dataSource" />
</bean>
<bean name="transactionTemplate" class="org.springframework.transaction.support.TransactionTemplate">
<property name="transactionManager" ref="transactionManager" />
</bean>
<bean name="accountDao" class="com.AccountDaoImpl">
<property name="dataSource" ref="dataSource" />
</bean>
<bean name="accountService" class="com.AccountServiceImpl">
<property name="accountDao" ref="accountDao" />
<property name="transactionTemplate" ref="transactionTemplate" />
</bean>
|
此时调用测试类测试,在转账出现异常时,Spring 事务会自动进行回滚,让数据保持一致。
5.3 配置事务通知
修改 applicationContext.xml,配置事务通知是需注意:
企业中配置CRUD方法一般使用 方法名+通配符* 的形式配置通知,此时类中的方法名要和配置的方法名一致。
使用 <tx:advice> <tx:attributes> <tx:method ... /> 配置指定方法的事务通知。
- 以方法为单位,指定方法应用什么事务属性:
- isolation:用于指定事务的
隔离级别。默认值是 DEFAULT,表示使用数据库的默认隔离级别。
- propagation:用于指定事务的
传播行为。默认值是 REQUIRED,表示一定会有事务,增删改的选择。查询方法可以选择 SUPPORTS。
- read-only:用于指定事务是否
只读。只有查询方法才能设置为true。默认值是false,表示读写。
- timeout:用于指定事务的
超时时间,默认值是-1,表示永不超时。如果指定了数值,以秒为单位。
- rollback-for:用于
指定一个异常,决定是否回滚,当产生该异常时,事务回滚,产生其他异常时,事务不回滚。没有默认值。表示任何异常都回滚。
- no-rollback-for:用于
指定一个异常,决定是否不回滚,当产生该异常时,事务不回滚,产生其他异常时事务回滚。没有默认值。表示任何异常都回滚。
1
2
3
4
5
6
7
8
9
10
11
12
13
14
15
16
17
18
19
20
21
22
23
24
25
26
27
28
29
30
31
32
33
34
35
36
37
38
39
40
41
42
43
| <bean name="dataSource" class="com.alibaba.druid.pool.DruidDataSource">
<property name="url" value="jdbc:mysql://localhost:3306/mydb"></property>
<property name="driverClassName" value="com.mysql.jdbc.Driver"></property>
<property name="username" value="root"></property>
<property name="password" value="root"></property>
</bean>
<bean name="transactionManager"
class="org.springframework.jdbc.datasource.DataSourceTransactionManager">
<property name="dataSource" ref="dataSource"></property>
</bean>
<tx:advice id="txAdvice" transaction-manager="transactionManager">
<tx:attributes>
<tx:method name="save*" isolation="REPEATABLE_READ" propagation="REQUIRED" read-only="false" />
<tx:method name="persist*" isolation="REPEATABLE_READ" propagation="REQUIRED" read-only="false" />
<tx:method name="update*" isolation="REPEATABLE_READ" propagation="REQUIRED" read-only="false" />
<tx:method name="modify*" isolation="REPEATABLE_READ" propagation="REQUIRED" read-only="false" />
<tx:method name="delete*" isolation="REPEATABLE_READ" propagation="REQUIRED" read-only="false" />
<tx:method name="remove*" isolation="REPEATABLE_READ" propagation="REQUIRED" read-only="false" />
<tx:method name="get*" isolation="REPEATABLE_READ" propagation="REQUIRED" read-only="true" />
<tx:method name="find*" isolation="REPEATABLE_READ" propagation="REQUIRED" read-only="true" />
<tx:method name="transfer" isolation="REPEATABLE_READ" propagation="REQUIRED" read-only="false" />
</tx:attributes>
</tx:advice>
<aop:config>
<aop:pointcut expression="execution(* com.demo.service.*ServiceImpl.*(..))" id="txPc" />
<aop:advisor advice-ref="txAdvice" pointcut-ref="txPc" />
</aop:config>
<bean name="accountDao" class="com.AccountDaoImpl">
<property name="dataSource" ref="dataSource"></property>
</bean>
<bean name="accountService" class="com.AccountServiceImpl">
<property name="accountDao" ref="accountDao"></property>
</bean>
|
5.4 注解 配置事务
注解配置(aop)的方式完成事务管理,修改 applicationContext.xml :
<tx:annotation-driven /> 开启 spring 对注解事务的支持。
1
2
3
4
5
6
7
8
9
10
11
12
13
14
15
16
17
18
19
20
21
22
| <bean name="dataSource" class="com.alibaba.druid.pool.DruidDataSource">
<property name="url" value="jdbc:mysql://localhost:3306/mydb" />
<property name="driverClassName" value="com.mysql.jdbc.Driver" />
<property name="username" value="root" />
<property name="password" value="root" />
</bean>
<bean name="transactionManager" class="org.springframework.jdbc.datasource.DataSourceTransactionManager">
<property name="dataSource" ref="dataSource" />
</bean>
<tx:annotation-driven />
<bean name="accountDao" class="com.AccountDaoImpl">
<property name="dataSource" ref="dataSource" />
</bean>
<bean name="accountService" class="com.AccountServiceImpl">
<property name="accountDao" ref="accountDao" />
</bean>
|
@Transactional 注解
| 属性 |
类型 |
描述 |
| value |
String |
事务管理器 |
| propagation |
Propagation |
传播级别 |
| isolation |
Isolation |
隔离级别 |
| readOnly |
boolean |
读/写与只读事务 |
| timeout |
int |
事务超时(秒) |
| rollbackFor |
Class |
触发事务回滚的类,默认只对未检查异常有效 |
| noRollbackFor |
Class |
设置不需要进行回滚的异常类数组 |
- @Transactional 特性
- 类上添加 @Transactional,在每个方法单开一个事务,管理方式相同。
- @Transactional 注解只在 public 方法上起作用。
- 默认只对未检查异常回滚
- 只读事务只在事务启动时应用,否则即使配置也会被忽略。
修改 AccountServiceImpl :
1
2
3
4
5
6
7
8
9
10
11
12
13
14
15
16
17
18
19
20
|
@Transactional(isolation=Isolation.REPEATABLE_READ, propagation=Propagation.REQUIRED, readOnly=true)
public class AccountServiceImpl implements AccountService {
private AccountDao accountDao;
@Override
@Transactional(isolation= Isolation.REPEATABLE_READ, propagation= Propagation.REQUIRED, readOnly=false)
public void transfer(Integer from, Integer to, Double money) {
accountDao.decreaseMoney(from, money);
int i = 1 / 0;
accountDao.increaseMoney(to, money);
}
public void setAccountDao(AccountDao accountDao) {
this.accountDao = accountDao;
}
}
|
