
官网:https://www.rabbitmq.com/#getstarted
中文教程网:http://rabbitmq.mr-ping.com
1. 消息模式
1.1 普通消息

Java 原生 - 如上集成代码
SpringBoot - 如上集成代码
1.2 Work 消息

Work模式消息:一个发送者对应多个消费者。还是保证一个消息只能被消费1次。
消息特点:
实现了消息消费者的集群、负载均衡,适用于高并发下消息发送的速度远远大于消费速度。 高并发下的消息生成
1
2
3
4
5
6
7
8
9
10
11
12
13
14
15
16
17
18
19
20
21
22
23
24
25
26
27
28
29
30
31
32
33
34
35
36
37
38
39
40
41
42
43
44
45
46
47
48
49
50
51
52
53
54
55
56
57
58
59
|
import com.rabbitmq.client.Channel;
import com.rabbitmq.client.Connection;
import com.rabbitmq.client.ConnectionFactory;
import java.io.IOException;
import java.util.concurrent.TimeoutException;
public class WorkerSend {
public static void main(String[] args) throws IOException, TimeoutException {
ConnectionFactory factory=new ConnectionFactory();
factory.setHost("服务器IP");
factory.setPort(5672);
factory.setUsername("guest");
factory.setPassword("guest");
factory.setVirtualHost("/");
Connection connection=factory.newConnection();
Channel channel=connection.createChannel();
channel.queueDeclare("TestHello",true,false,true,null);
new Thread(()->{
while (true){
for(int i=1;i<1000;i++) {
try {
channel.basicPublish("", "TestHello", null, ("Hello,Offer!_"+i+"_"+System.currentTimeMillis()).getBytes());
} catch (IOException e) {
e.printStackTrace();
}
} try {
Thread.sleep(1000);
} catch (InterruptedException e) {
e.printStackTrace();
}
}
}).start();
}
}
|
1
2
3
4
5
6
7
8
9
10
11
12
13
14
15
16
17
18
19
20
21
22
23
24
25
26
27
28
29
30
31
32
33
34
35
36
37
38
39
40
41
42
43
44
45
46
47
48
49
50
51
52
53
54
55
56
57
58
59
60
61
|
import com.rabbitmq.client.*;
import java.io.IOException;
import java.util.concurrent.TimeoutException;
public class WorkerConsumer2 {
public static void main(String[] args) throws IOException, TimeoutException {
ConnectionFactory factory=new ConnectionFactory();
factory.setHost("服务器IP");
factory.setPort(5672);
factory.setUsername("guest");
factory.setPassword("guest");
factory.setVirtualHost("/");
Connection connection=factory.newConnection();
Channel channel=connection.createChannel();
while (true) {
channel.basicConsume("TestHello", new DefaultConsumer(channel) {
@Override
public void handleDelivery(String consumerTag, Envelope envelope, AMQP.BasicProperties properties, byte[] body) throws IOException {
System.out.println("第一个消费者:获取消息:" + new String(body));
}
});
}
}
}
import com.rabbitmq.client.*;
import java.io.IOException;
import java.util.concurrent.TimeoutException;
public class WorkerConsumer2 {
public static void main(String[] args) throws IOException, TimeoutException {
ConnectionFactory factory=new ConnectionFactory();
factory.setHost("服务器IP");
factory.setPort(5672);
factory.setUsername("guest");
factory.setPassword("guest");
factory.setVirtualHost("/");
Connection connection=factory.newConnection();
Channel channel=connection.createChannel();
while (true) {
channel.basicConsume("TestHello", new DefaultConsumer(channel) {
@Override
public void handleDelivery(String consumerTag, Envelope envelope, AMQP.BasicProperties properties, byte[] body) throws IOException {
System.out.println("第二个消费者:获取消息:" + new String(body));
}
});
}
}
}
|
运行测试:
运行提供者,不断生成消息;运行消费者,不断消费消息
1
2
3
4
| <dependency>
<groupId>org.springframework.boot</groupId>
<artifactId>spring-boot-starter-amqp</artifactId>
</dependency>
|
1
2
3
4
5
6
7
8
9
10
11
12
13
14
15
16
17
18
19
20
21
22
23
24
25
26
27
28
29
30
31
32
33
34
35
36
37
38
39
40
41
42
43
44
45
46
47
48
49
50
51
52
53
54
55
56
57
58
59
60
61
62
63
64
65
66
|
import org.springframework.amqp.core.Queue;
import org.springframework.context.annotation.Bean;
import org.springframework.context.annotation.Configuration;
@Configuration
public class RabbitWorkConfig {
@Bean
public Queue createQue() {
return new Queue("mq_work_001");
}
}
import org.springframework.amqp.rabbit.annotation.RabbitHandler;
import org.springframework.amqp.rabbit.annotation.RabbitListener;
import org.springframework.stereotype.Component;
@Component
@RabbitListener(queues = "mq_work_001")
public class MqWorkListener01 {
@RabbitHandler
public void handler(String msg) {
System.out.println("消费者111:" + msg);
}
}
import org.springframework.amqp.rabbit.annotation.RabbitHandler;
import org.springframework.amqp.rabbit.annotation.RabbitListener;
import org.springframework.stereotype.Component;
@Component
@RabbitListener(queues = "mq_work_001")
public class MqWorkListener02 {
@RabbitHandler
public void handler(String msg) {
System.out.println("消费者222:" + msg);
}
}
import org.springframework.amqp.rabbit.core.RabbitTemplate;
import org.springframework.beans.factory.annotation.Autowired;
import org.springframework.web.bind.annotation.GetMapping;
import org.springframework.web.bind.annotation.RequestMapping;
import org.springframework.web.bind.annotation.RestController;
@RestController
@RequestMapping("api/mq")
public class MqController {
@Autowired
private RabbitTemplate rabbitTemplate;
@GetMapping("/workMsg")
public String sendWorkMsg(String msg) {
rabbitTemplate.convertAndSend("mq_work_001", msg);
return "OK";
}
}
|
运行测试:
消费者01和02轮换接收到消息,每个消息每次还是只有1个消费者消费。
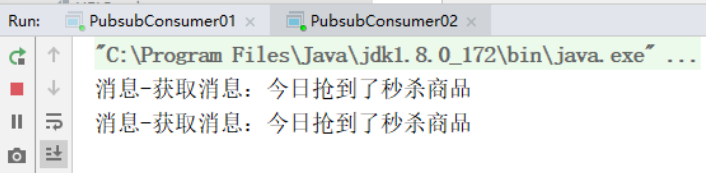
1.3 ExChange-fanout 消息
ExChange 的 fanout 的特点就是将交换器获取的消息,直接全部转发给所有绑定的队列。

1
2
3
4
5
6
7
8
9
10
11
12
13
14
15
16
17
18
19
20
21
22
23
24
25
26
27
28
29
30
31
32
33
34
35
36
37
38
39
40
41
42
43
|
import com.rabbitmq.client.BuiltinExchangeType;
import com.rabbitmq.client.Channel;
import com.rabbitmq.client.Connection;
import com.rabbitmq.client.ConnectionFactory;
import java.io.IOException;
import java.util.concurrent.TimeoutException;
public class PubsubSend {
public static void main(String[] args) throws IOException, TimeoutException {
ConnectionFactory factory=new ConnectionFactory();
factory.setHost("服务器IP");
factory.setPort(5672);
factory.setUsername("guest");
factory.setPassword("guest");
factory.setVirtualHost("/");
Connection connection=factory.newConnection();
Channel channel=connection.createChannel();
channel.exchangeDeclare("Testex_pubsub", BuiltinExchangeType.FANOUT);
channel.queueDeclare("TestEx_Qlog",false,false,false,null);
channel.queueDeclare("TestEx_Qinfo",false,false,false,null);
channel.queueBind("TestEx_Qlog","Testex_pubsub","");
channel.queueBind("TestEx_Qinfo","Testex_pubsub","");
channel.basicPublish("Testex_pubsub","",null,"今日抢到了秒杀商品".getBytes());
channel.close();
connection.close();
}
}
|
1
2
3
4
5
6
7
8
9
10
11
12
13
14
15
16
17
18
19
20
21
22
23
24
25
26
27
28
29
|
import com.rabbitmq.client.*;
import java.io.IOException;
import java.util.concurrent.TimeoutException;
public class PubsubConsumer01 {
public static void main(String[] args) throws IOException, TimeoutException {
ConnectionFactory factory=new ConnectionFactory();
factory.setHost("服务器IP");
factory.setPort(5672);
factory.setUsername("guest");
factory.setPassword("guest");
factory.setVirtualHost("/");
Connection connection=factory.newConnection();
Channel channel=connection.createChannel();
channel.basicConsume("TestEx_Qlog", new DefaultConsumer(channel){
@Override
public void handleDelivery(String consumerTag, Envelope envelope, AMQP.BasicProperties properties, byte[] body) throws IOException {
System.out.println("日志-获取消息:"+new String(body));
channel.basicAck(envelope.getDeliveryTag(),false);
}
});
}
}
|
1
2
3
4
5
6
7
8
9
10
11
12
13
14
15
16
17
18
19
20
21
22
23
24
25
26
27
28
29
|
import com.rabbitmq.client.*;
import java.io.IOException;
import java.util.concurrent.TimeoutException;
public class PubsubConsumer01 {
public static void main(String[] args) throws IOException, TimeoutException {
ConnectionFactory factory=new ConnectionFactory();
factory.setHost("服务器IP");
factory.setPort(5672);
factory.setUsername("guest");
factory.setPassword("guest");
factory.setVirtualHost("/");
Connection connection=factory.newConnection();
Channel channel=connection.createChannel();
channel.basicConsume("TestEx_Qinfo", new DefaultConsumer(channel){
@Override
public void handleDelivery(String consumerTag, Envelope envelope, AMQP.BasicProperties properties, byte[] body) throws IOException {
System.out.println("消息-获取消息:"+new String(body));
channel.basicAck(envelope.getDeliveryTag(),false);
}
});
}
}
|
1
2
3
4
| <dependency>
<groupId>org.springframework.boot</groupId>
<artifactId>spring-boot-starter-amqp</artifactId>
</dependency>
|
1
2
3
4
5
6
7
8
9
10
11
12
13
14
15
16
17
18
19
20
21
22
23
24
25
26
27
28
29
30
31
32
33
34
35
36
37
38
39
40
41
42
43
44
45
46
47
48
49
50
51
52
53
54
55
56
57
58
59
60
61
62
63
64
65
66
67
68
69
70
71
72
73
74
75
76
77
78
79
80
81
82
83
84
85
86
87
88
89
90
91
92
93
94
|
import org.springframework.amqp.core.Binding;
import org.springframework.amqp.core.BindingBuilder;
import org.springframework.amqp.core.FanoutExchange;
import org.springframework.amqp.core.Queue;
import org.springframework.context.annotation.Bean;
import org.springframework.context.annotation.Configuration;
@Configuration
public class RabbitFanoutConfig {
@Bean
public Queue createQue1() {
return new Queue("mq_fanout_2001_01");
}
@Bean
public Queue createQue2() {
return new Queue("mq_fanout_2001_02");
}
@Bean
public FanoutExchange createEx() {
return new FanoutExchange("ex_fanout_2001", true, true);
}
@Bean
public Binding createB01(FanoutExchange fx) {
return BindingBuilder.bind(createQue1()).to(fx);
}
@Bean
public Binding createB02(FanoutExchange fx) {
return BindingBuilder.bind(createQue2()).to(fx);
}
}
import org.springframework.amqp.rabbit.annotation.RabbitHandler;
import org.springframework.amqp.rabbit.annotation.RabbitListener;
import org.springframework.stereotype.Component;
@Component
@RabbitListener(queues = "mq_fanout_2001_01")
public class MqFanoutListener01 {
@RabbitHandler
public void handler(String msg) {
System.out.println("消费者AAA:" + msg);
}
}
import org.springframework.amqp.rabbit.annotation.RabbitHandler;
import org.springframework.amqp.rabbit.annotation.RabbitListener;
import org.springframework.stereotype.Component;
@Component
@RabbitListener(queues = "mq_fanout_2001_02")
public class MqFanoutListener02 {
@RabbitHandler
public void handler(String msg) {
System.out.println("消费者BBB:" + msg);
}
}
import org.springframework.amqp.rabbit.core.RabbitTemplate;
import org.springframework.beans.factory.annotation.Autowired;
import org.springframework.web.bind.annotation.GetMapping;
import org.springframework.web.bind.annotation.RequestMapping;
import org.springframework.web.bind.annotation.RestController;
@RestController
@RequestMapping("api/mq")
public class MqController {
@Autowired
private RabbitTemplate rabbitTemplate;
@GetMapping("/fanoutMsg")
public String sendFanoutMsg(String msg) {
rabbitTemplate.convertAndSend("ex_fanout_2001", null, msg);
return "OK";
}
}
|
运行测试:
消费者01和02都能同时从队列获取到消息。
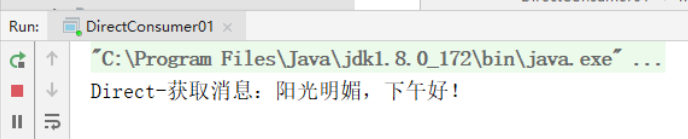
1.4 ExChange-direct 消息
ExChange 的 direct 消息的特点是交换器转发消息可以进行路由过滤,路由只支持精确匹配。

1
2
3
4
5
6
7
8
9
10
11
12
13
14
15
16
17
18
19
20
21
22
23
24
25
26
27
28
29
30
31
32
33
34
35
36
37
38
39
40
41
|
import com.rabbitmq.client.BuiltinExchangeType;
import com.rabbitmq.client.Channel;
import com.rabbitmq.client.Connection;
import com.rabbitmq.client.ConnectionFactory;
import java.io.IOException;
import java.util.concurrent.TimeoutException;
public class DirectSend {
public static void main(String[] args) throws IOException, TimeoutException {
ConnectionFactory factory=new ConnectionFactory();
factory.setHost("服务器IP");
factory.setPort(5672);
factory.setUsername("guest");
factory.setPassword("guest");
factory.setVirtualHost("/");
Connection connection=factory.newConnection();
Channel channel=connection.createChannel();
channel.exchangeDeclare("Testex_direct", BuiltinExchangeType.DIRECT);
channel.queueDeclare("TestEx_directlog",false,false,false,null);
channel.queueBind("TestEx_directlog","Testex_direct","log");
channel.basicPublish("Testex_direct","log",null,"阳光明媚,下午好!".getBytes());
channel.close();
connection.close();
}
}
|
1
2
3
4
5
6
7
8
9
10
11
12
13
14
15
16
17
18
19
20
21
22
23
24
25
26
27
28
29
|
import com.rabbitmq.client.*;
import java.io.IOException;
import java.util.concurrent.TimeoutException;
public class DirectConsumer01 {
public static void main(String[] args) throws IOException, TimeoutException {
ConnectionFactory factory=new ConnectionFactory();
factory.setHost("服务器IP");
factory.setPort(5672);
factory.setUsername("guest");
factory.setPassword("guest");
factory.setVirtualHost("/");
Connection connection=factory.newConnection();
Channel channel=connection.createChannel();
channel.basicConsume("TestEx_directlog", new DefaultConsumer(channel){
@Override
public void handleDelivery(String consumerTag, Envelope envelope, AMQP.BasicProperties properties, byte[] body) throws IOException {
System.out.println("Direct-获取消息:"+new String(body));
channel.basicAck(envelope.getDeliveryTag(),false);
}
});
}
}
|
运行测试:
1
2
3
4
| <dependency>
<groupId>org.springframework.boot</groupId>
<artifactId>spring-boot-starter-amqp</artifactId>
</dependency>
|
1
2
3
4
5
6
7
8
9
10
11
12
13
14
15
16
17
18
19
20
21
22
23
24
25
26
27
28
29
30
31
32
33
34
35
36
37
38
39
40
41
42
43
44
45
46
47
48
49
50
51
52
53
54
55
56
57
58
59
60
61
62
63
64
65
66
67
68
69
70
71
72
73
74
75
76
77
78
79
80
81
82
83
84
85
86
87
88
89
|
import org.springframework.amqp.core.*;
import org.springframework.context.annotation.Bean;
import org.springframework.context.annotation.Configuration;
@Configuration
public class RabbitDirectConfig {
@Bean
public Queue createQue1() {
return new Queue("mq_direct_2001_01");
}
@Bean
public Queue createQue2() {
return new Queue("mq_direct_2001_02");
}
@Bean
public DirectExchange createEx() {
return new DirectExchange("ex_direct_2001", true, true);
}
@Bean
public Binding createB01(DirectExchange fx) {
return BindingBuilder.bind(createQue1()).to(fx).with("log");
}
@Bean
public Binding createB02(DirectExchange fx) {
return BindingBuilder.bind(createQue2()).to(fx).with("error");
}
}
import org.springframework.amqp.rabbit.annotation.RabbitHandler;
import org.springframework.amqp.rabbit.annotation.RabbitListener;
import org.springframework.stereotype.Component;
@Component
@RabbitListener(queues = "mq_direct_2001_01")
public class MqDirectListener01 {
@RabbitHandler
public void handler(String msg) {
System.out.println("消费者PPP:" + msg);
}
}
import org.springframework.amqp.rabbit.annotation.RabbitHandler;
import org.springframework.amqp.rabbit.annotation.RabbitListener;
import org.springframework.stereotype.Component;
@Component
@RabbitListener(queues = "mq_direct_2001_02")
public class MqDirectListener02 {
@RabbitHandler
public void handler(String msg) {
System.out.println("消费者QQQ:" + msg);
}
}
import org.springframework.amqp.rabbit.core.RabbitTemplate;
import org.springframework.beans.factory.annotation.Autowired;
import org.springframework.web.bind.annotation.GetMapping;
import org.springframework.web.bind.annotation.RequestMapping;
import org.springframework.web.bind.annotation.RestController;
@RestController
@RequestMapping("api/mq")
public class MqController {
@Autowired
private RabbitTemplate rabbitTemplate;
@GetMapping("/directMsg")
public String sendDirectMsg(String msg, String key) {
rabbitTemplate.convertAndSend("ex_direct_2001", key, msg);
return "OK";
}
}
|
运行测试:
精确匹配路由 routingKey 的消费者可以收取到队列中的消息。
1.5 ExChange-topic 消息
Exchange的 Topic 模式,路由模式,支持路由匹配,且支持路由的模糊匹配。

模糊匹配:
- 使用
. 来区分单词
- 使用
* 来匹配单个单词
- 使用
# 来匹配 0个或多个
1
2
3
4
5
6
7
8
9
10
11
12
13
14
15
16
17
18
19
20
21
22
23
24
25
26
27
28
29
30
31
32
33
34
35
36
37
38
39
40
41
42
43
|
import com.rabbitmq.client.BuiltinExchangeType;
import com.rabbitmq.client.Channel;
import com.rabbitmq.client.Connection;
import com.rabbitmq.client.ConnectionFactory;
import java.io.IOException;
import java.util.concurrent.TimeoutException;
public class TopicSend {
public static void main(String[] args) throws IOException, TimeoutException {
ConnectionFactory factory=new ConnectionFactory();
factory.setHost("服务器IP");
factory.setPort(5672);
factory.setUsername("guest");
factory.setPassword("guest");
factory.setVirtualHost("/");
Connection connection=factory.newConnection();
Channel channel=connection.createChannel();
channel.exchangeDeclare("Testex_topic", BuiltinExchangeType.TOPIC);
channel.queueDeclare("TestEx_topiclog",false,false,false,null);
channel.queueBind("TestEx_topiclog","Testex_topic","log.#");
channel.basicPublish("Testex_topic","log.info",null,"上课信息".getBytes());
channel.basicPublish("Testex_topic","log.error",null,"错误信息".getBytes());
channel.basicPublish("Testex_topic","log.warn",null,"警告睡觉".getBytes());
channel.close();
connection.close();
}
}
|
1
2
3
4
5
6
7
8
9
10
11
12
13
14
15
16
17
18
19
20
21
22
23
24
25
26
27
28
29
|
import com.rabbitmq.client.*;
import java.io.IOException;
import java.util.concurrent.TimeoutException;
public class TopicConsumer01 {
public static void main(String[] args) throws IOException, TimeoutException {
ConnectionFactory factory=new ConnectionFactory();
factory.setHost("服务器IP");
factory.setPort(5672);
factory.setUsername("guest");
factory.setPassword("guest");
factory.setVirtualHost("/");
Connection connection=factory.newConnection();
Channel channel=connection.createChannel();
channel.basicConsume("TestEx_topiclog", new DefaultConsumer(channel){
@Override
public void handleDelivery(String consumerTag, Envelope envelope, AMQP.BasicProperties properties, byte[] body) throws IOException {
System.out.println("Topic-获取消息:"+new String(body));
channel.basicAck(envelope.getDeliveryTag(),false);
}
});
}
}
|
1
2
3
4
| <dependency>
<groupId>org.springframework.boot</groupId>
<artifactId>spring-boot-starter-amqp</artifactId>
</dependency>
|
1
2
3
4
5
6
7
8
9
10
11
12
13
14
15
16
17
18
19
20
21
22
23
24
25
26
27
28
29
30
31
32
33
34
35
36
37
38
39
40
41
42
43
44
45
46
47
48
49
50
51
52
53
54
55
56
57
58
59
60
|
@Configuration
public class RabbitTopicConfig {
@Bean
public Queue createQ1(){
return new Queue("qname_topic_2001_01");
}
@Bean
public Queue createQ2(){
return new Queue("qname_topic_2001_02");
}
@Bean
public TopicExchange createEx(){
return new TopicExchange("ex_topic_2001",true,true);
}
@Bean
public Binding createB01(TopicExchange fx){
return BindingBuilder.bind(createQ1()).to(fx).with("log.#");
}
@Bean
public Binding createB02(TopicExchange fx){
return BindingBuilder.bind(createQ2()).to(fx).with("stu.*");
}
}
@Component
@RabbitListener(queues = "qname_topic_2001_01")
public class TopicListener01 {
@RabbitHandler
public void handler(String msg){
System.out.println("消费者001----"+msg);
}
}
@Component
@RabbitListener(queues = "qname_topic_2001_02")
public class TopicListener02 {
@RabbitHandler
public void handler(String msg){
System.out.println("消费者002----"+msg);
}
}
@RestController
public class TopicController {
@Autowired
private RabbitTemplate rabbitTemplate;
@GetMapping("api/mq/topicmsg")
public String sendWorkMsg(String msg,String key){
rabbitTemplate.convertAndSend("ex_topic_2001",key,msg);
return "OK";
}
}
|
Headers 根据消息头的信息进行匹配队列,而且消息头支持整型和哈希。
对应的属性:x-match
支持的2种取值:
all: 默认 headers 中的键值对和消息的键值对完全匹配,才可以实现转发any: 只需要匹配任意一个,就可以实现消息的转发

1
2
3
4
5
6
7
8
9
10
11
12
13
14
15
16
17
18
19
20
21
22
23
24
25
26
27
28
29
30
31
32
33
34
35
36
|
import com.rabbitmq.client.*;
import java.io.IOException;
import java.util.HashMap;
import java.util.Map;
import java.util.concurrent.TimeoutException;
public class HeadersSend {
public static void main(String[] args) throws IOException, TimeoutException {
ConnectionFactory factory=new ConnectionFactory();
factory.setHost("服务器IP");
factory.setPort(5672);
factory.setUsername("guest");
factory.setPassword("guest");
factory.setVirtualHost("/");
Connection connection=factory.newConnection();
Channel channel=connection.createChannel();
channel.exchangeDeclare("Testex_headers", BuiltinExchangeType.HEADERS);
Map<String,Object> headMap=new HashMap<>();
headMap.put("x-match","all");
headMap.put("author","Feri");
headMap.put("version",1);
AMQP.BasicProperties propertie=new AMQP.BasicProperties.Builder().headers(headMap).build();
channel.basicPublish("Testex_headers","",propertie,"测试信息".getBytes());
channel.close();
connection.close();
}
}
|
1
2
3
4
5
6
7
8
9
10
11
12
13
14
15
16
17
18
19
20
21
22
23
24
25
26
27
28
29
30
31
32
33
34
35
36
37
38
|
import com.rabbitmq.client.*;
import java.io.IOException;
import java.util.HashMap;
import java.util.Map;
import java.util.concurrent.TimeoutException;
public class HeaderConsumer01 {
public static void main(String[] args) throws IOException, TimeoutException {
ConnectionFactory factory=new ConnectionFactory();
factory.setHost("服务器IP");
factory.setPort(5672);
factory.setUsername("guest");
factory.setPassword("guest");
factory.setVirtualHost("/");
Connection connection=factory.newConnection();
Channel channel=connection.createChannel();
channel.exchangeDeclare("Testex_headers", BuiltinExchangeType.HEADERS);
channel.queueDeclare("Testex_headerslog",false,false,false,null);
Map<String,Object> headMap=new HashMap<>();
headMap.put("x-match","all");
headMap.put("author","Feri");
headMap.put("version",1);
channel.queueBind("Testex_headerslog","Testex_headers","",headMap);
channel.basicConsume("Testex_headerslog", new DefaultConsumer(channel){
@Override
public void handleDelivery(String consumerTag, Envelope envelope, AMQP.BasicProperties properties, byte[] body) throws IOException {
System.out.println("Headers-获取消息:"+new String(body));
channel.basicAck(envelope.getDeliveryTag(),false);
}
});
}
}
|
运行测试:输出 Headers-获取消息:测试信息
1
2
3
4
| <dependency>
<groupId>org.springframework.boot</groupId>
<artifactId>spring-boot-starter-amqp</artifactId>
</dependency>
|
1
2
3
4
5
6
7
8
9
10
11
12
13
14
15
16
17
18
19
20
21
22
23
24
25
26
27
28
29
30
31
32
33
34
35
36
37
38
39
40
41
42
43
44
45
46
47
48
49
50
51
52
53
54
55
56
57
58
59
60
61
62
63
64
65
66
67
68
69
70
71
72
73
74
75
76
77
78
79
80
81
82
83
84
|
@Configuration
public class HeadersConfig {
@Bean
public Queue createQ1(){
return new Queue("qname_headers_2001_01");
}
@Bean
public Queue createQ2(){
return new Queue("qname_headers_2001_02");
}
@Bean
public HeadersExchange createEx(){
return new HeadersExchange("ex_headers_2001",true,true);
}
@Bean
public Binding createB01(HeadersExchange fx){
return BindingBuilder.bind(createQ1()).to(fx).whereAll("token","ver").exist();
}
@Bean
public Binding createB02(HeadersExchange fx){
return BindingBuilder.bind(createQ2()).to(fx).whereAny("version","author").exist();
}
}
@RestController
public class HeadersController {
@Autowired
private RabbitTemplate rabbitTemplate;
@GetMapping("api/mq/headmsgall")
public String sendWorkMsg1(String msg){
rabbitTemplate.convertAndSend(
"ex_headers_2001"
,null
,msg
,message -> {
MessageProperties properties=message.getMessageProperties();
properties.getHeaders().put("ver","1.0");
properties.getHeaders().put("token","abc001");
return message;
}
,new CorrelationData(UUID.randomUUID().toString()));
return "OK";
}
@GetMapping("api/mq/headmsgany")
public String sendWorkMsg2(String msg){
rabbitTemplate.convertAndSend(
"ex_headers_2001"
,null
,msg
,message -> {
MessageProperties properties=message.getMessageProperties();
properties.getHeaders().put("version","1.0");
return message;
}
,new CorrelationData(UUID.randomUUID().toString()));
return "OK";
}
}
@Component
@RabbitListener(queues = "qname_headers_2001_01")
public class HeadersListener01 {
@RabbitHandler
public void handler(String msg){
System.out.println("消费者001----"+msg);
}
}
@Component
@RabbitListener(queues = "qname_headers_2001_02")
public class HeadersListener02 {
@RabbitHandler
public void handler(String msg){
System.out.println("消费者002----"+msg);
}
}
|
运行测试:
whereAll() 所有的 header 字段匹配才能发送成功,消息被获取到;
whereAny() 任一的 header 字段匹配都能发送成功,消息被获取到。
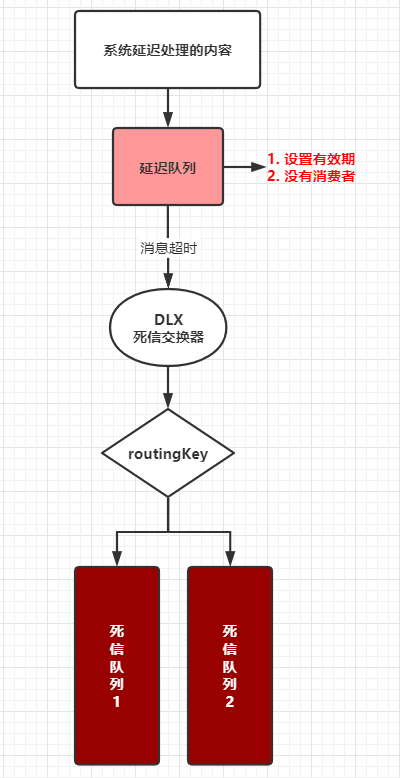
2. 延迟消息
2.1 死信
RabbitMQ可以为消息队列设置内部消息的有效期,如果消息超过有效期,还未被处理,name这条消息就会被转发到死信队列,成为死信消息。
DLX 私信交换器 Dead Letter - ExChange,专门用来进行转发死信消息到达对应的死信队列中。
TTL 消息对立内部消息的有效期。
涉及参数:
- 消息队列中消息的有效期:
x-message-ttl 设置有效期
- 消息队列对应的死信交换器:
x-dead-letter-exchange 设置死信交换器
- 消息队列对应的死信路由:
x-dead-letter-routingkey 死信交换器对应的路由
需要满足的条件:
2.2 场景
延迟处理或者超时处理,借助死信实现延迟消息处理:
把消息发送到一个队列中(设置消息的有效期为指定的时间),该队列没有消费者(没有监听器),目的让消息超时成为死信,借助死信交换器将死信消息转发到对应的队列(死信队列),值需要监听死信队列就可以实现消息的延迟处理。
如:
- 超时订单,15分/30分/2小时 必须完成支付,超时自动处理,如关闭订单
- 自动确认收货,7天自动收货
- 默认评价,7天自动好评
- 预约提醒,秒杀活动开始前推送提醒
- 订单退款,超过一定期限,没人处理就自动处理
2.3 实现
借助 RabbitMQ 的死信机制实现延迟消息处理。
1
2
3
4
5
6
7
8
9
10
11
12
13
14
15
16
17
18
19
20
21
22
23
24
25
26
27
28
29
30
31
32
33
34
35
36
37
38
39
40
41
42
43
44
45
46
47
48
49
50
51
52
53
54
55
56
57
58
59
60
|
@Configuration
public class RabbitMQConfig {
@Bean
public Queue createQ01() {
Map<String,Object> args=new HashMap<>();
args.put("x-message-ttl",10000);
args.put("x-dead-letter-exchange","dead-study");
args.put("x-dead-letter-routing-key","order-timeout");
return QueueBuilder.durable("qname-time-order").withArguments(args).build();
}
@Bean
public Queue createQ02(){
return new Queue("qname-timeout-order");
}
@Bean
public DirectExchange createEx(){
return new DirectExchange("dead-study");
}
@Bean
public Binding createBd(DirectExchange ex){
return BindingBuilder.bind(createQ02()).to(ex).with("order-timeout");
}
}
@Component
@RabbitListener(queues = "qname-timeout-order")
public class OrderTimeOutLintener {
@RabbitHandler
public void handler(String msg){
System.out.println("消息--->"+msg+"------>"+System.currentTimeMillis()/1000);
}
}
@RestController
public class DeadController {
@Autowired
private RabbitTemplate rabbitTemplate;
@GetMapping("/api/mq/dlxmsg")
public String sendMsg(String msg){
System.out.println("发送消息---->"+msg+"---->"+System.currentTimeMillis()/1000);
rabbitTemplate.convertAndSend(null,"qname-time-order",msg);
return "OK-"+System.currentTimeMillis();
}
}
|
运行测试:
发送消息后,过了 10s 监听器监听到死信队列消息,做该做的逻辑即可。
