
参考资料(XXL开源社区-官方中文文档):https://www.xuxueli.com/xxl-job/
官方详细说明文档: https://gitee.com/xuxueli0323/xxl-job/blob/master/doc/XXL-JOB官方文档.md
1. 概述
XXL-JOB是一个轻量级分布式任务调度平台,作者大众点评员工许雪里 XuXueLi(XXL),其核心设计目标是开发迅速、学习简单、轻量级、易扩展。现已开放源代码并接入多家公司线上产品线,开箱即用。
已有多家公司接入xxl-job,包括比较知名的大众点评,京东,优信二手车,北京尚德,360金融 (360),联想集团 (联想),易信 (网易)等等….
在Java中,传统的定时任务实现方案,比如Timer,Quartz等都或多或少存在一些问题:
不支持集群、不支持统计、没有管理平台、没有失败报警、没有监控等等
而且在现在分布式的架构中,有一些场景需要分布式任务调度:
同一个服务多个实例的任务存在互斥时,需要统一的调度。
任务调度需要支持高可用、监控、故障告警。
需要统一管理和追踪各个服务节点任务调度的结果,需要记录保存任务属性信息等。
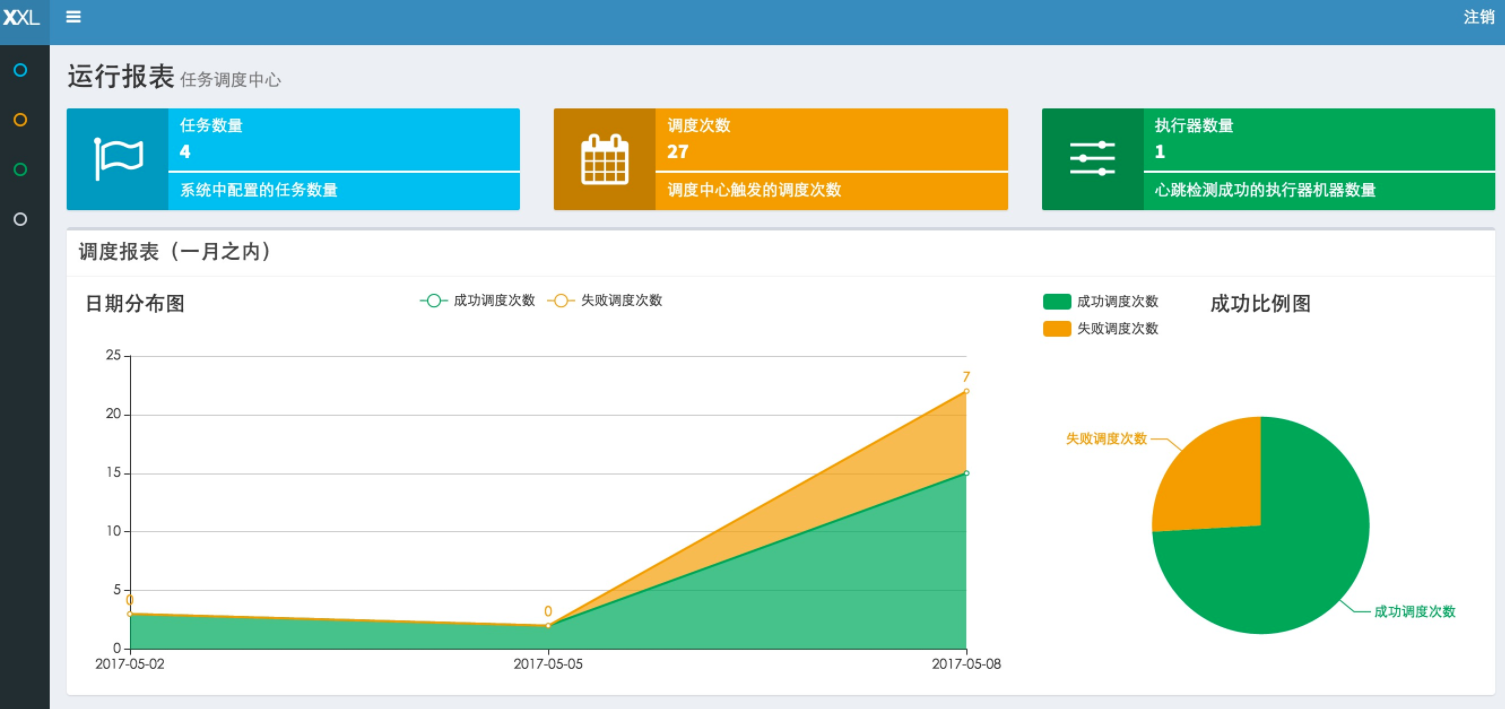
显然传统的定时任务已经不满足现在的分布式架构,所以需要一个分布式任务调度平台,目前比较主流的是elasticjob和xxl-job(github上有15.7k个star,登记公司有348个,与SpringBoot有非常好的集成,更优的选择)。
2. 安装
2.1 拉取源码
1
| git clone https://github.com/xuxueli/xxl-job.git
|
2.2 导入IDEA
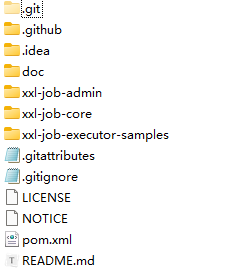
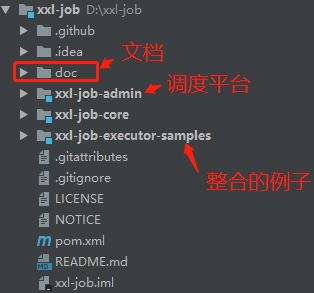
导入后,maven自动下载完依赖jar包后,就可以看到项目:
2.3 初始化数据库
执行 doc/db/tables_xxl_job.sql 的数据库初始化内容:
1
2
3
4
5
6
7
| #
# XXL-JOB v2.2.1-SNAPSHOT
# Copyright (c) 2015-present, xuxueli.
CREATE database if NOT EXISTS `xxl_job` default character set utf8mb4 collate utf8mb4_unicode_ci;
use `xxl_job`;
...
|
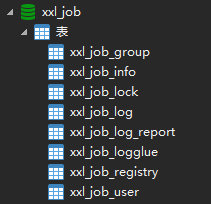
初始化完成后的结果:
2.4 配置文件
在admin项目下找到application.properties文件:
1
2
3
4
5
6
7
8
9
10
11
12
13
14
15
16
17
18
19
20
21
22
23
24
25
|
spring.datasource.url=jdbc:mysql://127.0.0.1:3306/xxl_job?useUnicode=true&characterEncoding=UTF-8&autoReconnect=true&serverTimezone=Asia/Shanghai
spring.datasource.username=root
spring.datasource.password=123456 #默认是 root_pwd 注意此处改一下即可启动了!!!
spring.datasource.driver-class-name=com.mysql.jdbc.Driver
spring.mail.host=smtp.qq.com
spring.mail.port=25
spring.mail.username=471553857@qq.com
spring.mail.password=xxx
spring.mail.properties.mail.smtp.auth=true
spring.mail.properties.mail.smtp.starttls.enable=true
spring.mail.properties.mail.smtp.starttls.required=true
spring.mail.properties.mail.smtp.socketFactory.class=javax.net.ssl.SSLSocketFactory
xxl.job.accessToken=
xxl.job.i18n=zh_CN
xxl.job.triggerpool.fast.max=200
xxl.job.triggerpool.slow.max=100
xxl.job.logretentiondays=10
|
2.5 编译运行
IDEA 的 springboot 启动 或 直接跑admin项目的main方法启动也行:

到这里就完成了,可以直接打开浏览器访问管理页面了。
访问地址:http://localhost:8080/xxl-job-admin
账号密码: admin/123456
2.6 部署
如果需要部署到服务器的话,需要打包成jar包,在IDEA利用Maven插件打包:
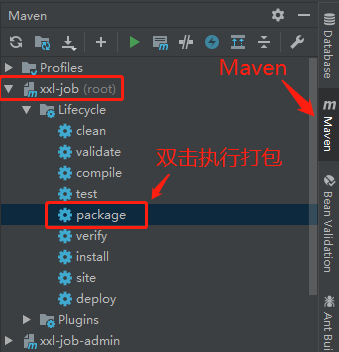
然后在 xxl-job\xxl-job-admin\target 路径下,找到jar包。
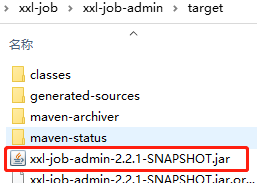
使用java -jar命令就可以启动:

然后可以直接打开浏览器访问管理页面了。
访问地址:http://localhost:8080/xxl-job-admin
账号密码: admin/123456

3. 使用
3.1 xxljob-demo
部署了调度中心之后,需要往调度中心注册执行器,添加调度任务。接下来就参考xxl-job写一个简单的例子。
首先创建一个SpringBoot项目,名字叫”xxljob-demo”,添加依赖:
1
2
3
4
5
6
7
8
9
10
11
12
13
14
15
16
| <dependencies>
<dependency>
<groupId>org.springframework.boot</groupId>
<artifactId>spring-boot-starter-web</artifactId>
</dependency>
<dependency>
<groupId>org.springframework.boot</groupId>
<artifactId>spring-boot-starter</artifactId>
</dependency>
<dependency>
<groupId>com.xuxueli</groupId>
<artifactId>xxl-job-core</artifactId>
<version>2.2.0</version>
</dependency>
</dependencies>
|
修改application.properties:
1
2
3
4
5
6
7
8
9
10
11
12
13
14
15
16
17
18
19
20
21
22
23
24
|
server.port=8081
logging.config=classpath:logback.xml
spring.application.name=xxljob-demo
xxl.job.admin.addresses=http://127.0.0.1:8080/xxl-job-admin
xxl.job.accessToken=
xxl.job.executor.appname=xxl-job-demo
xxl.job.executor.address=
xxl.job.executor.ip=
xxl.job.executor.port=9999
xxl.job.executor.logpath=/data/applogs/xxl-job/jobhandler
xxl.job.executor.logretentiondays=10
|
springcloud 中 bootstrap.yml 配置参考:
1
2
3
4
5
| xxl:
job:
enabled: true
admin:
addresses: 127.0.0.1:8080
|
接着写一个配置类XxlJobConfig:
1
2
3
4
5
6
7
8
9
10
11
12
13
14
15
16
17
18
19
20
21
22
23
24
25
26
27
28
29
30
31
32
33
34
35
| @Configuration
public class XxlJobConfig {
private Logger logger = LoggerFactory.getLogger(XxlJobConfig.class);
@Value("${xxl.job.admin.addresses}")
private String adminAddresses;
@Value("${xxl.job.accessToken}")
private String accessToken;
@Value("${xxl.job.executor.appname}")
private String appname;
@Value("${xxl.job.executor.address}")
private String address;
@Value("${xxl.job.executor.ip}")
private String ip;
@Value("${xxl.job.executor.port}")
private int port;
@Value("${xxl.job.executor.logpath}")
private String logPath;
@Value("${xxl.job.executor.logretentiondays}")
private int logRetentionDays;
@Bean
public XxlJobSpringExecutor xxlJobExecutor() {
logger.info(">>>>>>>>>>> xxl-job config init.");
XxlJobSpringExecutor xxlJobSpringExecutor = new XxlJobSpringExecutor();
xxlJobSpringExecutor.setAdminAddresses(adminAddresses);
xxlJobSpringExecutor.setAppname(appname);
xxlJobSpringExecutor.setAddress(address);
xxlJobSpringExecutor.setIp(ip);
xxlJobSpringExecutor.setPort(port);
xxlJobSpringExecutor.setAccessToken(accessToken);
xxlJobSpringExecutor.setLogPath(logPath);
xxlJobSpringExecutor.setLogRetentionDays(logRetentionDays);
return xxlJobSpringExecutor;
}
}
|
3.2 两种使用方式
- 方式一:使用Bean模式
推荐(一个类中管理多个定时)。
1
2
3
4
5
6
7
8
9
10
| @Component
public class XxlJobDemoHandler {
@XxlJob("demoJobHandler")
public ReturnT<String> demoJobHandler(String param) throws Exception {
XxlJobLogger.log("java, Hello World~~~");
XxlJobLogger.log("param:" + param);
return ReturnT.SUCCESS;
}
}
|
Bean模式,一个方法为一个任务:
在Spring Bean实例中,开发Job方法,方式格式要求为:
1
| public ReturnT<String> execute(String param) {...}
|
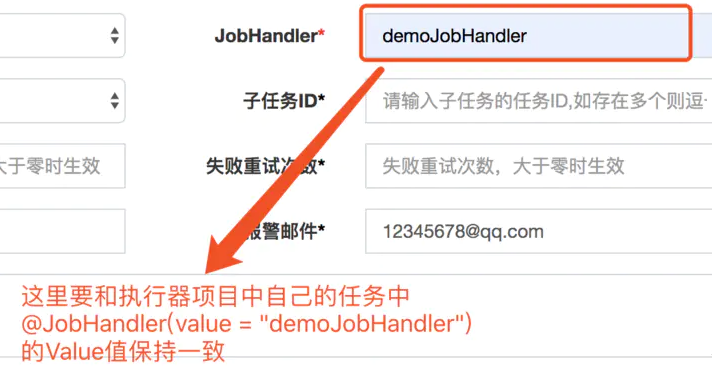
为Job方法添加注解 @XxlJob(…),注解value值对应的是调度中心新建任务的JobHandler属性的值。
1
2
3
4
| @XxlJob(value="自定义jobhandler名称",
init = "JobHandler初始化方法",
destroy = "JobHandler销毁方法"
)
|
执行日志:需要通过 “XxlJobLogger.log” 打印执行日志;
1
2
3
4
5
6
7
8
9
10
| @JobHandler(value = "demoJobHandler")
@Component
public class DemoJobHandler extends IJobHandler {
@Override
public ReturnT<String> execute(String param) throws Exception {
System.out.println("XXL-JOB Hello World");
return SUCCESS;
}
}
|
任务Handler示例(Bean模式)
开发步骤:
1、继承”IJobHandler”:“com.xxl.job.core.handler.IJobHandler”;
2、注册到Spring容器:添加“@Component”注解,被Spring容器扫描为Bean实例;
3、注册到执行器工厂:添加“@JobHandler(value=”自定义jobhandler名称”)”注解,注解value值对应的是调度中心新建任务的JobHandler属性的值。
4、执行日志:需要通过 “XxlJobLogger.log” 打印执行日志。
在resources目录下,添加logback.xml文件:
1
2
3
4
5
6
7
8
9
10
11
12
13
14
15
16
17
18
19
20
21
22
23
24
| <?xml version="1.0" encoding="UTF-8"?>
<configuration debug="false" scan="true" scanPeriod="1 seconds">
<contextName>logback</contextName>
<property name="log.path" value="/data/applogs/xxl-job/xxl-job-executor-sample-springboot.log"/>
<appender name="console" class="ch.qos.logback.core.ConsoleAppender">
<encoder>
<pattern>%d{HH:mm:ss.SSS} %contextName [%thread] %-5level %logger{36} - %msg%n</pattern>
</encoder>
</appender>
<appender name="file" class="ch.qos.logback.core.rolling.RollingFileAppender">
<file>${log.path}</file>
<rollingPolicy class="ch.qos.logback.core.rolling.TimeBasedRollingPolicy">
<fileNamePattern>${log.path}.%d{yyyy-MM-dd}.zip</fileNamePattern>
</rollingPolicy>
<encoder>
<pattern>%date %level [%thread] %logger{36} [%file : %line] %msg%n
</pattern>
</encoder>
</appender>
<root level="info">
<appender-ref ref="console"/>
<appender-ref ref="file"/>
</root>
</configuration>
|
写完之后启动服务。
3.3 添加执行器
然后可以打开管理界面,找到执行器管理,添加执行器:

接着任务管理,添加任务:
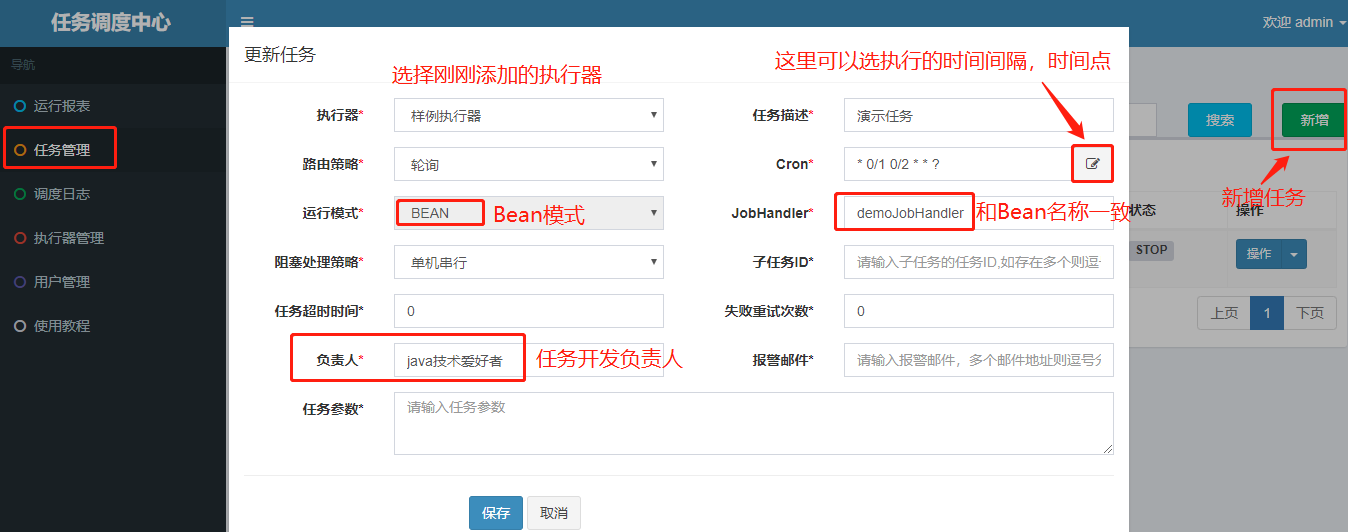

3.4 测试
最后可以到任务管理去测试一下,运行demoJobHandler:

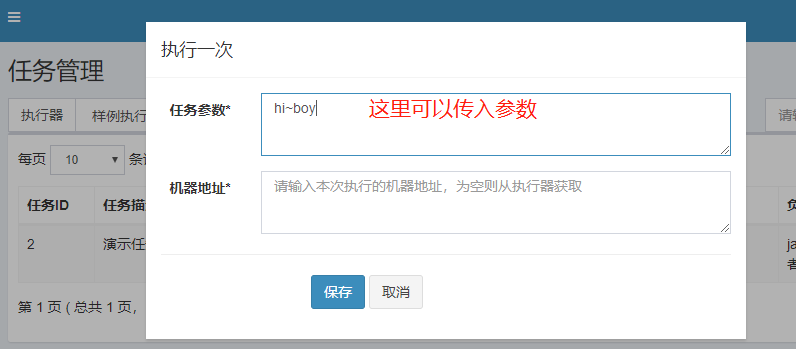
点击保存后,会立即执行。点击查看日志,可以看到任务执行的历史日志记录:
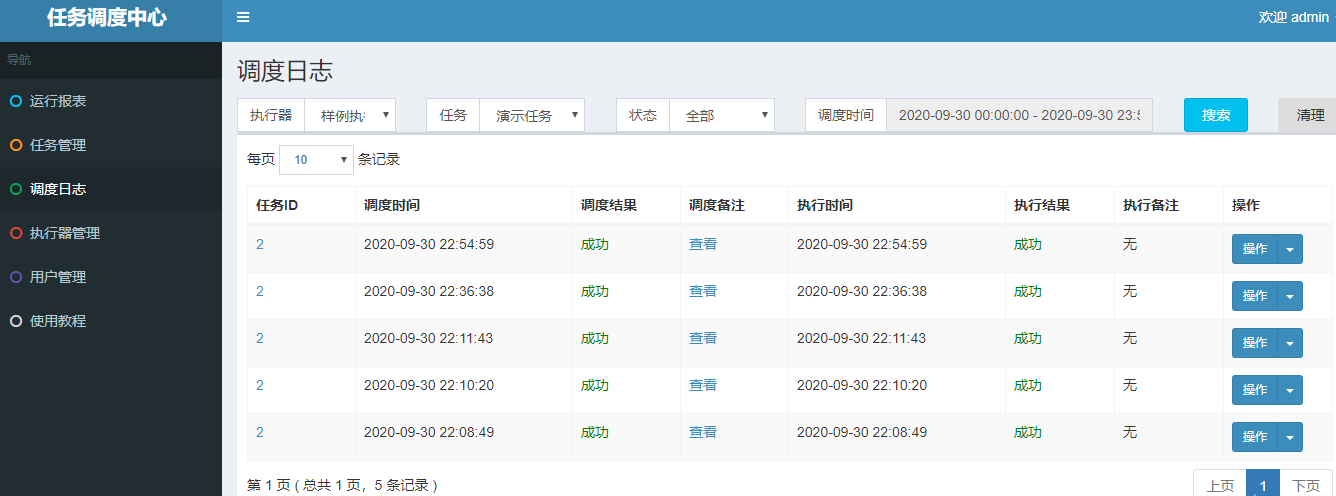
打开刚刚执行的执行日志,我们可以看到,运行成功。

4. XXL-JOB架构设计
4.1 架构图
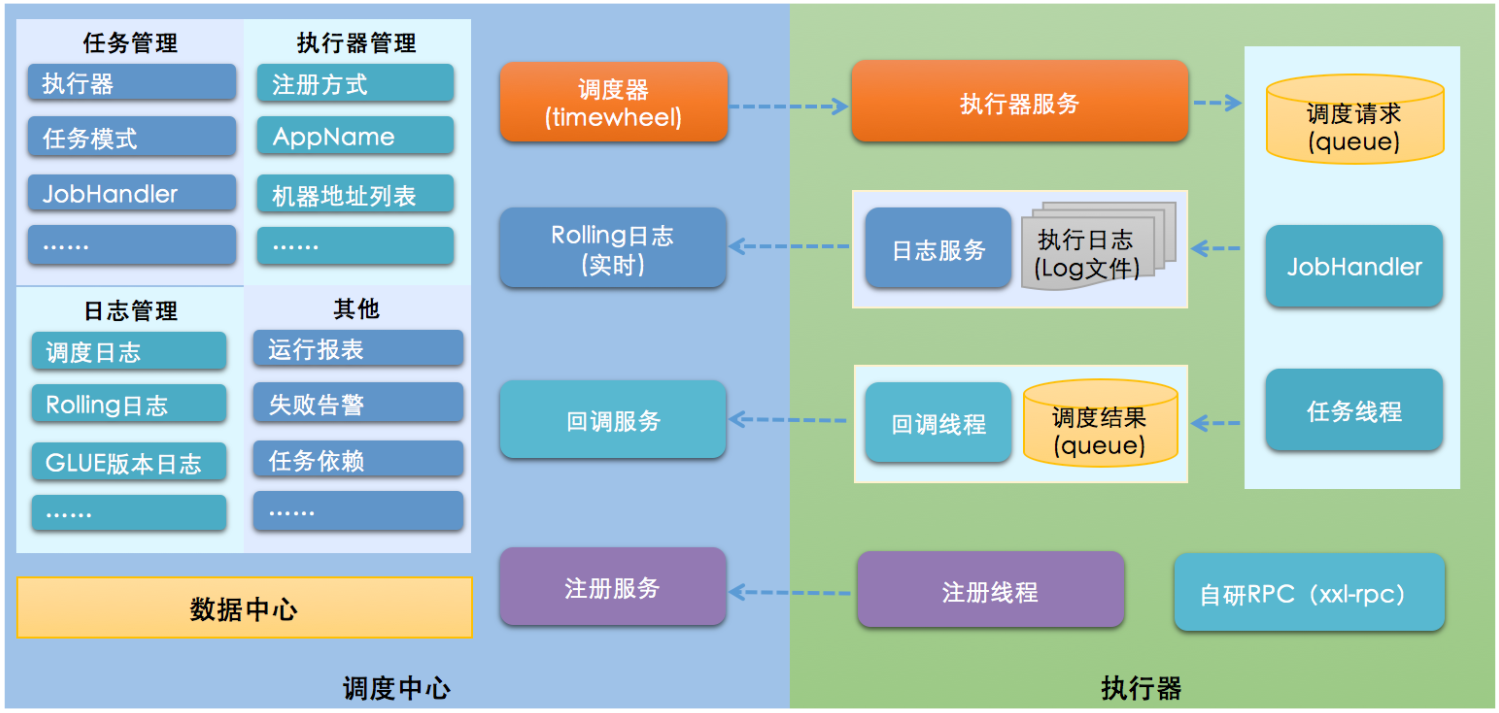
从架构图可以看出,分别有调度中心和执行器两大组成部分
- 调度中心。负责管理调度信息,按照调度配置发出调度请求,自身不承担业务代码。支持可视化界面,可以在调度中心对任务进行新增,更新,删除,会实时生效。支持监控调度结果,查看执行日志,查看调度任务统计报表,任务失败告警等等。
- 执行器。负责接收调度请求,执行调度任务的业务逻辑。执行器启动后需要注册到调度中心。接收调度中心的发出的执行请求,终止请求,日志请求等等。
4.2 工作原理
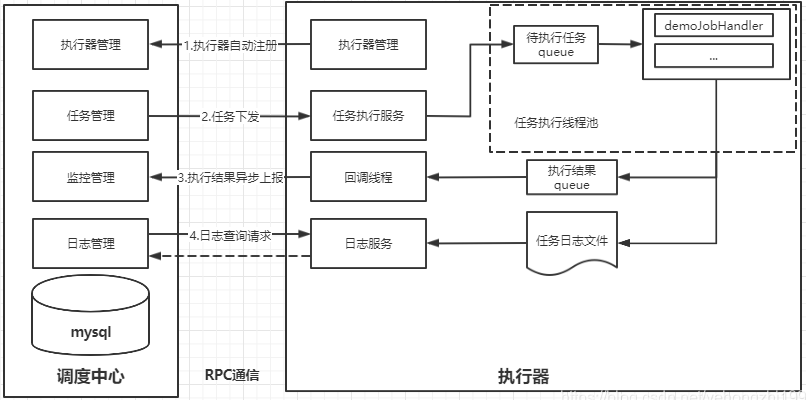
- 任务执行器根据配置的调度中心的地址,自动注册到调度中心。
- 达到任务触发条件,调度中心下发任务。
- 执行器基于线程池执行任务,并把执行结果放入内存队列中、把执行日志写入日志文件中。
- 执行器的回调线程消费内存队列中的执行结果,主动上报给调度中心。
- 当用户在调度中心查看任务日志,调度中心请求任务执行器,任务执行器读取任务日志文件并返回日志详情。


