参考资料:
1. vuex状态库
1.1 介绍
Vuex 是一个专为 Vue.js 应用程序开发的状态管理模式 + 库。基于内存 且 响应式。
它采用集中式存储管理应用的所有组件的状态,并以相应的规则保证状态以一种可预测的方式发生变化。
背景:如果您不打算开发大型单页应用,使用 Vuex 可能是繁琐冗余的。确实是如此——如果您的应用够简单,您最好不要使用 Vuex。一个简单的 store 模式就足够您所需了。
但是,如果您需要构建一个中大型单页应用,您很可能会考虑如何更好地在组件外部管理状态,Vuex 将会成为自然而然的选择。
即:
- 页面有多个需要共享的状态,引入 vuex,便于维护(非父子通信的技术选型)
- 缓存部分异步数据,减少后端服务的访问,增加用户体验
状态(值)被修改必须经过 Mutations(内部只支持同步),通过 Devtools 能够记录出值的变化,让数据改变更安全、可追溯可跟踪。
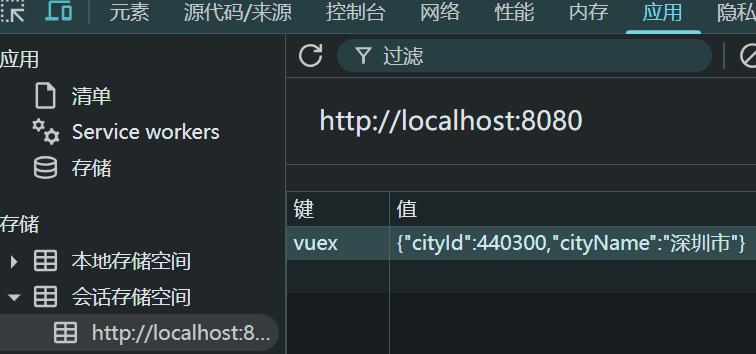
vuex 默认的管理在内存,只要刷新页面公共状态就丢失了。需要进行持久化处理。
1.2 安装和使用
基于 vite4 + vue3 + vuex4
安装:npm i vuex@next
目录:src/store/index.js
1
2
3
4
5
6
7
8
9
| import { createStore } from 'vuex'
const store = createStore({
state: {
isTabbarShow: true
}
})
export default store
|
- 导入:main.js
1
2
3
4
5
6
7
8
| import { createApp } from 'vue'
import './style.css'
import App from './App.vue'
import store from './store'
createApp(App)
.use(store)
.mount('#app')
|
- 使用:App.vue
1
2
3
4
5
6
7
8
9
10
11
12
13
14
| <template>
<div class="box">
<router-view></router-view>
<!-- 使用vuex状态管理中的字段控制显示隐藏 -->
<Tabbar v-show="store.state.isTabbarShow"></Tabbar>
</div>
</template>
<script setup>
import Tabbar from "./components/Tabbar.vue"
import { useStore } from "vuex";
const store = useStore()
</script>
|
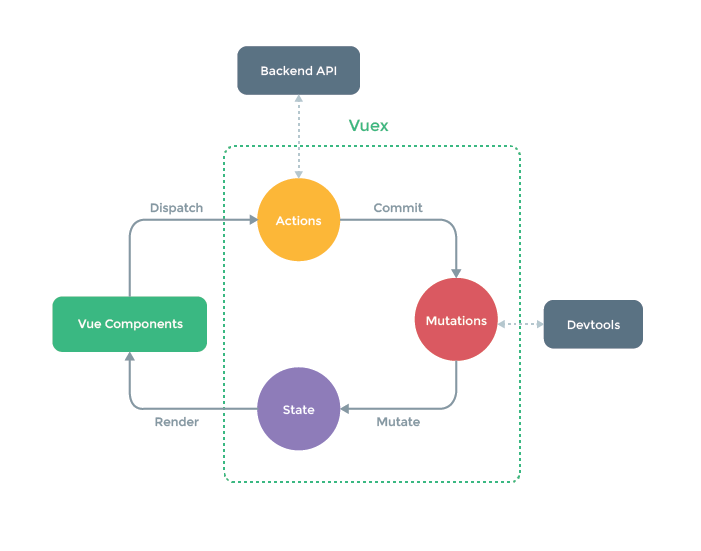
1.3 同步工作流
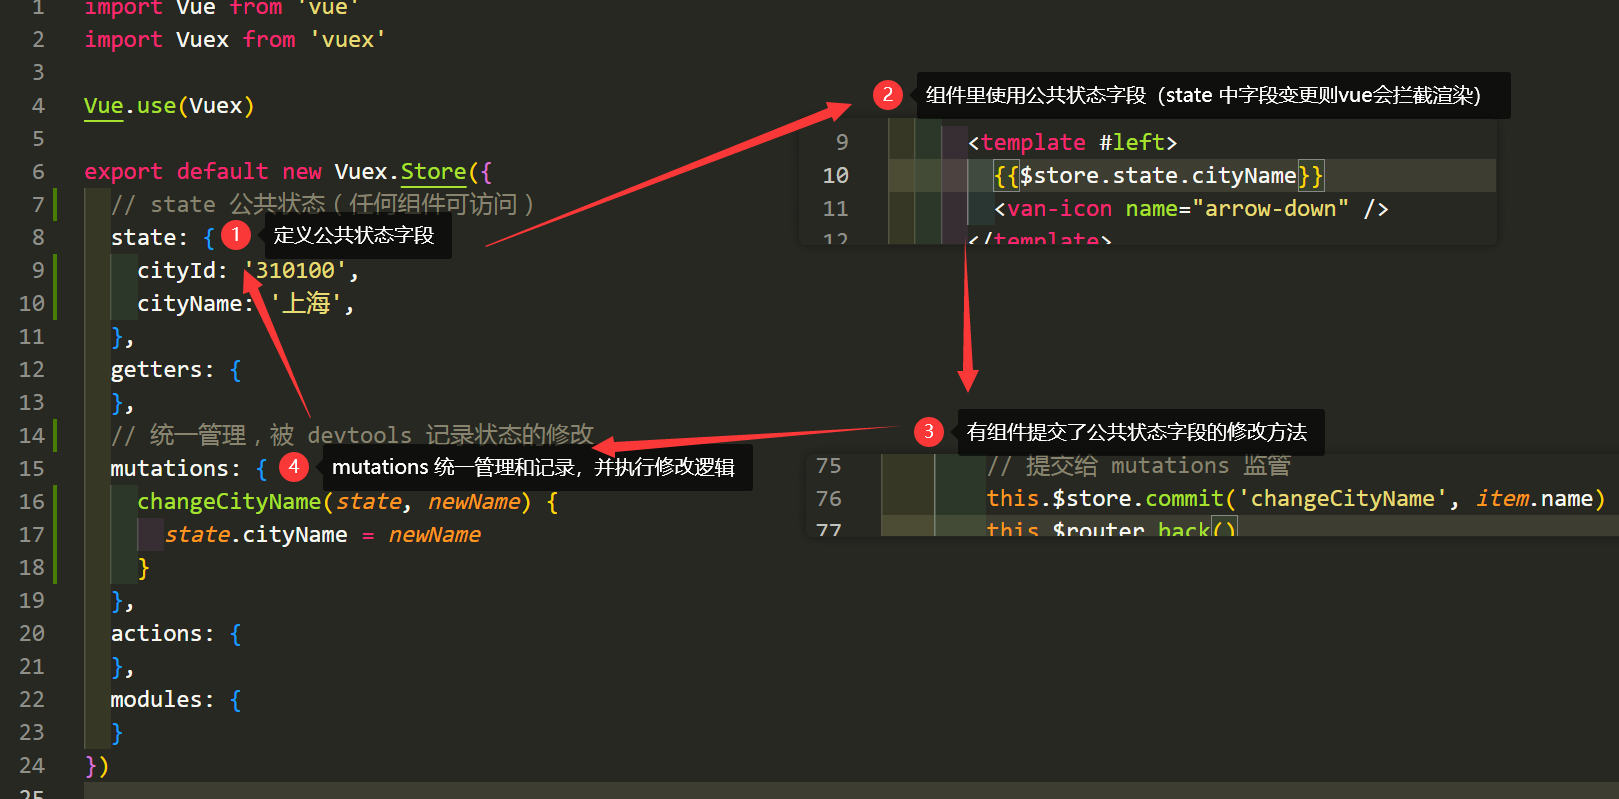
state 定义公共状态字段,任何组件均可访问
- 组件中通过
this.$store.state.状态名 访问(dom节点中不需要 this.)
getters 从state中派生出的计算属性,它的返回值会根据它的依赖被缓存,且只有当依赖值发生改变才会被重新计算。可以认为是 store 的计算属性
- 组件中通过
this.$store.getters.计算属性名 访问
mutaitons 维护修改 state 字段的函数方法(只支持同步方法),统一管理且被devtools记录state的修改
- 组件中通过
this.$store.commit("func", param) 触发调用
actions 支持同步或异步方法实现,方法中提交的是 mutation,而不是直接变更状态。
- 组件中通过
this.$store.dispatch("func", param) 触发调用
modules
- 将 store 分割成模块(module)。每个模块拥有自己的 state、mutation、action、getter、甚至是嵌套子模块,参考官方文档
1
2
3
4
5
6
7
8
9
10
11
12
13
14
15
16
17
18
| import Vuex from 'vuex'
Vue.use(Vuex)
export default new Vuex.Store({
state: {},
getters: {
getTodoById: (state) => (id) => {
return state.todos.find(todo => todo.id === id)
}
},
mutations: {},
actions: {},
modules: {}
})
|
state 定义公共状态字段。$store.state.key组件里使用 state 中的公共状态字段(如果变化也会立即拦截渲染)this.$store.commit(function, newValue)有组件提交了公共状态字段的修改方法mutations 统一管理和记录,并执行修改逻辑
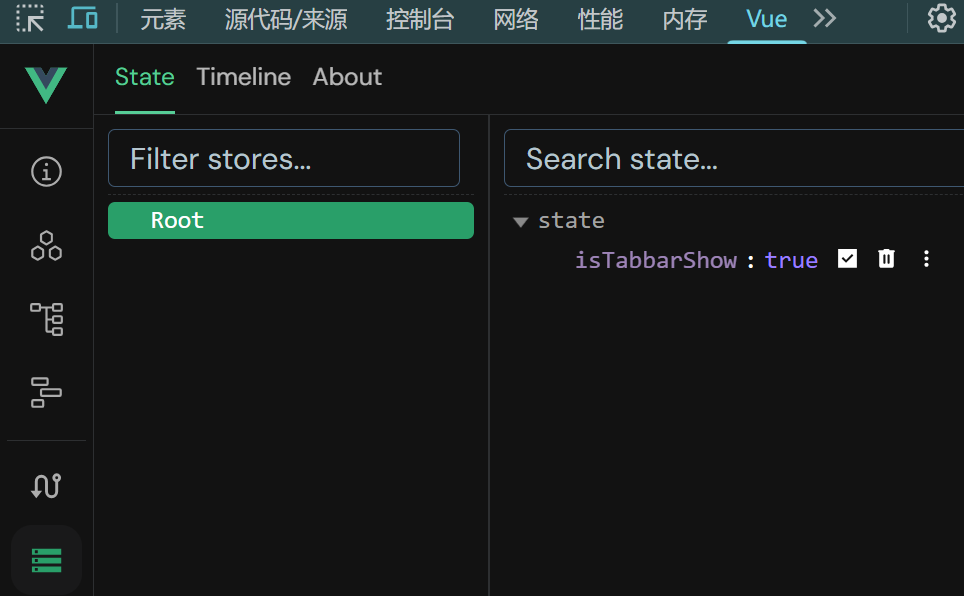
vue-devtools 浏览器插件,可视化跟踪公共状态字段和方法的过程,支持时光回溯。
Vue2 安装Edge浏览器扩展程序的5.3.4版本,参考下载:https://blog.csdn.net/weixin_45204443/article/details/124205504
Vue3 安装Chrome浏览器扩展程序的7.7.7版本,参考下载:https://chrome.zzzmh.cn/info/nhdogjmejiglipccpnnnanhbledajbpd
亲测可用。
如 Edge 检查 vue2 的 状态监控:
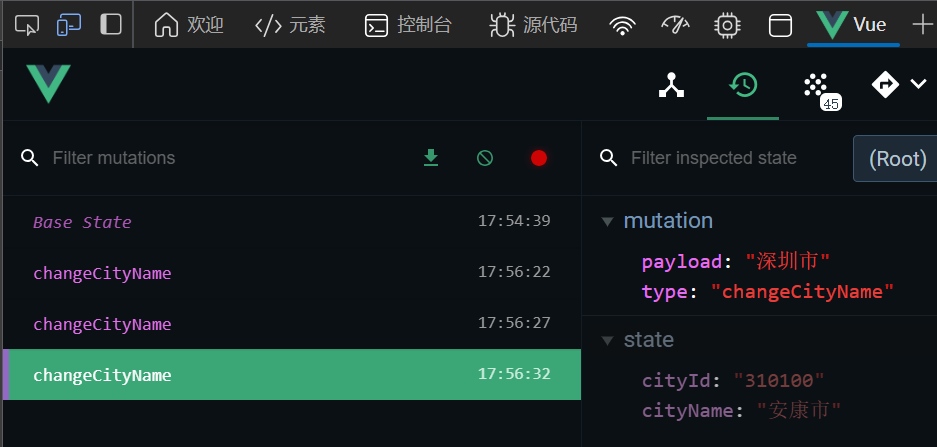
如 Chrome 检查 vue3 的 状态监控:
1.5 actions 异步缓存
- 非父子的数据通信
- 后端数据的缓存快照,减少重复数据请求,减轻服务器压力,提高用户体验
1
2
3
4
5
6
7
8
9
10
11
12
13
14
15
16
17
18
19
20
21
22
23
24
25
26
27
28
29
30
31
32
33
34
35
36
37
38
39
40
41
42
43
44
45
46
47
48
49
| import Vue from 'vue'
import Vuex from 'vuex'
import http from "@/util/http.js";
Vue.use(Vuex)
export default new Vuex.Store({
state: {
cityId: '310100',
cityName: '上海',
cinemasList: []
},
getters: {
},
mutations: {
changeCityName(state, newName) {
state.cityName = newName
},
changeCityId(state, newId) {
state.cityId = newId
},
changeCinemaData(state, list) {
state.cinemasList = list
},
clearCinemasList(state) {
state.cinemasList = []
}
},
actions: {
async getCinemaData(store, cityId) {
console.log("getCinemaData->http")
return await http({
url: `/gateway?cityId=${cityId}&ticketFlag=1&k=6136159`,
headers: {
"X-Host": "mall.film-ticket.cinema.list",
},
}).then((res) => {
console.log("res->", res.data.data.cinemas)
store.commit("changeCinemaData", res.data.data.cinemas)
});
}
},
modules: {
}
})
|
1.6 注意
- 应用层级的状态应该集中到单个 store 对象中(即单个项目)。
- 提交 mutation 是更改状态的唯一方法,并且这个过程是同步的。
- 异步逻辑都应该封装到 action 里面。
1.7 type.js 常量维护(★)
【推荐用法】定义 store/type.js 维护所有的 mutations 的方法名称,避免重复,易于维护。
1
2
3
4
5
6
7
8
9
|
const CHANGE_TABBAR = "changeTabbar"
export { CHANGE_TABBAR }
|
store/index.js
1
2
3
4
5
6
7
8
9
10
11
12
13
14
15
| import { createStore } from 'vuex'
import { CHANGE_TABBAR } from './type'
const store = createStore({
state: {
isTabbarShow: true
},
mutations: {
[CHANGE_TABBAR](state, payload) {
state.isTabbarShow = payload
}
}
})
export default store
|
Xxx.vue - 组件中
1
2
| this.$store.commit(CHANGE_TABBAR, false)
this.$store.commit(CHANGE_TABBAR, true)
|
2. vuex辅助函数…mapXxx
2.1 mapState | mapGetters
...mapState(["title"]) 等价于 this.$store.state.状态名,新写法:this.状态名
...mapGetters(["计算属性名"]) 等价于 this.$store.getters.计算属性名,新写法:this.计算属性名
导入 import { mapState, mapGetters } from ‘vuex’
就不需要再 $store.state. 和 $store.getters. 了,直接 this. (dom中可以省略this.)就可以通过 mapState 访问到 store 中的公共状态字段
映射在计算属性 computed 中
示例:
1
2
3
4
5
6
7
8
9
10
11
12
13
14
15
16
17
18
19
20
21
22
| // dom中也可以直接写 公共状态名,不需要 $store.state. 了
<template #left>
{{ cityName }}
</template>
<script>
import { mapState } from 'vuex'
export default {
computed: {
...mapState(['cityId', 'cityName', 'cinemasList'])
},
mounted() {
// if (this.$store.state.cinemasList.length === 0) { // 不需要再 .$store.state 了,直接 this.
if (this.cinemasList.length === 0) {
// 分发
this.$store
// .dispatch("getCinemaData", this.$store.state.cityId) // 不需要再 .$store.state 了,直接 this.
.dispatch("getCinemaData", this.cityId)
.then((res) => {
console.log("异步请求结束,数据拿到");
...
</script>
|
本质原理:
1
2
3
4
5
6
| computed: {
cinemasList() {
return this.$store.state.cinemasList
}
},
|
2.2 mapMutations | mapActions
...mapMutations(["func"]) 等价于 this.$store.commit("func", param),新写法:this.func(param)
...mapActions(["func"]) 等价于 this.$store.dispatch("func", param),新写法:this.func(param)
- 导入 import { mapActions, mapMutations } from ‘vuex’
- 直接 this. 就可以访问到 store 中的对应方法
- 映射在计算属性
methods 中
示例:
1
2
3
4
5
6
7
8
9
10
11
12
13
14
15
16
17
18
19
20
21
22
23
24
25
26
27
| <script>
import { mapState, mapActions, mapMutations } from 'vuex';
export default {
computed: {
...mapState(['cityId', 'cityName', 'cinemasList'])
},
mounted() {
// if (this.$store.state.cinemasList.length === 0) {
if (this.cinemasList.length === 0) {
// this.$store.dispatch('getCinemaData', this.cityId)
this.getCinemaData(this.cityId)
.then((res) => {...});
} else {...}
},
methods: {
onClickLeft() {
Toast("城市");
this.$router.push("/city");
// this.$store.commit("clearCinemasList")
this.clearCinemasList()
},
...mapActions(['getCinemaData']),
...mapMutations(['clearCinemasList'])
},
};
</script>
|
3. vuex 混入与模块
3.1 mixins 混入
mixins 需要结合 混入 的使用方式。如 通过 vuex 控制底部选项卡显示/隐藏。
src/App.vue
1
2
3
4
5
6
7
| <template>
<div>
...
<!-- 底部选项卡 -->
<tabbar ref="mytabbar" v-show="$store.state.isTabbarShow"></tabbar>
</div>
</template>
|
src/store/index.js
1
2
3
4
5
6
7
8
9
10
11
12
13
14
15
16
17
18
| import Vue from 'vue'
import Vuex from 'vuex'
Vue.use(Vuex)
export default new Vuex.Store({
state: {
isTabbarShow: true
},
mutations: {
show(state) {
state.isTabbarShow = true
},
hide(state) {
state.isTabbarShow = false
}
},
})
|
src/util/mixinObj.js
1
2
3
4
5
6
7
8
9
10
11
12
13
14
15
16
17
18
|
let tabbarShowHide = {
created() {
console.log("tabbarShowHide 创建完成")
this.$store.commit("hide")
},
destroyed() {
console.log("tabbarShowHide 对象销毁")
this.$store.commit("show")
},
methods: {
aaa() {
console.log("方法也可以混入被click事件触发,注意重名")
}
}
}
export default tabbarShowHide
|
src/views/City.vue - 城市索引列表里不显示底部选项卡、其他位置正常展示。
1
2
3
4
5
6
7
8
9
10
11
12
13
| <template>
...
</template>
<script>
import tabbarShowHide from '@/util/mixinObj.js'
export default {
// 混入 - 控制底部选项卡是否显示
mixins: [tabbarShowHide],
data() {},
};
</script>
|
3.2 module 模块
由于使用单一状态树,应用的所有状态会集中到一个比较大的对象。当应用变得非常复杂时,store 对象就有可能变得相当臃肿。
为了解决以上问题,Vuex 允许我们将 store 分割成模块(module)。每个模块拥有自己的 state、mutation、action、getter、甚至是嵌套子模块——从上至下进行同样方式的分割。
1
2
3
4
5
6
7
8
9
10
11
12
13
14
15
16
17
18
19
| const moduleA = {
state: () => ({ ... }),
mutations: { ... },
actions: { ... },
getters: { ... }
}
const moduleB = {
state: () => ({ ... }),
mutations: { ... },
actions: { ... }
}
const store = createStore({
modules: {
a: moduleA,
b: moduleB
}
})
store.state.a.xx
store.state.b.yy
|
模块拆分示例:
目录结构
1
2
3
4
5
6
| src/
store/
modules/ // 存放拆分后的模块文件
user.js // 用户模块
cart.js // 购物车模块
index.js // 主 Store 文件(导入并注册模块)
|
独立的用户模块文件A:src/store/modules/user.js
1
2
3
4
5
6
7
8
9
10
11
12
13
14
15
16
17
18
19
20
| const User = {
namespaced: true,
state: () => ({
name: '张三',
age: 20
}),
mutations: {
updateName(state, newName) {
state.name = newName
}
},
actions: {
asyncUpdateName({ commit }, newName) {
setTimeout(() => {
commit('updateName', newName)
}, 1000)
}
}
}
export default User
|
独立的购物车模块文件B:src/store/modules/cart.js
1
2
3
4
5
6
7
8
9
10
11
12
13
14
| const Cart = {
namespaced: true,
state: () => ({
goodsList: ['电影票', '爆米花'],
count: 2
}),
mutations: {
addGoods(state, goods) {
state.goodsList.push(goods)
state.count += 1
}
}
}
export default Cart
|
主 Store 文件:src/store/index.js
1
2
3
4
5
6
7
8
9
10
11
12
13
| import { createStore } from 'vuex'
import User from './modules/user'
import Cart from './modules/cart'
const store = createStore({
state: {},
modules: {
User,
Cart
}
})
export default store
|
3.2.1 namespace 命名空间
因为开启了命名空间,因此使用辅助函数时,需要指定命名空间:
1
2
3
4
| ...mapState("namespace", ["xxx", ...])
...mapGetters("namespace", ["计算属性名", ...])
...mapMutations("namespace", ["func", ...])
...mapActions("namespace", ["func", ...])
|
4. vuex-VCA(组合式api)
4.1 state | getters
为了访问 state 和 getter,需要创建 computed 引用以保留响应性,这与在选项式 API 中创建计算属性等效。
- 访问 state 状态格式:
computed(() => store.state.公共状态) 或 computed(() => store.state.模块名.公共状态)
- 访问 getter 状态格式:
computed(() => store.getters.计算属性名) 或 computed(() => store.getters[‘模块名/计算属性名’])
1
2
3
4
5
6
7
8
9
10
11
12
| <template>
<div>{{ store.state.xxx }}-{{ userName }}-{{ userFullName }}</div>
</template>
<script setup>
import { useStore } from 'vuex'
const store = useStore()
const userName = computed(() => store.state.name)
//const userName = computed(() => store.state.User.name) //分模块时,带模块名
const userFullName = computed(() => store.getters.fullName)
// const userFullName = computed(() => store.getters['User/fullName']) //分模块时,带模块名
</script>
|
4.2 mutations | actions
要使用 mutation 和 action 时,只需要在 setup 钩子函数中调用 commit 和 dispatch 函数。
- 提交 mutation 格式:
store.commit('mutation方法名', 参数) 或 store.commit(‘模块名/mutation方法名’, 参数)
- 提交 action 格式:
store.dispatch('action方法名', 参数) 或 store.dispatch(‘模块名/action方法名’, 参数)
1
2
3
4
5
6
7
8
9
10
11
12
13
14
15
16
17
18
| <script setup>
import { useStore } from 'vuex'
const store = useStore()
const handleUpdateUserName = () => {
store.commit('updateName', '李四')
// store.commit('User/updateName', '李四') //分模块时,带模块名
}
const handleAsyncUpdateUserName = async () => {
try {
await store.dispatch('asyncUpdateName', '王五')
//await store.dispatch('User/asyncUpdateName', '王五') //分模块时,带模块名
console.log('用户名修改成功')
} catch (err) {
console.error('用户名修改失败:', err)
}
}
</script>
|
5. vuex持久化
大部分场景不需要持久化,通过后端接口获取最新的数据渲染出来。
特殊的一些场景,比如 选择了城市后,刷新页面,已选择的城市不能变化。
5.1 vuex-persistedstate
源码和用法:https://github.com/robinvdvleuten/vuex-persistedstate
vuex-persistedstate 持久化插件。
安装:npm i vuex-persistedstate
用法:store/index.js
1
2
3
4
5
6
7
8
9
10
11
12
13
14
15
| import { createStore } from 'vuex'
import createPersistedState from "vuex-persistedstate";
const store = createStore({
...,
plugins: [createPersistedState({
storage: window.sessionStorage,
reducer: (state) => {
return {
cityId: state.cityId,
cityName: state.cityName
}
}
})],
});
|