
参考资料:
element ui 或 element plus 主要用于管理后台系统。
1. elementUI-vue2
elementUI,饿了么UED团队退出的 vue 前端框架,主要用于PC端(偏后台系统)。
官网:https://element.eleme.cn/
源码:https://github.com/ElemeFE/element
1.1 安装×2
1
2
3
| vue create my-app
cd my-app
vue add element
|
1
2
|
npm i element-ui@2.9.2 -S
|
默认安装的是最新版,如果需要安装指定版本使用如下命令:
1
2
| npm uninstall element-ui -f
npm i element-ui@版本号 -f
|
1.2 引入
1
2
3
4
5
| import Vue from "vue";
import ElementUI from "element-ui";
import "element-ui/lib/theme-chalk/index.css";
Vue.use(ElementUI);
|
测试:
1
2
3
4
5
6
7
8
9
10
11
12
13
14
15
16
17
18
19
20
21
22
23
24
25
26
27
28
29
30
31
32
33
34
35
36
37
38
39
40
41
42
43
44
45
46
47
48
49
| <template>
<el-table :data="tableData" style="width: 100%">
<el-table-column prop="date" label="日期" width="180"> </el-table-column>
<el-table-column prop="name" label="姓名" width="180"> </el-table-column>
<el-table-column prop="address" label="地址"> </el-table-column>
{{msg}}
</el-table>
</template>
<script>
import Vue from "vue";
import ElementUI from "element-ui";
import "element-ui/lib/theme-chalk/index.css";

Vue.use(ElementUI);
export default {
data() {
return {
msg: 'hello,table',
tableData: [
{
date: "2016-05-02",
name: "王小虎",
address: "上海市普陀区金沙江路 1518 弄",
},
{
date: "2016-05-04",
name: "王小虎",
address: "上海市普陀区金沙江路 1517 弄",
},
{
date: "2016-05-01",
name: "王小虎",
address: "上海市普陀区金沙江路 1519 弄",
},
{
date: "2016-05-03",
name: "王小虎",
address: "上海市普陀区金沙江路 1516 弄",
},
],
};
},
};
</script>
<style></style>
|
启动项目,验证发现 element-ui的 el-table 不显示,最终发现是依赖版本过高的问题。
解决方案:
1
2
| npm uninstall element-ui -f
npm i element-ui@2.9.2 -f
|
重启项目,验证OK。
1.3 验证使用
1
2
3
4
5
6
7
8
9
10
11
12
13
14
15
16
17
18
19
20
21
22
23
24
25
26
27
28
29
30
31
32
33
34
35
36
37
38
39
40
41
42
43
44
45
46
47
48
49
50
51
52
53
54
55
56
57
58
59
60
61
62
63
64
65
66
67
68
69
70
71
72
73
74
75
76
77
78
79
80
81
82
83
84
85
86
87
88
89
90
91
92
93
94
95
96
97
98
99
100
101
102
103
104
105
106
107
108
109
110
111
112
113
| <template>
<el-container style="height: 100%;">
<el-aside width="200px" style="background-color: rgb(238, 241, 246)">
<el-menu :default-openeds="['1', '2']">
<el-submenu v-for="data in sideList" :key="data.id" :index="data.id+''" >
<template slot="title">
<i class="el-icon-message"></i>
{{data.title}}
</template>
<el-menu-item v-for="item in data.children" :key="item.id" :index="item.id+''">
{{item.title}}
</el-menu-item>
</el-submenu>
</el-menu>
</el-aside>
<el-container>
<el-header style="text-align: right; font-size: 12px">
<el-dropdown>
<i class="el-icon-setting" style="margin-right: 15px"></i>
<el-dropdown-menu slot="dropdown">
<el-dropdown-item>查看</el-dropdown-item>
<el-dropdown-item>新增</el-dropdown-item>
<el-dropdown-item>删除</el-dropdown-item>
<el-dropdown-item>退出</el-dropdown-item>
</el-dropdown-menu>
</el-dropdown>
<span>{{myname}}</span>
</el-header>
<el-main>
<el-table :data="tableData">
<el-table-column prop="date" label="日期" width="140">
</el-table-column>
<el-table-column prop="name" label="姓名" width="120">
</el-table-column>
<el-table-column prop="address" label="地址"> </el-table-column>
</el-table>
</el-main>
</el-container>
</el-container>
</template>
<script>
import ElementUI from "element-ui";
import "element-ui/lib/theme-chalk/index.css";
import Vue from "vue";
Vue.use(ElementUI);
export default {
data() {
const item = {
date: "2016-05-02",
name: "王小虎",
address: "上海市普陀区金沙江路 1518 弄",
};
return {
myname: 'Jerry',
sideList: [
{
id: 1,
title: '用户管理',
children: [
{
id: 11,
title: '用户列表'
},
{
id: 12,
title: '用户权限'
},
]
},
{
id: 2,
title: '权限管理',
children: [
{
id: 21,
title: '权限列表'
},
{
id: 22,
title: '角色列表'
},
]
}
],
tableData: Array(10).fill(item),
};
},
};
</script>
<style lang="scss" scoped>
*{
margin: 0;
}
html,body{
height: 100%;
}
.el-header {
background-color: #b3c0d1;
color: #333;
line-height: 60px;
}
.el-aside {
color: #333;
}
</style>
|
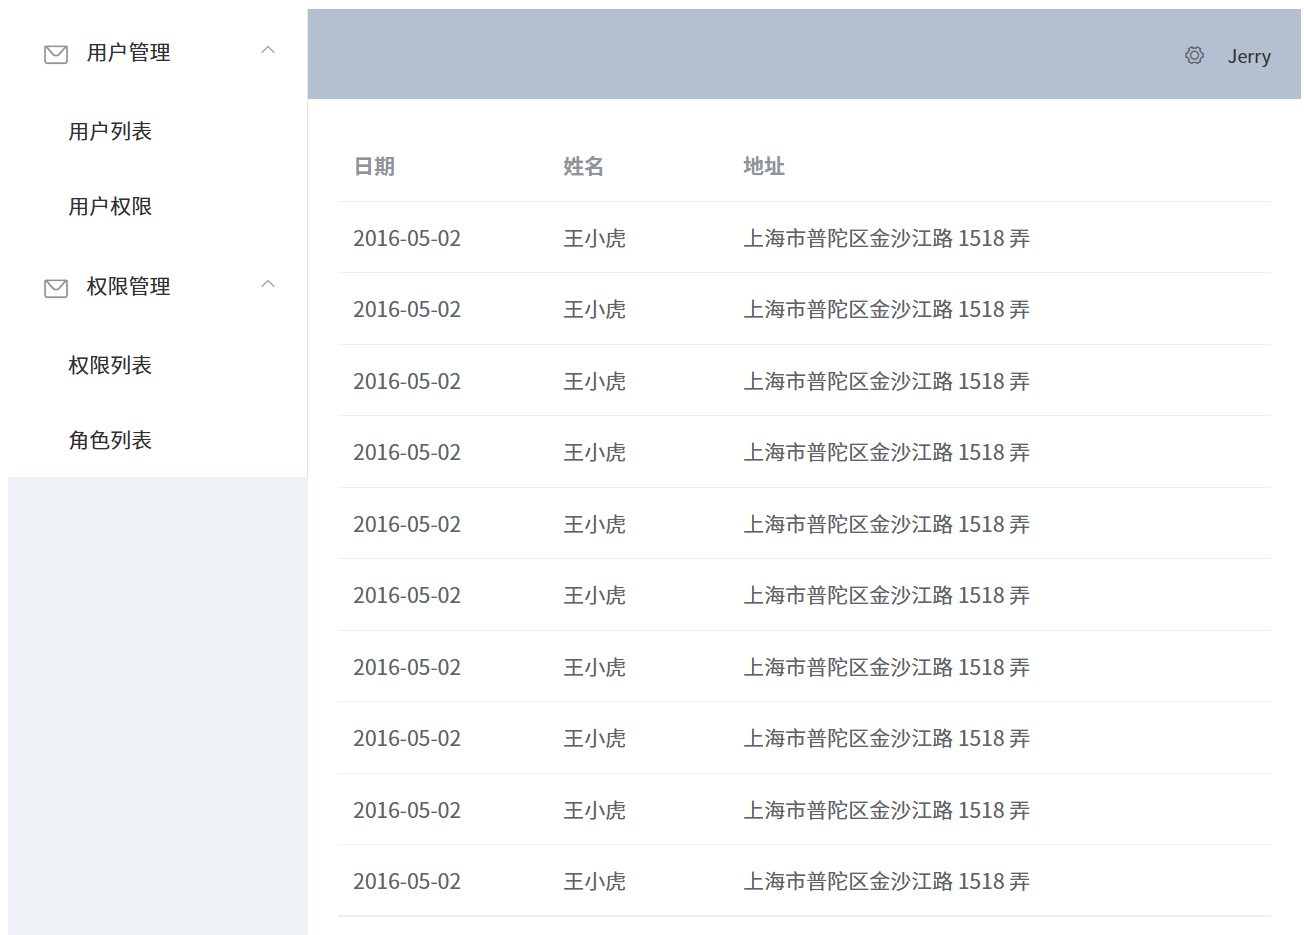
效果:
2. elementPlus-vue3(★)
elementPLUS,饿了么UED团队退出的 vue 前端框架,主要用于PC端(偏后台系统)。
官网:https://element-plus.org/zh-CN/
源码:https://github.com/element-plus/element-plus
2.1 安装
2.2 引入
该方式为全局引入,所有组件一次注册均可使用。
1
2
3
4
5
6
7
8
9
|
import { createApp } from 'vue'
import ElementPlus from 'element-plus'
import 'element-plus/dist/index.css'
import App from './App.vue'
createApp(App)
.use(ElementPlus)
.mount('#app')
|
2.3 验证使用
基于 vite4 + vue3 + pinia 创建。
目录结构
1
2
3
4
5
6
7
8
9
10
| src/
components/
AddNews.vue
Home.vue
NewsList.vue
NotFound.vue
router/
index.js
store/
newsStore.js
|
main.js
引入需要的内容
1
2
3
4
5
6
7
8
9
10
11
12
13
| import { createApp } from 'vue'
import './style.css'
import App from './App.vue'
import router from './router'
import { createPinia } from 'pinia'
import ElementPlus from 'element-plus'
import 'element-plus/dist/index.css'
createApp(App)
.use(router)
.use(createPinia())
.use(ElementPlus)
.mount('#app')
|
router/index.js
定义好路由路径划分
1
2
3
4
5
6
7
8
9
10
11
12
13
14
15
16
17
18
19
20
| import { createRouter, createWebHistory } from 'vue-router'
import Home from '../components/Home.vue'
import AddNews from '../components/AddNews.vue'
import NewsList from '../components/NewsList.vue'
import NotFound from '../components/NotFound.vue'
const routes = [
{ path: '/home', component: Home },
{ path: '/news/addnews', component: AddNews },
{ path: '/news/newslist', component: NewsList },
{ path: '/:pathMatch(.*)*', component: NotFound },
{ path: '/', redirect: 'home' },
]
const router = createRouter({
history: createWebHistory(),
routes,
})
export default router
|
App.vue
使用组件 Container 布局容器
- index 推荐写成与路由一样的 path 内容,方便跳转使用
:default-active="route.fullPath" 开启 router 模式则会跳转 index 的 path- el-main: 主要内容区域,即点击菜单展示的区域,放
<router-view> 用于显示路由加载的组件
1
2
3
4
5
6
7
8
9
10
11
12
13
14
15
16
17
18
19
20
21
22
23
24
25
26
27
28
29
30
31
32
33
34
35
36
37
38
39
40
41
42
43
44
45
46
47
48
49
50
51
52
53
54
55
56
57
| <template>
<el-container class="layout-container-demo" style="height: 100vh">
<el-aside width="200px">
<el-scrollbar>
<!-- 文档中有说明:开启 router 模式则会跳转 index 的 path -->
<el-menu :router="true" :default-active="route.fullPath">
<!-- index推荐写成与路由一样的 path 内容,方便跳转使用 -->
<el-menu-item index="/home">
<el-icon><HomeFilled /></el-icon><span>首页</span>
</el-menu-item>
<el-sub-menu index="/news">
<template #title>
<el-icon><message /></el-icon>新闻管理
</template>
<el-menu-item index="/news/addnews">创建新闻</el-menu-item>
<el-menu-item index="/news/newslist">新闻列表</el-menu-item>
</el-sub-menu>
</el-menu>
</el-scrollbar>
</el-aside>
<el-container>
<el-header>
<div>新闻系统首页</div>
<div>欢迎 jerry 回来</div>
</el-header>
<!-- main: 主要内容区域,即点击菜单展示的区域 -->
<el-main>
<el-scrollbar>
<router-view></router-view>
</el-scrollbar>
</el-main>
</el-container>
</el-container>
</template>
<script setup>
import { Menu as IconMenu, Message, Setting, HomeFilled } from "@element-plus/icons-vue"
import { useRoute } from "vue-router";
const route = useRoute() // 用于侧边栏动态绑定和高亮显示 :default-active
</script>
<style scoped>
*{
margin: 0;
padding: 0;
}
.el-header{
background: lightcyan;
display: flex;
justify-content: space-between;
align-items: center;
}
</style>
|
效果:

Home.vue
使用 Carousel 走马灯/轮播图 和 Layout 布局
1
2
3
4
5
6
7
8
9
10
11
12
13
14
15
16
17
18
19
20
21
22
23
24
25
26
27
28
29
30
31
32
33
34
35
36
37
38
39
| <template>
<!-- Carousel 走马灯/轮播图 -->
<el-carousel :interval="4000" type="card" height="200px">
<el-carousel-item v-for="item in 6" :key="item">
<h3 text="2xl" justify="center">{{ item }}</h3>
</el-carousel-item>
</el-carousel>
<!-- Layout 布局 -->
<el-row :gutter="20">
<el-col :span="8">
<div>公司介绍</div>
</el-col>
<el-col :span="8">
<div>公司产品</div>
</el-col>
<el-col :span="8">
<div>个人介绍</div>
</el-col>
</el-row>
</template>
<style scoped>
.el-carousel__item h3 {
color: #475669;
opacity: 0.75;
line-height: 200px;
margin: 0;
text-align: center;
}
.el-carousel__item:nth-child(2n) {
background-color: #99a9bf;
}
.el-carousel__item:nth-child(2n + 1) {
background-color: #d3dce6;
}
</style>
|
效果:同上。
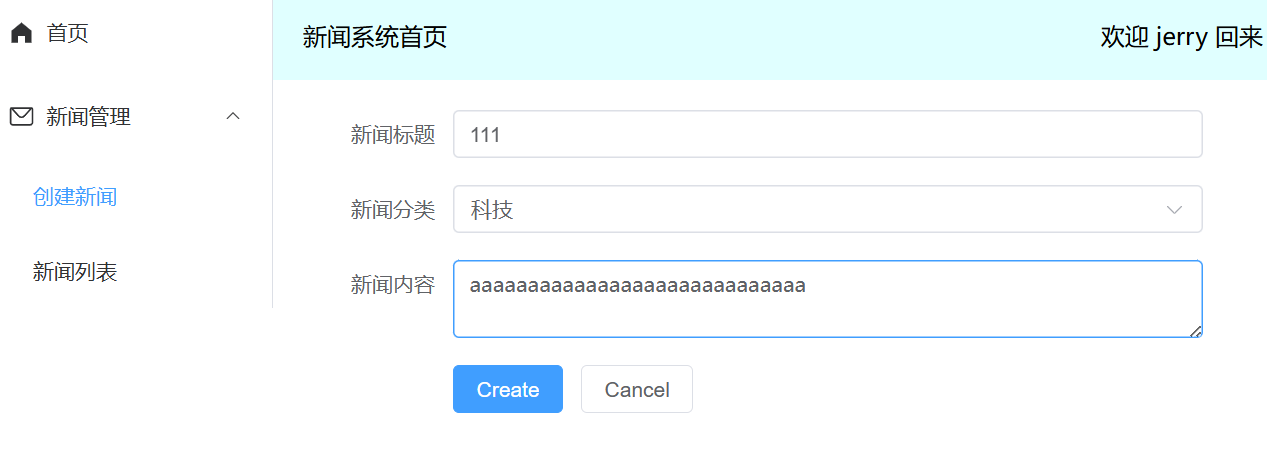
AddNews.vue
使用 form 表单
label-width需要指定宽度,否则会有警告信息:ElementPlusError: [ElForm] unexpected width 0onSubmit 提交事件处理
1
2
3
4
5
6
7
8
9
10
11
12
13
14
15
16
17
18
19
20
21
22
23
24
25
26
27
28
29
30
31
32
33
34
35
36
37
38
39
40
41
42
43
44
45
| <template>
<!-- label-width需要指定宽度,否则会有警告信息:ElementPlusError: [ElForm] unexpected width 0 -->
<el-form :model="form" label-width="100px" style="max-width: 600px">
<el-form-item label="新闻标题">
<el-input v-model="form.title" />
</el-form-item>
<el-form-item label="新闻分类">
<el-select v-model="form.type" placeholder="请选择新闻分类...">
<el-option label="科技" value="keji" />
<el-option label="明星" value="mingxing" />
<el-option label="经济" value="jingji" />
</el-select>
</el-form-item>
<el-form-item label="新闻内容">
<el-input v-model="form.desc" type="textarea" />
</el-form-item>
<el-form-item>
<el-button type="primary" @click="onSubmit">Create</el-button>
<el-button>Cancel</el-button>
</el-form-item>
</el-form>
</template>
<script setup>
import { reactive } from "vue"
import useNewsStore from "../store/newsStore"
import { useRouter } from "vue-router"
const newsStore = useNewsStore()
const router = useRouter()
// do not use same name with ref
const form = reactive({
title: "",
type: "",
desc: "",
})
const onSubmit = () => {
console.log("submit!")
console.log(form.title, form.type, form.desc)
newsStore.addNews(form)
router.push('/news/newslist')
}
</script>
|
效果:
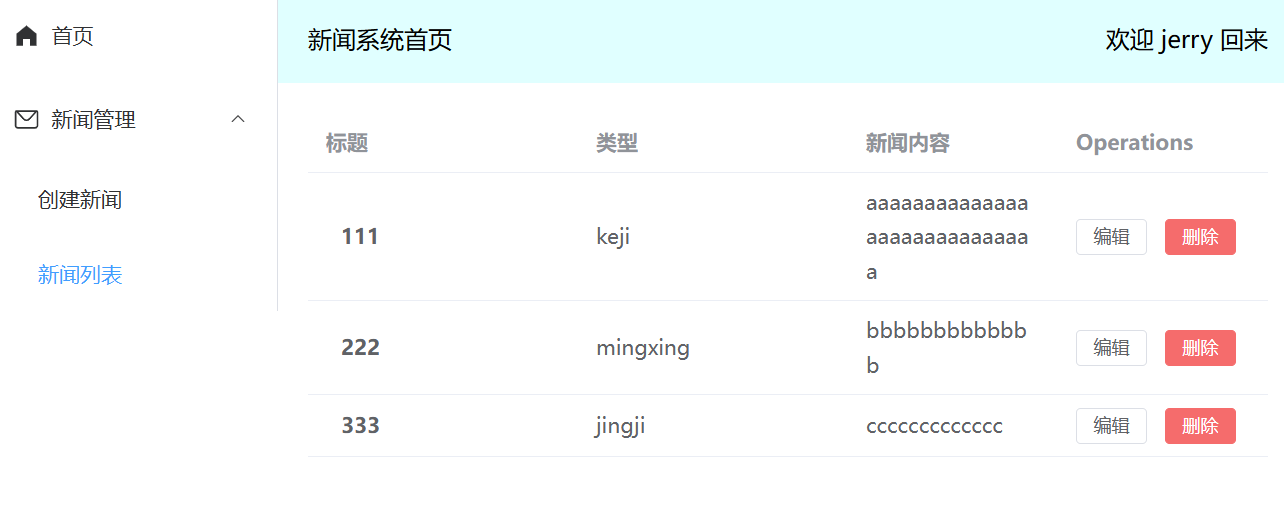
NewsList.vue
使用 Table 表格 基础表格+自定义列模版
<template #default="scope"> 中的内容为 自定义列模版,可灵活使用。
1
2
3
4
5
6
7
8
9
10
11
12
13
14
15
16
17
18
19
20
21
22
23
24
25
26
27
28
29
30
31
| <template>
<el-table :data="newsStore.newsList" style="width: 100%">
<!-- <el-table-column prop="title" label="标题" width="180" /> -->
<el-table-column prop="title" label="标题" width="180">
<template #default="scope">
<b style="margin-left: 10px">{{ scope.row.title }}</b>
</template>
</el-table-column>
<el-table-column prop="type" label="类型" width="180" />
<el-table-column prop="desc" label="新闻内容" />
<el-table-column label="Operations">
<template #default="scope">
<el-button size="small" @click="handleEdit(scope.$index, scope.row)"> 编辑 </el-button>
<el-button size="small" type="danger" @click="handleDelete(scope.$index, scope.row)"> 删除 </el-button>
</template>
</el-table-column>
</el-table>
</template>
<script setup>
import useNewsStore from "../store/newsStore"
const newsStore = useNewsStore()
const handleEdit = (index, row) => {
console.log("edit:", index, row.title, row.type, row.desc)
}
const handleDelete = (index, row) => {
console.log("delete:", index, row.title)
}
</script>
|
效果:
store/newsStore.js
- 使用 pinia 公共状态管理。
xxxList.value.push({...value}) 展开操作是为了防止 form 提交过来的是引用数据,导致多次提交值都一样的问题。
1
2
3
4
5
6
7
8
9
10
11
12
13
14
15
| import { defineStore } from "pinia";
import { ref } from "vue";
const useNewsStore = defineStore('news', () => {
const newsList = ref([])
const addNews = (value) => {
newsList.value.push({...value})
}
return {
newsList,
addNews
}
})
export default useNewsStore
|
