14-Vant

image-20200723170734421

1. vant - 移动端

vant,有赞技术团队推出的 vue 前端框架,主要用于移动端。

官网:https://vant-ui.github.io/vant/#/zh-CN

源码:https://github.com/youzan/vant

1.1 安装

现有项目中使用,通过如下命令安装。

1
2
3
4
5
# Vue 3 项目,安装最新版 Vant:
npm i vant

# Vue 2 项目,安装 Vant 2,如果有报错使用 -f 强制安装(如2.13.9):
npm i vant@latest-v2

1.2 引入

全局注册

vue2 - main.js 全局注册&全量注册

1
2
3
4
5
import Vue from 'vue';
import Vant from 'vant';
import 'vant/lib/index.css';

Vue.use(Vant);

vue3 - main.js 全局注册Button组件

1
2
3
4
5
6
7
import { createApp } from 'vue'
import { Button } from 'vant' //vant4 1. 引入你需要的组件
import 'vant/lib/index.css' //vant4 2. 引入组件样式(不论全局还是局部都需要引入)

createApp(App)
.use(Button) //引入vant4 Button组件
.mount('#app')

局部注册

注意: main.js 需要确认全局引入 import 'vant/lib/index.css' 样式

vue3 - option 方式

1
2
3
4
5
6
7
import { Button } from 'vant';

export default {
components: {
[Button.name]: Button, //Button.name === "van-button"
},
};

vue3 - setup 方式(导入最好重命名,就可以再复制其他组件demo代码时直接使用其标签规则 van-xxx)

1
2
3
4
5
6
7
<template>
<van-button type="warning">警告按钮</van-button>
</template>

<script setup>
import { Button as vanButton } from "vant"
</script>

1.3 验证使用

NavBar 导航栏(使用插槽自定义两侧内容) + Icon 图标(基础图标)

1
2
3
4
5
6
7
8
9
10
11
12
13
14
15
16
17
18
19
20
21
22
23
24
25
26
27
28
29
30
31
32
33
34
35
36
37
38
39
<template>
<div>
<van-nav-bar title="影院" @click-left="onClickLeft" @click-right="onClickRight" ref="navbar">
<template #left>
深圳
<van-icon name="arrow-down" />
</template>
<template #right>
<van-icon name="search" size="22" color="black" />
</template>
</van-nav-bar>
...
</div>
</template>

<script>
...
import { Toast } from 'vant';

export default {
...data...
mounted() {
// 动态计算高度: 视口高度 - 底部选项卡高度, 注意一定要加单位 'px'
this.height =
document.documentElement.clientHeight -
this.$refs.navbar.$el.offsetHeight - //还需要减去顶部的高度
document.querySelector("footer").offsetHeight +
"px";
},
methods: {
onClickLeft() {
Toast("返回");
},
onClickRight() {
Toast("搜索");
},
},
};
</script>

效果:

image-20251226112537788

Swipe 轮播

1
2
3
4
5
6
7
8
9
10
11
12
13
14
15
16
17
18
19
20
21
22
23
24
25
26
27
28
29
30
31
32
33
34
35
36
<template>
<div>
<van-swipe class="my-swipe" :autoplay="3000" indicator-color="white" lazy-render>
<van-swipe-item v-for="image in images" :key="image">
<img :src="image" />
</van-swipe-item>
</van-swipe>
</div>
</template>

<script setup>
import {ref} from 'vue'
import { Swipe as vanSwipe, SwipeItem as vanSwipeItem } from "vant" //局部注册轮播(重命名很重要!)

const images = ref([
'https://fastly.jsdelivr.net/npm/@vant/assets/apple-1.jpeg',
'https://fastly.jsdelivr.net/npm/@vant/assets/apple-2.jpeg',
'https://fastly.jsdelivr.net/npm/@vant/assets/apple-3.jpeg',
])
</script>

<style lang="scss" scoped>
.my-swipe .van-swipe-item {
color: #fff;
font-size: 20px;
line-height: 150px;
text-align: center;
background-color: #39a9ed;
img{
display: block;
width: 100%;
height: 150px;
box-sizing: border-box;
}
}
</style>

1.4 注意事项(★)

  1. 标签名称:使用 vant 导入时进行重命名,就可以在复制其他组件 demo 代码时直接使用其原标签。
1
2
3
4
5
6
7
<template>
<van-button type="primary">主要按钮</van-button>
</template>

<script setup>
import { Button as vanButton } from "vant"
</script>
  1. 样式引入:不论全局注册还是局部注册,main.js 中都需要确认全局引入其样式文件
1
import 'vant/lib/index.css'
  1. 样式覆盖:如果要覆盖其默认样式,使用 :deep(选择器) 进行深度选择,如覆盖 Cell单元格的内容样式 :deep(.van-cell__value) {...}
1
2
3
4
5
6
7
8
<style lang="scss" scoped>
:deep(.van-cell__value) {
text-align: left;
}
.a :deep(.b) { /* 该行代码被编译为: .a[data-v-a1b2c3d] .b { */
/* ... */
}
</style>

案例:IndexBar 索引栏

效果:

localhost_5173_cinemas(iPhone SE)

city.vue

1
2
3
4
5
6
7
8
9
10
11
12
13
14
15
16
17
18
19
20
21
22
23
24
25
26
27
28
29
30
31
32
33
34
35
36
37
38
39
40
41
42
43
44
45
46
47
48
49
50
51
52
53
54
55
56
57
58
59
60
61
62
63
64
65
66
67
68
69
70
71
72
73
74
75
76
77
78
79
80
81
82
83
84
85
86
87
<template>
<div>
<!-- Vant索引栏组件:绑定计算后的字母索引列表 -->
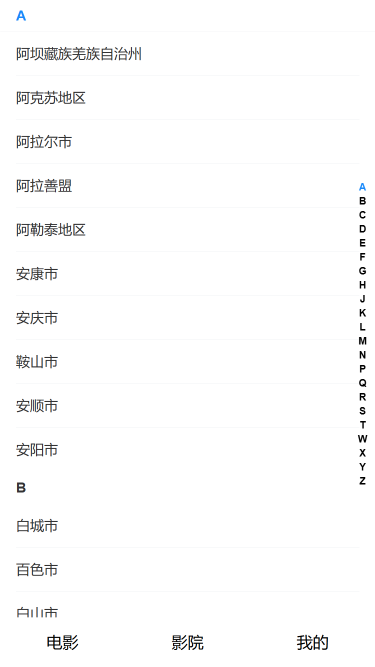
<van-index-bar :index-list="computedIndexList">
<!-- 循环渲染按字母分组后的城市数据 -->
<div v-for="item in cityList" :key="item.type">
<!-- 索引锚点:与右侧字母索引联动,点击索引跳转到对应锚点位置 -->
<van-index-anchor :index="item.type" />
<!-- 城市列表项:点击触发城市选择逻辑 -->
<van-cell v-for="data in item.list" :key="data.cityId" :title="data.name" @click="handleCityChange(data)" />
</div>
</van-index-bar>
</div>
</template>

<script setup>
import axios from "axios"
import { onMounted, ref, computed } from "vue" // 导入Vue3核心API:生命周期、响应式、计算属性
import _ from "lodash" // 导入lodash:用于数组分组
import { IndexBar as vanIndexBar, IndexAnchor as vanIndexAnchor, Cell as vanCell } from "vant" // 导入Vant4索引栏相关组件
import useCityStore from "../store/cityStore" // 导入城市状态管理仓库(Pinia)
import { useRouter } from "vue-router" // 导入VueRouter:用于页面跳转

const cityStore = useCityStore() // 初始化Pinia仓库:用于存储选中的城市信息
const router = useRouter() // 初始化路由实例:用于返回上一页

const cityList = ref([]) // 响应式数据:存储按字母分组后的城市列表(格式:[{type: 'A', list: [城市1, 城市2]}, ...])

// 生命周期:组件挂载完成后执行(获取城市列表数据)
onMounted(async () => {
try {
// 调用第三方接口获取原始城市列表数据
let res = await axios({
url: "https://m.maizuo.com/gateway", // 城市列表接口地址
headers: {
"x-client-info": '{"a":"3000","ch":"1002","v":"5.2.1","e":"1766027790872690109906945"}',
"x-host": "mall.film-ticket.city.list",
},
})
// 对原始城市数据进行分组处理(按拼音首字母)
cityList.value = filterCity(res.data.data.cities)
} catch (error) {
// 接口请求失败容错:打印错误信息,避免页面崩溃
console.error("城市列表数据请求失败:", error)
}
})

/**
* 城市数据处理核心函数:将原始城市数组按拼音首字母分组
* @param {Array} cities - 原始城市列表(接口返回的未分组数据)
* @returns {Array} 按字母分组后的城市列表([{type: 'A', list: [城市项]}, ...])
*/
const filterCity = cities => {
// 1. 按城市拼音首字母排序(A-Z):通过首字母ASCII码差值排序
cities.sort(
(x, y) => x.pinyin.substring(0, 1).toUpperCase().charCodeAt() - y.pinyin.substring(0, 1).toUpperCase().charCodeAt()
)
// 2. lodash分组:按拼音首字母(大写)将城市分组为对象({A: [城市1,城市2], B: [城市3,...], ...})
const groupObj = _.groupBy(cities, item => item.pinyin.substring(0, 1).toUpperCase())
// 3. 转换分组对象为数组:适配Vant IndexBar组件的渲染格式
let newCities = []
for (const e in groupObj) {
newCities.push({
type: e, // 字母(A/B/C...)
list: groupObj[e], // 该字母下的所有城市
})
}
console.log("按字母分组后的城市数据:", newCities)
return newCities
}

// 计算属性:提取城市分组的字母列表(适配IndexBar的index-list属性)
// 响应式:当cityList变化时,自动更新索引列表
const computedIndexList = computed(() => cityList.value.map(item => item.type))

/**
* 城市选择事件处理函数
* @param {Object} data - 选中的城市对象(包含cityId/name等字段)
*/
const handleCityChange = ({ cityId, name }) => {
console.log("选中的城市ID/名称:", cityId, name)
// 1. 将选中的城市信息存入Pinia仓库(全局共享)
cityStore.changeCity(cityId, name)
// 2. 路由返回上一页(城市选择完成后返回原页面)
router.back()
}
</script>

cityStore.js

1
2
3
4
5
6
7
8
9
10
11
12
13
14
15
16
17
18
19
import { defineStore } from "pinia";
import { ref } from "vue";

const useCityStore = defineStore("city", () => {
const cityId = ref(110100)
const cityName = ref("北京")
const changeCity = (id, name) => {
cityId.value = id
cityName.value = name
}

return {
cityId,
cityName,
changeCity
}
})

export default useCityStore

main.js

1
2
3
4
5
6
7
8
9
10
11
import { createApp } from 'vue'
import './style.css'
import App from './App.vue'
import router from './router' //导入路由管理插件
import { createPinia } from 'pinia' //导入pinia插件
import 'vant/lib/index.css'; // vant4 引入组件样式(不论全局还是局部都需要引入)

createApp(App)
.use(router) //使用路由插件
.use(createPinia()) //使用pinia插件
.mount('#app')

14-Vant
https://janycode.github.io/2022/05/22/04_大前端/04_Vue/14-Vant/
作者
Jerry(姜源)
发布于
2022年5月22日
许可协议