
参考:
1. 介绍
Koa 是由 Express 团队设计的新 Web 框架,旨在为 Web 应用和 API 提供更小、更具表现力且更强大的基础。通过利用异步函数,Koa 允许您摆脱回调并大大增强错误处理能力。Koa 的核心不捆绑任何中间件,它提供了一套优雅的方法,使编写服务器变得快速而愉快。
2. 快速开始
2.1 安装
初始化:npm init - 初始化package.json
安装:npm i koa@2 - 安装koa2
2.2 使用
1
2
3
4
5
6
7
8
9
10
11
| const Koa = require("koa")
const app = new Koa()
app.use((ctx, next) => {
console.log(ctx.request.path);
ctx.body = "hello,world"
})
app.listen(3000)
|
2.3 req与res
请求方式:
Koa-router 请求方式: get 、 put 、 post 、 patch 、 delete 、 del ,而使用方法就是 router.方式() ,比如 router.get() 和 router.post() 。而 router.all() 会匹配所有的请求方法。
koa 中 request 和 response 可以省略,都在 ctx 上下文对象中。
| 请求 request |
响应 response |
ctx.header
ctx.headers
ctx.method
ctx.method=
ctx.url
ctx.url=
ctx.originalUrl
ctx.origin
ctx.href
ctx.path
ctx.path=
ctx.query
ctx.query=
ctx.querystring
ctx.querystring=
ctx.host
ctx.hostname
ctx.fresh
ctx.stale
ctx.socket
ctx.protocol
ctx.secure
ctx.ip
ctx.ips
ctx.subdomains
ctx.is()
ctx.accepts()
ctx.acceptsEncodings()
ctx.acceptsCharsets()
ctx.acceptsLanguages()
ctx.get() |
ctx.body
ctx.body=
ctx.status
ctx.status=
ctx.message
ctx.message=
ctx.length=
ctx.length
ctx.type=
ctx.type
ctx.headerSent
ctx.redirect()
ctx.attachment()
ctx.set()
ctx.append()
ctx.remove()
ctx.lastModified=
ctx.etag= |
2.4 对比express
洋葱模型

通常都会说 Koa 是洋葱模型,这重点在于中间件的设计。
因此如果我们想做接口耗时统计、错误处理 Koa 的这种中间件模式处理起来更方便些。
最后一点响应机制也很重要,Koa 不是立即响应,是整个中间件处理完成在最外层进行了响应,而 Express 则是立即响应。
【更轻量】
- koa 不提供内置的中间件;
- koa 不提供路由,而是把路由这个库分离出来了(koa/router)
【Context对象】
koa增加了一个Context的对象,作为这次请求的上下文对象(在koa2中作为中间件的第一个参数传入)。
同时Context上也挂载了Request和Response两个对象。和Express类似,这两个对象都提供了大量的便捷方法辅助开发, 这样的话对于在保存一些公有的参数的话变得更加合情合理。
【异步流程控制】
【中间件模型】
【同步 vs 异步】
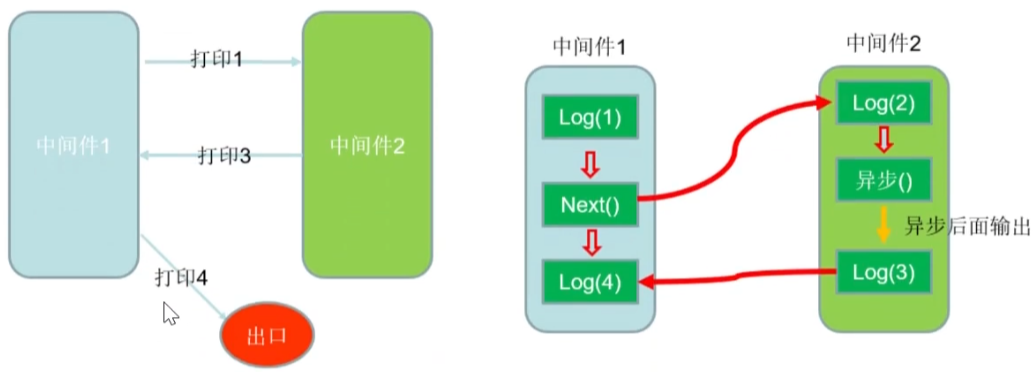
koa 异步示例:
1
2
3
4
5
6
7
8
9
10
11
12
13
14
15
16
17
18
19
20
21
22
23
24
25
| const Koa = require("koa")
const app = new Koa()
app.use(async (ctx, next) => {
if (ctx.url === "/.well-known/appspecific/com.chrome.devtools.json") return
console.log("111");
await next()
console.log("444", ctx.token);
ctx.body = "hello,world"
})
app.use(async (ctx, next) => {
console.log("222");
await delay(1000)
ctx.token = "abc123def456ghi789"
console.log("333");
})
function delay(timeout) {
return new Promise((resolve, reject) => {
setTimeout(resolve, timeout)
})
}
app.listen(3000)
|
输出:
111
222
333
444 abc123def456ghi789
3. 路由
3.1 安装
安装:npm i koa-router
使用示例:
1
2
3
4
5
6
7
8
9
10
11
12
13
14
15
16
17
18
19
20
| const Koa = require("koa")
const Router = require("koa-router")
const app = new Koa()
const router = new Router()
router.post("/list", (ctx, next) => {
ctx.body = { ok: 1, message: "add list success" }
}).del("/list/:id", (ctx, next) => {
ctx.body = { ok: 1, message: "del list success" }
}).put("/list/:id", (ctx, next) => {
console.log(ctx.params);
ctx.body = { ok: 1, message: "put list success" }
}).get("/list", (ctx, next) => {
ctx.body = ["111", "222", "333"]
})
app.use(router.routes()).use(router.allowedMethods())
app.listen(3000, () => {
console.log("server start");
})
|
router.allowedMethods()
Koa 框架中 koa-router 的一个中间件,用于处理 HTTP 方法不匹配的情况。当请求方法不被允许时,它会返回 405 Method Not Allowed 状态码,并在响应头中添加 Allow 字段,列出允许的请求方法。
3.2 拆分路由
1
2
3
4
5
6
| routes/
index.js
home.js
user.js
list.js
index.js
|
index.js
1
2
3
4
5
6
7
8
9
10
| const Koa = require("koa")
const router = require("./routes")
const app = new Koa()
app.use(router.routes()).use(router.allowedMethods())
app.listen(3000, () => {
console.log("server start");
})
|
routes/index.js
1
2
3
4
5
6
7
8
9
10
11
12
13
14
15
| const Router = require("koa-router")
const homeRouter = require("./home")
const userRouter = require("./user")
const listRouter = require("./list")
const router = new Router()
router.use("/home", homeRouter.routes(), homeRouter.allowedMethods())
router.use("/user", userRouter.routes(), userRouter.allowedMethods())
router.use("/list", listRouter.routes(), listRouter.allowedMethods())
router.redirect("/", "/home")
module.exports = router
|
routes/home.js
1
2
3
4
5
6
7
8
9
10
11
12
| const Router = require("koa-router")
const router = new Router()
router.get("/", (ctx, next) => {
ctx.body = `
<html>
<h1>home页面</h1>
</html>
`
})
module.exports = router
|
routes/user.js
1
2
3
4
5
6
7
8
9
10
11
12
13
14
15
| const Router = require("koa-router")
const router = new Router()
router.post("/", (ctx, next) => {
ctx.body = { ok: 1, message: "add user success" }
}).del("/:id", (ctx, next) => {
ctx.body = { ok: 1, message: "del user success" }
}).put("/:id", (ctx, next) => {
console.log(ctx.params);
ctx.body = { ok: 1, message: "put user success" }
}).get("/", (ctx, next) => {
ctx.body = ["aaa", "bbb", "ccc"]
})
module.exports = router
|
routes/list.js
1
2
3
4
5
6
7
8
9
10
11
12
13
14
15
| const Router = require("koa-router")
const router = new Router()
router.post("/", (ctx, next) => {
ctx.body = { ok: 1, message: "add list success" }
}).del("/:id", (ctx, next) => {
ctx.body = { ok: 1, message: "del list success" }
}).put("/:id", (ctx, next) => {
console.log(ctx.params);
ctx.body = { ok: 1, message: "put list success" }
}).get("/", (ctx, next) => {
ctx.body = ["111", "222", "333"]
})
module.exports = router
|
3.3 静态资源
安装:npm i koa-static
引入和注册:
1
2
3
4
5
| const Koa = require('koa')
const static = require("koa-static")
const path = require("path")
const app = new Koa()
app.use(static(path.join( __dirname, "public")))
|
目录:
1
2
3
4
| public/
css/
center.css
center.html
|
center.html
1
2
3
4
5
6
7
8
9
10
11
12
| <!DOCTYPE html>
<html lang="en">
<head>
<meta charset="UTF-8">
<meta name="viewport" content="width=device-width, initial-scale=1.0">
<title>Document</title>
<link rel="stylesheet" href="/css/center.css">
</head>
<body>
<div>center</div>
</body>
</html>
|
访问 http://localhost:3000/center.html 静态资源则被完全支持。
3.4 获取请求参数
get
在koa中,获取GET请求数据源头是koa中request对象中的query方法或querystring方法,query返回是格式化好的参数对象,querystring返回的是请求字符串,由于ctx对request的API有直接引用的方式,所以获取GET请求数据有两个途径。
是从上下文中直接获取
- 请求对象
ctx.query,返回如 { a:1, b:2 }
- 请求字符串
ctx.querystring,返回如 a=1&b=2
是从上下文的request对象中获取
- 请求对象
ctx.request.query,返回如 { a:1, b:2 }
- 请求字符串
ctx.request.querystring,返回如 a=1&b=2
使用:
1
2
3
4
5
6
7
8
9
10
| const Router = require("koa-router")
const router = new Router()
router.get("/", (ctx, next) => {
console.log("get 参数->", ctx.query);
console.log("get 参数->", ctx.querystring);
ctx.body = ["aaa", "bbb", "ccc"]
})
module.exports = router
|
post
对于POST请求的处理,koa-bodyparser 中间件可以把koa2上下文的 formData 数据解析到 ctx.request.body 中(request 不能省略)
安装:npm i koa-bodyparser
引入和注册:
1
2
3
4
5
| const Koa = require("koa")
const bodyParser = require("koa-bodyparser")
const app = new Koa()
app.use(bodyParser())
|
使用:
1
2
3
4
5
6
7
8
9
| const Router = require("koa-router")
const router = new Router()
router.post("/", (ctx, next) => {
console.log("post 参数->", ctx.request.body);
ctx.body = { ok: 1, message: "add user success" }
})
module.exports = router
|
4. 模板引擎 ejs
4.1 安装
安装:npm i koa-views ejs - 安装 koa-views 和 ejs 库
目录:
1
2
3
4
5
6
| ├── package.json
├── index.js
├── routes/
| └── home.js
└── view/
└── home.ejs
|
引入和注册:
1
2
3
4
5
6
7
| const Koa = require("koa")
const path = require("path")
const views = require("koa-views")
const app = new Koa()
app.use(views(path.join(__dirname, "views"), { extension: "ejs" }))
|
4.2 使用
home.js
1
2
3
4
5
6
7
8
| const Router = require("koa-router")
const router = new Router()
router.get("/", async (ctx, next) => {
await ctx.render("home", { username: "jerry" })
})
module.exports = router
|
home.ejs
1
2
3
4
5
6
7
8
9
10
| <!DOCTYPE html>
<html>
<head>
<title><%= title %></title>
</head>
<body>
<h1>home<%= title %>页面</h1>
<div>欢迎 <%= username %> 回来!</div>
</body>
</html>
|
5. Cookie & Session
5.1 Cookie
koa提供了从上下文直接读取、写入 cookie 的方法。
ctx.cookies.get(name, [options]) 读取上下文请求中的cookie
ctx.cookies.set(name, value, [options]) 在上下文中写入cookie
routes/login.js - 示例
1
2
3
4
5
6
7
8
9
10
11
12
13
14
15
| const Router = require("koa-router")
const router = new Router()
router.get("/", async (ctx, next) => {
console.log(ctx.cookies.get("age"))
console.log(ctx.cookies.get("location"))
ctx.cookies.set("name", "jerry")
await ctx.render("login", { title: '登陆', username: "jerry" })
})
module.exports = router
|
5.2 Session
koa-session-minimal 适用于koa2 的session中间件,提供存储介质的读写接口 。
安装:npm i koa-session-minimal
引入和注册、拦截配置 示例:
1
2
3
4
5
6
7
8
9
10
11
12
13
14
15
16
17
18
19
20
21
22
23
24
25
26
27
28
29
30
31
32
33
| const Koa = require("koa")
const router = require("./routes")
const session = require("koa-session-minimal")
const app = new Koa()
app.use(session({
key: "jerrySessionId",
cookie: {
maxAge: 1000 * 60 * 60,
}
}))
app.use(async (ctx, next) => {
if (ctx.url.includes("login")) {
await next()
return
}
if (ctx.session.user) {
ctx.session.mydate = Date.now()
await next()
} else {
ctx.redirect("/login")
}
})
app.use(router.routes()).use(router.allowedMethods())
app.listen(3000, () => {
console.log("server start");
})
|
routes/user.js - login
1
2
3
4
5
6
7
8
9
10
11
12
13
14
15
16
| const Router = require("koa-router")
const router = new Router()
router.post("/login", (ctx, next) => {
console.log(ctx.request.body);
const { username, password } = ctx.request.body
if (username === "admin" && password === "123") {
ctx.session.user = { username }
ctx.body = { ok: 1 }
} else {
ctx.body = { ok: -1 }
}
})
module.exports = router
|
views/login.ejs
1
2
3
4
5
6
7
8
9
10
11
12
13
14
15
16
17
18
19
20
21
22
23
24
25
26
27
28
29
30
31
32
33
34
35
36
37
38
| <div>
<div>用户名:
<input type="text" id="username">
</div>
<div>密码:
<input type="text" id="password">
</div>
<div>
<button id="login_post">登陆-post</button>
</div>
</div>
<script>
var ologinPost = document.querySelector("#login_post")
var username = document.querySelector("#username")
var password = document.querySelector("#password")
ologinPost.onclick = () => {
console.log(username.value, password.value);
fetch(`/user/login`, {
method: "POST",
body: JSON.stringify({
username: username.value,
password: password.value
}),
headers: {
"content-type": "application/json"
}
}).then(res => res.json())
.then(res => {
console.log(res);
if (res.ok === 1) {
location.href = "/"
} else {
alert("账号或密码错误!")
}
})
}
</script>
|
6. JWT
安装:npm i jsonwebtoken@9
引入和使用封装工具类 JWT.js
1
2
3
4
5
6
7
8
9
10
11
12
13
14
15
16
17
| const jwt = require("jsonwebtoken")
const secret = "jerry-anydata"
const JWT = {
generate(value, expires) {
return jwt.sign(value, secret, { expiresIn: expires })
},
verify(token) {
try {
return jwt.verify(token, secret)
} catch (error) {
console.error(error.message);
return false
}
}
}
module.exports = JWT
|
index.js - token 判断和拦截,注意 async+await 同步拦截
1
2
3
4
5
6
7
8
9
10
11
12
13
14
15
16
17
18
19
20
21
22
23
24
25
26
| app.use(async (ctx, next) => {
if (ctx.url.includes("login")) {
await next()
return
}
const token = ctx.headers["authorization"]?.split(" ")[1]
if (token) {
const payload = JWT.verify(token)
if (payload) {
const newToken = JWT.generate({
_id: payload._id,
username: payload.username
}, "1h")
ctx.set("Authorization", newToken)
await next()
} else {
ctx.status = 401
ctx.body = { errCode: -1, errInfo: "token过期" }
}
} else {
await next()
}
})
|
login.js - 登陆成功时,返回到 header 中 token 值(jwt加密生成的内容)
1
2
3
4
5
6
7
8
9
10
11
12
13
14
15
| router.post("/login", (ctx, next) => {
console.log(ctx.request.body);
const { username, password } = ctx.request.body
if (username === "admin" && password === "123") {
const token = JWT.generate({
username: username
}, "10s")
ctx.set("Authorization", token)
ctx.body = { ok: 1 }
} else {
ctx.body = { ok: -1 }
}
})
|
7. 上传文件
文档:@koa/multer
安装:npm i @koa/multer multer - Don’t forget the enctype="multipart/form-data" in your form.
引入和使用:routes/user.js
1
2
3
4
5
6
7
8
9
10
| const multer = require('@koa/multer');
const upload = multer({ dest: 'public/uploads/' })
router.post("/", upload.single('avatar'), (ctx, next) => {
console.log(ctx.request.body, ctx.file)
ctx.body = {
ok: 1,
info: "add user success"
}
})
|
8. 操作MongoDB
安装
安装:npm i mongoose@6
引入和连接 mongoDB:
1
2
| const mongoose = require("mongoose")
mongoose.connect("mongodb://127.0.0.1:27017/jerry_project")
|
1
2
3
4
5
6
7
8
9
10
11
12
| const mongoose = require("mongoose")
const Schema = mongoose.Schema
const UserType = {
username:String,
password:String,
age:Number,
avatar:String
}
const UserModel = mongoose.model("user",new Schema(UserType))
module.exports = UserModel
|
使用
使用方式与 express 一样,没有差异,参考 express 与 mongodb 使用。
