18_SpringBoot动态数据源实现

1. 多套数据源
一句话概括:Spring Boot开发中连接多个数据库进行读写操作,使用多套数据源是最直接、简单的方式。
在开发过程中,避免不了需要同时操作多个数据库的情况,通常的应用场景如下 :
- 数据库高性能场景:主从,包括一主一从,一主多从等,在主库进行增删改操作,在从库进行读操作。
- 数据库高可用场景:主备,包括一往一备,多主多备等,在数据库无法访问时可以切换。
- 同构或异构数据的业务处理:需要处理的数据存储在不同的数据库中,包括同构(如都是 MySQL ),异构(如一个MySQL ,另外是 PG 或者 Oracle )。
使用 Spring Boot 该如何处理多个数据库的读写,一般有以下几种策略:
- 多套数据源:即针对一个数据库建立一套数据处理逻辑,每套数据库都包括数据源配置、会话工厂( sessionFactory )、连接、SQL 操作、实体。各套数据库相互独立。
- 动态数据源:确定数量的多个数据源共用一个会话工厂,根据条件动态选取数据源进行连接、SQL 操作。
- 参数化变更数据源:根据参数添加数据源,并进行数据源切换,数据源数量不确定。通常用于对多个数据库的管理工作。
1.1 运行环境
- JAVA 运行环境:
JDK1.8 - Spring Boot:
2.2.2.RELEASE - MyBatis Plus:
3.3.0 - 开发IDE:
IDEA - 构建工具Maven:
3.3.9 - MySQL :
5.6.26 - Lombok:
1.18.10
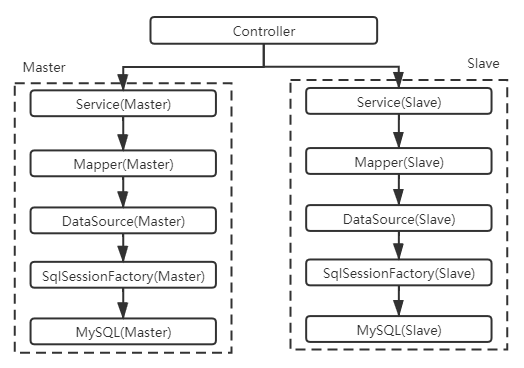
1.2 多套数据源搭建
多套数据源,顾名思义每一个数据库有一套独立的操作。从下往上,数据库、会话工厂、DAO操作,服务层都是独立的一套,如下所示:
sql 示例:
1 | |
1.2.1 搭建 Spring Boot 工程
1.2.1.1 初始化 Spring Boot 工程
使用 spring.io 构建初始 Spring Boot 工程,选用以下几个构件:
- Lombok: 用于简化操作
- Spring Configuration Processor:配置文件处理器
- Spring Web: 用于构建web服务
- MySQL Driver: 数据库驱动
1.2.1.2 添加 MyBatis Plus 依赖
MyBatis Plus 是对 MyBatis 增强,简化 DAO 操作,提高数据库操作效率。依赖如下:
1 | |
1.2.1.3 添加包结构
主要添加以下几个包:
1 | |
注:
- 由于示例简单,省略service层
- 实体类及mapper均根据主从进行划分
1.2.2 多套数据源
1.2.2.1 独立数据库连接信息
Spring Boot 的默认配置文件是 application.properties ,由于有两个数据库配置,独立配置数据库是好的实践,因此添加配置文件 jbdc.properties ,添加以下自定义的主从数据库配置:
1 | |
1.2.2.2 多套数据源配置
有了数据源连接信息,需要把数据源注入到 Spring 中。由于每个数据库使用独立的一套数据库连接,数据库连接使用的 SqlSession 进行会话连接,SqlSession 是由SqlSessionFactory 生成。因此,需要分别配置SqlSessionFactory 。以下操作均在 config 目录 下:
(1)添加 DataSourceConfig 配置文件,注入主从数据源
1 | |
- 注解
PropertySource指定配置信息文件- 注解
ConfigurationProperties指定主从配置前缀- 分别指定主从数据源的 bean 名称为
master,slave
(2)添加 MasterMybatisConfig 配置文件,注入 Master 的SqlSessionFactory
1 | |
- 注解
MapperScan指定那些包下的mapper使用本数据源,并指定使用哪个SqlSessionFactory,注意,此处的sqlSessionFactoryRef即本配置中的注入的SqlSessionFactory。- 设置指定的数据源,此处是名为
master的数据源,使用Qualifier指定。- MyBatis Plus 对应的 Mapper 若有自定义的 mapper.xml, 则使用
setMapperLocations指定。- 若需要对实体进行别名处理,则使用
setTypeAliasesPackage指定。
(3)添加 SlaveMybatisConfig 配置文件,注入Slave 的 SqlSessionFactory 与(2)一致,把 master 改为 slave即可。
1.2.2.3 多套实体
在 MyBatis 配置中,实体设置 typeAliases 可以简化 xml 的配置,前面提到,使用 typeAliasesPackage 设置实体路径,在 entity 包下分别设置 master 和 slave 包,存放两个库对应的表实体,使用 Lombok 简化实体操作。如下:
1 | |
1.2.2.4 多套Mapper操作
在 mapper 包下,分别添加 master 和 slave 包,存放两个库对应的 Mapper ,由于 MyBatis Plus 本身已包含基本的 CRUD 操作,所以很多时候可以不用 xml 文件配置。若需要自定义操作,需要结合 xml文件,与此同时需要指定对应的 xml 文件所在目录。如下:
1 | |
slave对应的Mapper与此类似
1.2.2.5 多套 mapper xml 文件
MyBatis Plus 的默认mapper xml 文件路径为 classpath*:/mapper/**/*.xml,即 resources/mapper 下,同样设置 master 及 slave 目录,分别存放对应的mapper xml 文件。以下是 master 的自定义操作:
1 | |
1.2.3 多数据源使用
经过上面的多套数据源配置,可知道,若需要操作哪个数据库,直接使用对应的 mapper 进行 CRUD 操作即可。如下为 Controller 中分别查询两个库,获取到的数据合在一起返回:
1 | |
- 使用Autowired注解注入对应的mapper
- 使用对应数据库的 mapper 进行业务操作
- 根据业务在数据库中执行相应的操作,如主只做增删改操作、从只读操作
至此,多数据源的实现已完成,当前示例是两个同构的数据库,当然,若是异构的数据库,或者多于两个的数据库,处理方式是一样的,只不过是把数据源增加一套而已。
1.3 优缺点
优点
- 简单、直接:一个库对应一套处理方式,很好理解。
- 符合开闭原则( OCP ):开发的设计模式告诉,对扩展开放,对修改关闭,添加多一个数据库,原来的那一套不需要改动,只添加即可。
缺点
- 资源浪费:针对每一个数据源写一套操作,连接数据库的资源也是独立的,分别占用同样多的资源。
SqlSessionFactory是一个工厂,建议是使用单例,完全可以重用,不需要建立多个,只需要更改数据源即可,跟多线程,使用线程池减少资源消耗是同一道理。 - 代码冗余:在前面的多数据源配置中可以看出,其实 master 和 slave 的很多操作是一样的,只是改个名称而已,因此会造成代码冗余。
- 缺乏灵活:所有需要使用的地方都需要引入对应的mapper,对于很多操作,只是选择数据源的不一样,代码逻辑是一致的。另外,对于一主多从的情况,若需要对多个从库进行负载均衡,相对比较麻烦。
正因为有上述的缺点,所以还有改进的空间,于是就有了动态数据源。
2. 动态数据源
一句话概括:使用动态数据源对多个数据库进行操作,灵活,简洁。
在大型应用程序中,配置主从数据库并使用读写分离是常见的设计模式。在Spring应用程序中,要实现读写分离,最好不要对现有代码进行改动,而是在底层透明地支持。
Spring内置了一个
AbstractRoutingDataSource,它可以把多个数据源配置成一个Map,然后,根据不同的key返回不同的数据源。因为AbstractRoutingDataSource也是一个DataSource接口,因此,应用程序可以先设置好key, 访问数据库的代码就可以从AbstractRoutingDataSource拿到对应的一个真实的数据源,从而访问指定的数据库。
动态数据源可以解决多套数据源的处理不够灵活、占用资源多等问题。用户可以根据实际的业务需要,统一操作逻辑,只要在需要切换数据源的进行处理即可。何为动态,其实是批切换数据源的时机可以动态选择,在需要的地方进行切换即可。
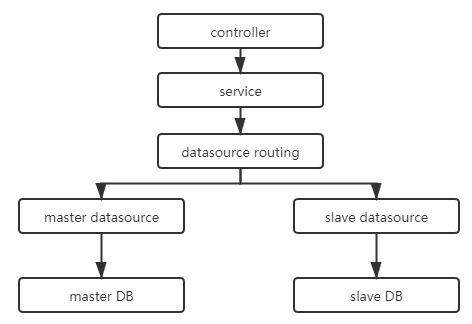
2.1 动态数据源流程说明
Spring Boot 的动态数据源,本质上是把多个数据源存储在一个 Map 中,当需要使用某个数据源时,从 Map 中获取此数据源进行处理。而在 Spring 中,已提供了抽象类 AbstractRoutingDataSource 来实现此功能。因此,在实现动态数据源的,只需要继承它,实现自己的获取数据源逻辑即可。动态数据源流程如下所示:
用户访问应用,在需要访问不同的数据源时,根据自己的数据源路由逻辑,访问不同的数据源,实现对应数据源的操作。本示例中的两数据库的分别有一个表 test_user,表结构一致,为便于说明,两个表中的数据是不一样的。两个表结构:
1 | |
2.2 实现动态数据源
2.2.1 说明及数据源配置
2.2.1.1 包结构说明
1 | |
2.2.1.2 数据库连接信息配置
Spring Boot 的默认配置文件是 application.properties ,由于有两个数据库配置,独立配置数据库是好的实践,因此添加配置文件 jbdc.properties ,添加以下自定义的主从数据库配置:
1 | |
2.2.1.3 数据源配置
根据连接信息,把数据源注入到 Spring 中,添加 DynamicDataSourceConfig 文件,配置如下:
1 | |
注意:
- 此处使用
PropertySource指定配置文件,ConfigurationProperties指定数据源配置前缀- 使用
MapperScan指定包,自动注入相应的 mapper 类- 把数据源常量写在
DataSourceConstants类中- 从此配置可以看到,已经把 SqlSessionFactory 这个配置从代码中擦除,直接使用 Spring Boot 自动配置的 SqlSessionFactory 即可,无需自己配置
2.2.2 动态数据源设置
前面的配置已把多个数据源注入到 Spring 中,接着对动态数据源进行配置。
2.2.2.1 动态数据源配置
(1)添加jdbc依赖
1 | |
(2)添加动态数据源类
1 | |
注意:
- 继承抽象类
AbstractRoutingDataSource,需要实现方法determineCurrentLookupKey,即路由策略- 动态路由策略下一步实现,当前策略直接返回 master 数据源
(3) 设置动态数据源为主数据源
在前面的数据源配置文件 DynamicDataSourceConfig 中,添加以下代码:
1 | |
- 使用 Map 保存多个数据源,并设置到动态数据源对象中
- 设置默认的数据源是 master 数据源
- 使用注解
Primary优先从动态数据源中获取
同时,需要在 DynamicDataSourceConfig 中,排除 DataSourceAutoConfiguration 的自动配置,否则 会出现The dependencies of some of the beans in the application context form a cycle的错误。
1 | |
2.2.2.2 动态选择数据源
**(1) 数据源 key 的上下文 **
前面固定写了一个数据源路由策略,总是返回 master,显然不是想要的。想要的是在需要的地方,想切换就切换。因此,需要有一个动态获取数据源 key 的地方(称为上下文),对于 web 应用,访问以线程为单位,使用 ThreadLocal 就比较合适,如下:
1 | |
- 以 DATASOURCE_CONTEXT_KEY_HOLDER 存储需要使用数据源 key
- getContextKey 时,若 key 为空,默认返回 master
(2) 设置动态数据 DynamicDataSource 路由策略
需要达到的路由策略是,当设置数据源 key 到上下文,则从上下文中得到此数据源 key ,从而知道使用此对应的数据源。因此,修改前面 DynamicDataSource 的 determineCurrentLookupKey 方法如下:
1 | |
2.2.2.3 动态数据源使用
有了上面的动态路由选择,则不需要像之前的多套数据源那样,mapper、entity、service等都写一套相同逻辑的代码,因为是主从,一般来说数据库结构是一致的,只需要一套entity、mapper、service即可,在需要在不同的数据源进行操作时,直接对上下文进行设置即可。如下:
1 | |
- 默认是使用 master 数据源查询
- 使用上下文的 setContextKey 来切换数据源,使用完后使用 removeContextKey 进行恢复
2.2.3 使用 AOP 选择数据源
经过上面的动态数据源配置,可以实现动态数据源切换,但会发现,在进行数据源切换时,都需要做 setContextKey 和 removeContextKey 操作,如果需要切换的方法比多,就会发现很多重复的代码,如何消除这些重复的代码,就需要用到动态代理了,在 Spring 中,AOP 的实现也是基于动态代理的。此处,希望通过注解的方式指定函数需要的数据源,从而消除数据源切换时产品的模板代码。
2.2.3.1 定义数据源注解
在annotation包中,添加数据源注解 DS,此注解可以写在类中,也可以写在方法定义中,如下所示:
1 | |
2.2.3.2 定义数据源切面
定义数据源切面,此切面可以针对使用了 DS 注解的方法或者类,进行数据源切换。
(1)添加aop依赖
1 | |
**(2) 定义切面 **
1 | |
- 注解 Pointcut 使用
annotation指定注解- 注解 Around 使用环绕通知处理,使用上下文进行对使用注解
DS的值进行数据源切换,处理完后,恢复数据源。
2.2.3.3 使用 AOP 进行数据源切换
在service层,定义一个 TestUserService ,里面有两个方法,分别是从 master 和 slave 中获取数据,使用了注解DS,如下:
1 | |
这样定义后,在 controller 层的处理就可以变成:
1 | |
由此可见,已经把数据库切换的模板代码消除,只需要关注业务逻辑处理即可,这就是AOP的好处。
3. 参数化变更数据源
一句话概括:参数化变更源意思是根据参数动态添加数据源以及切换数据源,解决不确定数据源的问题。
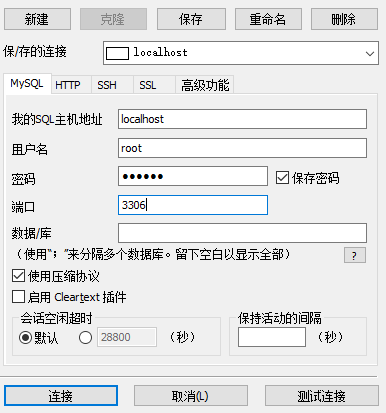
无论是多套源还是动态数据源,相对来说还是固定的数据源(如一主一从,一主多从等),即在编码时已经确定的数据库数量,只是在具体使用哪一个时进行动态处理。如果数据源本身并不确定,或者说需要根据用户输入来连接数据库,这时,如何处理呢?可以想象现在有一个需求,需要对数据库进行连接管理,用户可以输入对应的数据库连接信息,然后可以查看数据库有哪些表。这就跟平时使用的数据库管理软件有点类似了,如 MySQL Workbench、Navicat、SQLyog,下图是SQLyog截图:
1 | |
3.1 参数化变更源说明
3.1.1 解决思路
Spring Boot 的动态数据源,本质上是把多个数据源存储在一个 Map 中,当需要使用某个数据源时,从 Map 中获取此数据源进行处理。在动态数据源处理时,通过继承抽象类 AbstractRoutingDataSource 可实现此功能。既然是 Map ,如果有新的数据源,把新的数据源添加到此 Map 中就可以了。这就是整个解决思路。
但是,查看 AbstractRoutingDataSource 源码,可以发现,存放数据源的 Map targetDataSources 是 private 的,而且并没有提供对此 Map 本身的操作,它提供的是两个关键操作:setTargetDataSources 及 afterPropertiesSet 。其中 setTargetDataSources 设置整个 Map 目标数据源,afterPropertiesSet 则是对 Map 目标数据源进行解析,形成最终使用的 resolvedDataSources,可见以下源码:
1 | |
因此,为实现动态添加数据源到 Map 的功能,可以根据这两个关键操作进行处理。
3.1.2 流程说明
- 用户输入数据库连接参数(包括IP、端口、驱动名、数据库名、用户名、密码)
- 根据数据库连接参数创建数据源
- 添加数据源到动态数据源中
- 切换数据源
- 操作数据库
3.2 实现参数化变更源
下面的操作基于前面的工程。
3.2.1 改造动态数据源
3.2.1.1 动态数据源添加功能
为了可以动态添加数据源到 Map ,需要对动态数据源进行改造。如下:
1 | |
- 添加了自定义的
backupTargetDataSources作为原targetDataSources的拷贝- 自定义构造函数,把需要保存的目标数据源拷贝到自定义的 Map 中
- 添加新数据源时,依然使用
setTargetDataSources及afterPropertiesSet完成新数据源添加- 注意:
afterPropertiesSet的作用很重要,它负责解析成可用的目标数据源
3.2.1.2 动态数据源配置
原来在创建动态数据源时,使用的是无参数构造函数,经过前面改造后,使用有参构造函数,如下:
1 | |
3.2.2 添加数据源工具类
3.2.2.1 Spring 上下文工具类
在Spring Boot 使用过程中,经常会用到 Spring 的上下文,常见的就是从 Spring 的 IOC 中获取 bean 来进行操作。由于 Spring 使用的 IOC 基本上把 bean 都注入到容器中,因此需要 Spring 上下文来获取。在 context 包下添加 SpringContextHolder ,如下:
1 | |
通过 getContext 就可以获取上下文,进而操作。
3.2.2.2 数据源操作工具
通过参数添加数据源,需要根据参数构造数据源,然后添加到前面说的 Map 中。如下:
1 | |
- 通过
DataSourceBuilder及相应的参数来构造数据源,注意此处只针对 MySQL 作处理,其它数据库的话,对应的 url 及 DriveClassName 需作相应的变更。- 添加数据源时,通过 Spring 上下文获取动态数据源的 bean,然后添加。
3.2.3 使用参数变更数据源
前面两步已实现添加数据源,下面根据需求(根据用户输入的数据库连接信息,连接数据库,并返回数据库的表信息)。
3.2.3.1 添加查询数据库表信息的 Mapper
通过 MySQL 的 information_schema 可以获取表信息。
1 | |
3.2.3.2 定义数据库连接信息对象
把数据库连接信息通过一个类进行封装。
1 | |
3.2.3.3 参数化变更源并查询表信息
在 controller 层,定义一个查询表信息的接口,根据传入的参数,连接数据源,返回表信息:
1 | |
- 访问地址
http://localhost:8080/dd/table?ip=localhost&port=3310&dbName=mytest&username=root&password=111111,对应数据库连接参数。- 此处数据源的 key 是无意义的,建议根据实际场景设置有意义的值
3.3 动态代理消除模板代码
前面已经完成了参数化切换数据源功能,但还有一点就是有模板代码,如添加数据源、切换数据源、对此数据源进行CURD操作、释放数据源,如果每个地方都这样做,就很繁琐,这个时候,就需要用到动态代理了。此处使用 JDK 自带的动态代理,实现参数化变更数据源的功能,消除模板代码。
3.3.1 添加 JDK 动态代理
添加 proxy 包,添加 JdkParamDsMethodProxy 类,实现 InvocationHandler 接口,在 invoke 中编写参数化切换数据源的逻辑即可。如下:
1 | |
- 代码中,需要使用的参数通过构造函数传入
- 通过
Proxy.newProxyInstance创建代理,在方法执行时(invoke) 进行数据源添加、切换、数据库操作、清除等
3.3.2 使用代理实现功能
有了代理,在添加和切换数据源时就可以擦除模板代码,前面的业务代码就变成:
1 | |
通过代理,代码就简洁多了。