一、用户登录权限效验
⽤户登录权限的发展从之前每个⽅法中⾃⼰验证⽤户登录权限,到现在统⼀的⽤户登录验证处理,它是⼀个逐渐完善和逐渐优化的过程。
1.1 最初的用户登录验证
先来回顾⼀下最初⽤户登录验证的实现⽅法:
1
2
3
4
5
6
7
8
9
10
11
12
13
14
15
16
17
18
19
20
21
22
23
24
25
26
27
28
29
30
31
32
33
34
35
| @RestController
@RequestMapping("/user")
public class UserController {
@RequestMapping("/m1")
public Object method(HttpServletRequest request) {
HttpSession session = request.getSession(false);
if (session != null && session.getAttribute("userinfo") != null) {
return true;
} else {
return false;
}
}
@RequestMapping("/m2")
public Object method2(HttpServletRequest request) {
HttpSession session = request.getSession(false);
if (session != null && session.getAttribute("userinfo") != null) {
return true;
} else {
return false;
}
}
}
|
从上述代码可以看出,每个⽅法中都有相同的⽤户登录验证权限,它的缺点是:
- 每个⽅法中都要单独写⽤户登录验证的⽅法,即使封装成公共⽅法,也⼀样要传参调⽤和在⽅法中进⾏判断。
- 添加控制器越多,调⽤⽤户登录验证的⽅法也越多,这样就增加了后期的修改成本和维护成本。
- 这些⽤户登录验证的⽅法和接下来要实现的业务⼏何没有任何关联,但每个⽅法中都要写⼀遍。
所以提供⼀个公共的 AOP ⽅法来进⾏统⼀的⽤户登录权限验证迫在眉睫。
1.2 Spring AOP 用户统一登录验证的问题
说到统⼀的⽤户登录验证,想到的第⼀个实现⽅案是 Spring AOP 前置通知或环绕通知来实现,具体实现代码如下:
1
2
3
4
5
6
7
8
9
10
11
12
13
14
15
16
17
18
19
20
21
22
23
24
25
26
27
28
29
30
| import org.aspectj.lang.ProceedingJoinPoint;
import org.aspectj.lang.annotation.*;
import org.springframework.stereotype.Component;
@Aspect
@Component
public class UserAspect {
@Pointcut("execution(* com.example.demo.controller..*.*(..))")
public void pointcut(){ }
@Before("pointcut()")
public void doBefore(){
}
@Around("pointcut()")
public Object doAround(ProceedingJoinPoint joinPoint){
Object obj = null;
System.out.println("Around ⽅法开始执⾏");
try {
obj = joinPoint.proceed();
} catch (Throwable throwable) {
throwable.printStackTrace();
}
System.out.println("Around ⽅法结束执⾏");
return obj;
}
}
|
如果要在以上 Spring AOP 的切⾯中实现⽤户登录权限效验的功能,有以下两个问题:
- 没办法获取到 HttpSession 对象。
- 要对⼀部分⽅法进⾏拦截,⽽另⼀部分⽅法不拦截,如注册⽅法和登录⽅法是不拦截的,这样的话排除⽅法的规则很难定义,甚⾄没办法定义。
1.3 Spring 拦截器
对于以上问题 Spring 中提供了具体的实现拦截器:HandlerInterceptor,拦截器的实现分为以下两个步骤:
- 创建⾃定义拦截器,实现
HandlerInterceptor 接⼝的 preHandle(执⾏具体⽅法之前的预处理)⽅法。
- 将⾃定义拦截器加⼊
WebMvcConfigurer 的 addInterceptors ⽅法中。
具体实现如下。
补充 过滤器:
过滤器是Web容器提供的。触发的时机比拦截器更靠前,Spring 初始化前就执行了,所以并不能处理用户登录权限效验等问题。
1.3.1 准备工作
1
2
3
4
5
6
7
8
9
10
11
12
13
14
15
16
17
18
19
20
21
22
23
24
25
26
27
28
29
30
31
32
33
34
35
36
37
38
39
40
41
42
43
44
45
46
47
48
49
50
51
52
53
| package com.example.demo.controller;
import lombok.extern.slf4j.Slf4j;
import org.springframework.util.StringUtils;
import org.springframework.web.bind.annotation.RequestMapping;
import org.springframework.web.bind.annotation.RestController;
import javax.servlet.http.HttpServletRequest;
import javax.servlet.http.HttpSession;
@RestController
@RequestMapping("/user")
@Slf4j
public class UserController {
@RequestMapping("/login")
public boolean login(HttpServletRequest request,
String username, String password) {
if (StringUtils.hasLength(username) && StringUtils.hasLength(password)) {
if ("admin".equals(username) && "admin".equals(password)) {
HttpSession session = request.getSession();
session.setAttribute("userinfo", "admin");
return true;
} else {
return false;
}
}
return false;
}
@RequestMapping("/getinfo")
public String getInfo() {
log.debug("执行了 getinfo 方法");
return "执行了 getinfo 方法";
}
@RequestMapping("/reg")
public String reg() {
log.debug("执行了 reg 方法");
return "执行了 reg 方法";
}
}
|
1.3.2 自定义拦截器
接下来使⽤代码来实现⼀个⽤户登录的权限效验,⾃定义拦截器是⼀个普通类,具体实现代码如下:
1
2
3
4
5
6
7
8
9
10
11
12
13
14
15
16
17
18
19
20
21
22
23
24
25
26
27
28
29
| package com.example.demo.config;
import lombok.extern.slf4j.Slf4j;
import org.springframework.stereotype.Component;
import org.springframework.web.servlet.HandlerInterceptor;
import javax.servlet.http.HttpServletRequest;
import javax.servlet.http.HttpServletResponse;
import javax.servlet.http.HttpSession;
@Component
@Slf4j
public class LoginInterceptor implements HandlerInterceptor {
@Override
public boolean preHandle(HttpServletRequest request, HttpServletResponse response, Object handler) throws Exception {
HttpSession session = request.getSession(false);
if (session != null && session.getAttribute("userinfo") != null) {
return true;
}
log.error("当前用户没有访问权限");
response.setStatus(401);
return false;
}
}
|
返回 boolean 类型。
相当于一层安保:
为 false 则不能继续往下执行;为 true 则可以。
1.3.3 将自定义拦截器加入到系统配置
将上⼀步中的⾃定义拦截器加⼊到系统配置信息中,具体实现代码如下:
1
2
3
4
5
6
7
8
9
10
11
12
13
14
15
16
17
18
19
20
21
22
23
24
25
| package com.example.demo.config;
import org.springframework.beans.factory.annotation.Autowired;
import org.springframework.context.annotation.Configuration;
import org.springframework.web.servlet.config.annotation.InterceptorRegistry;
import org.springframework.web.servlet.config.annotation.ResourceHandlerRegistry;
import org.springframework.web.servlet.config.annotation.WebMvcConfigurer;
@Configuration
public class MyConfig implements WebMvcConfigurer {
@Autowired
private LoginInterceptor loginInterceptor;
@Override
public void addInterceptors(InterceptorRegistry registry) {
registry.addInterceptor(loginInterceptor)
.addPathPatterns("/**")
.excludePathPatterns("/user/login")
.excludePathPatterns("/user/reg");
}
}
|
或者:
1
2
3
4
5
6
7
8
9
10
11
12
13
14
15
16
17
18
19
20
21
22
23
24
25
26
27
28
29
30
31
32
33
34
35
36
37
38
39
| package com.example.demo.common;
import org.springframework.beans.factory.annotation.Autowired;
import org.springframework.context.annotation.Configuration;
import org.springframework.web.servlet.config.annotation.InterceptorRegistration;
import org.springframework.web.servlet.config.annotation.InterceptorRegistry;
import org.springframework.web.servlet.config.annotation.WebMvcConfigurer;
import java.util.ArrayList;
import java.util.List;
@Configuration
public class AppConfig implements WebMvcConfigurer {
List<String> excludes = new ArrayList<String>() {{
add("/**/*.html");
add("/js/**");
add("/editor.md/**");
add("/css/**");
add("/img/**");
add("/user/login");
add("/user/reg");
add("/art/detail");
add("/art/list");
add("/art/totalpage");
}};
@Autowired
private LoginInterceptor loginInterceptor;
@Override
public void addInterceptors(InterceptorRegistry registry) {
InterceptorRegistration registration = registry.addInterceptor(loginInterceptor);
registration.addPathPatterns("/**");
registration.excludePathPatterns(excludes);
}
}
|
如果不注入对象的话,addInterceptor() 的参数也可以直接 new 一个对象:
1
2
3
4
5
6
7
8
9
10
11
12
13
14
15
16
| @Configuration
public class MyConfig implements WebMvcConfigurer {
@Override
public void addInterceptors(InterceptorRegistry registry) {
registry.addInterceptor(new LoginInterceptor())
.addPathPatterns("/**")
.excludePathPatterns("/user/login")
.excludePathPatterns("/user/reg");
}
}
|
其中:
- addPathPatterns:表示需要拦截的 URL,“
**”表示拦截任意⽅法(也就是所有⽅法)。
- excludePathPatterns:表示需要排除的 URL。
说明:以上拦截规则可以拦截此项⽬中的使⽤ URL,包括静态⽂件 (图⽚⽂件、JS 和 CSS 等⽂件)。
1.4 拦截器实现原理
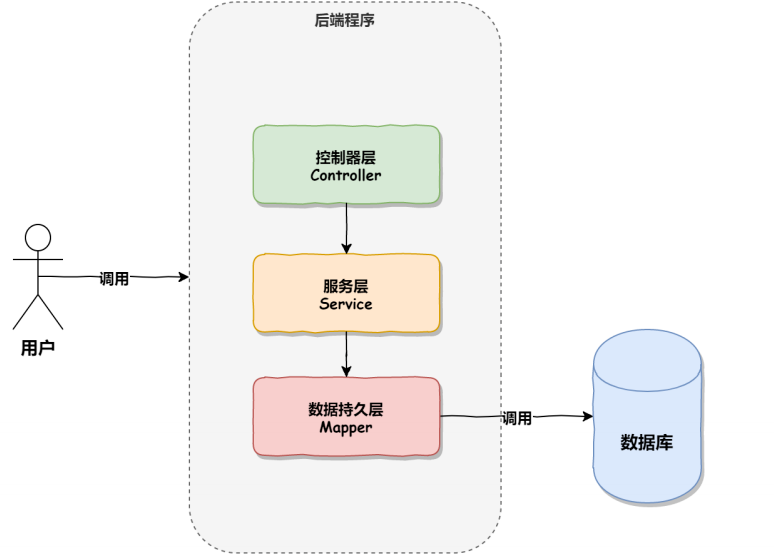
正常情况下的调⽤顺序:
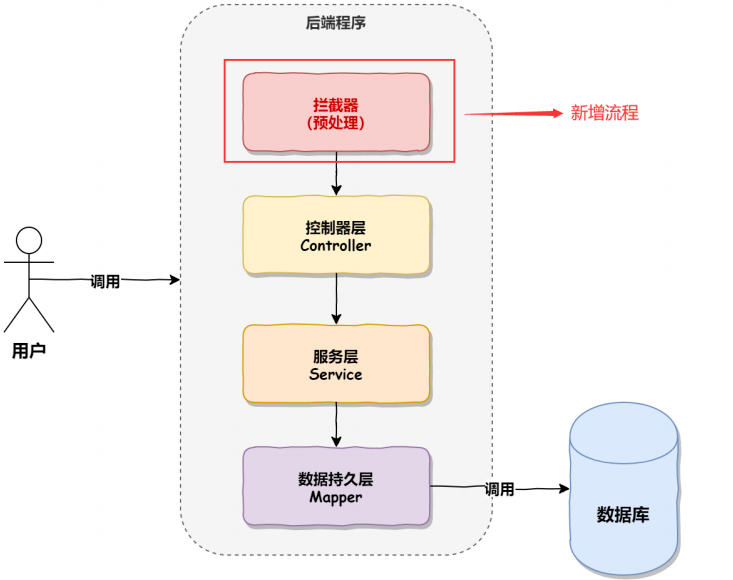
然⽽有了拦截器之后,会在调⽤ Controller 之前进⾏相应的业务处理,执⾏的流程如下图所示:
1.4.1 实现原理源码分析
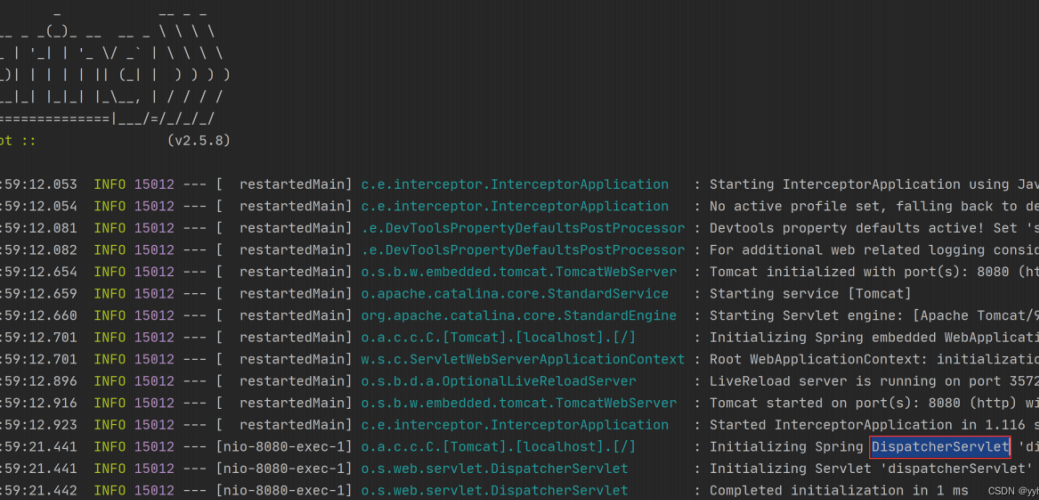
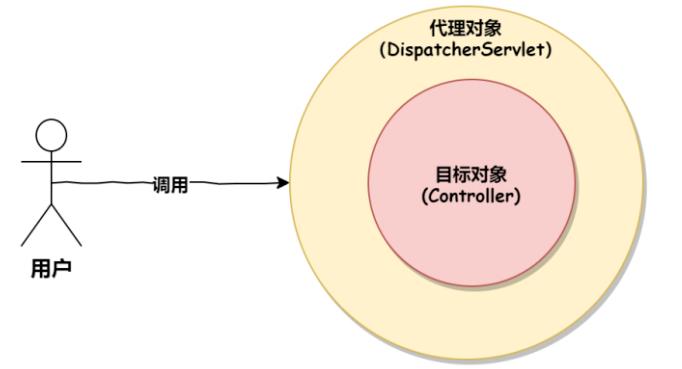
所有的 Controller 执⾏都会通过⼀个调度器 DispatcherServlet 来实现,这⼀点可以从 Spring Boot 控制台的打印信息看出,如下图所示:
⽽所有⽅法都会执⾏ DispatcherServlet 中的 doDispatch 调度⽅法,doDispatch 源码如下:
1
2
3
4
5
6
7
8
9
10
11
12
13
14
15
16
17
18
19
20
21
22
23
24
25
26
27
28
29
30
31
32
33
34
35
36
37
38
39
40
41
42
43
44
45
46
47
48
49
50
51
52
53
54
55
56
57
58
59
60
61
62
63
64
65
66
67
68
69
70
| protected void doDispatch(HttpServletRequest request, HttpServletResponse
response) throws Exception {
HttpServletRequest processedRequest = request;
HandlerExecutionChain mappedHandler = null;
boolean multipartRequestParsed = false;
WebAsyncManager asyncManager = WebAsyncUtils.getAsyncManager(request);
try {
try {
ModelAndView mv = null;
Object dispatchException = null;
try {
processedRequest = this.checkMultipart(request);
multipartRequestParsed = processedRequest != request;
mappedHandler = this.getHandler(processedRequest);
if (mappedHandler == null) {
this.noHandlerFound(processedRequest, response);
return;
}
HandlerAdapter ha = this.getHandlerAdapter(mappedHandler.g
etHandler());
String method = request.getMethod();
boolean isGet = HttpMethod.GET.matches(method);
if (isGet || HttpMethod.HEAD.matches(method)) {
long lastModified = ha.getLastModified(request, mapped
Handler.getHandler());
if ((new ServletWebRequest(request, response)).checkNo
tModified(lastModified) && isGet) {
return;
}
}
if (!mappedHandler.applyPreHandle(processedRequest, respon
se)) {
return;
}
mv = ha.handle(processedRequest, response, mappedHandler.g
etHandler());
if (asyncManager.isConcurrentHandlingStarted()) {
return;
}
this.applyDefaultViewName(processedRequest, mv);
mappedHandler.applyPostHandle(processedRequest, response,
mv);
} catch (Exception var20) {
dispatchException = var20;
} catch (Throwable var21) {
dispatchException = new NestedServletException("Handler di
spatch failed", var21);
}
this.processDispatchResult(processedRequest, response, mappedH
andler, mv, (Exception)dispatchException);
} catch (Exception var22) {
this.triggerAfterCompletion(processedRequest, response, mapped
Handler, var22);
} catch (Throwable var23) {
this.triggerAfterCompletion(processedRequest, response, mapped
Handler, new NestedServletException("Handler processing failed", var23));
}
} finally {
if (asyncManager.isConcurrentHandlingStarted()) {
if (mappedHandler != null) {
mappedHandler.applyAfterConcurrentHandlingStarted(processe
dRequest, response);
}
} else if (multipartRequestParsed) {
this.cleanupMultipart(processedRequest);
}
}
}
|
从上述源码可以看出在开始执⾏ Controller 之前,会先调⽤ 预处理⽅法 applyPreHandle,⽽ applyPreHandle ⽅法的实现源码如下:
1
2
3
4
5
6
7
8
9
10
11
12
13
14
| boolean applyPreHandle(HttpServletRequest request, HttpServletResponse response) throws Exception {
for(int i = 0; i < this.interceptorList.size(); this.interceptorIndex
= i++) {
HandlerInterceptor interceptor = (HandlerInterceptor)this.intercep
torList.get(i);
if (!interceptor.preHandle(request, response, this.handler)) {
this.triggerAfterCompletion(request, response, (Exception)null
);
return false;
}
}
return true;
}
|
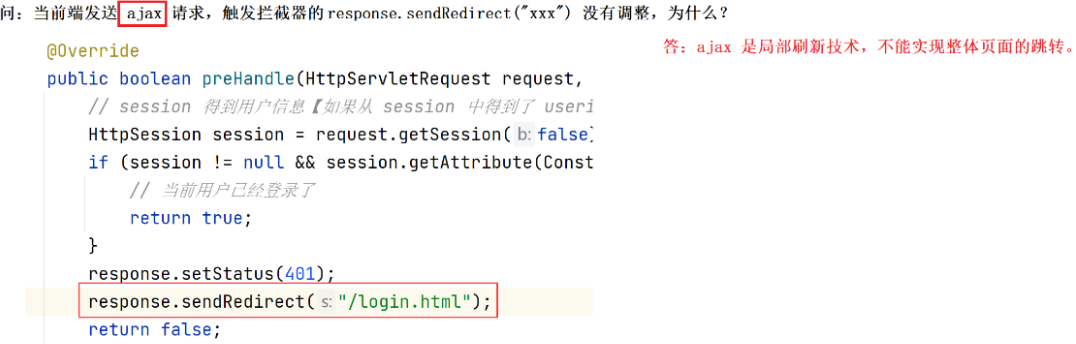
从上述源码可以看出,在 applyPreHandle 中会获取所有的拦截器 HandlerInterceptor 并执⾏拦截器中的 preHandle ⽅法,这样就会咱们前⾯定义的拦截器对应上了,如下图所示:

此时⽤户登录权限的验证⽅法就会执⾏,这就是拦截器的实现原理。
1.4.2 拦截器小结
通过上⾯的源码分析,可以看出,Spring 中的拦截器也是通过动态代理和环绕通知的思想实现的,⼤体的调⽤流程如下:
1.5 扩展:统一访问前缀添加
所有请求地址添加 api 前缀:
1
2
3
4
5
6
7
8
| @Configuration
public class AppConfig implements WebMvcConfigurer {
@Override
public void configurePathMatch(PathMatchConfigurer configurer) {
configurer.addPathPrefix("api", c -> true);
}
}
|
其中第⼆个参数是⼀个表达式,设置为 true 表示启动前缀。
二、统一异常处理
统⼀异常处理使⽤的是 @ControllerAdvice + @ExceptionHandler 来实现的,@ControllerAdvice 表示控制器通知类,@ExceptionHandler 是异常处理器,两个结合表示当出现异常的时候执⾏某个通知,也就是执⾏某个⽅法事件,具体实现代码如下:
1
2
3
4
5
6
7
8
9
10
11
12
13
14
15
16
17
18
19
20
21
22
23
24
25
26
27
28
29
30
31
32
33
| package com.example.demo.config;
import org.springframework.web.bind.annotation.ControllerAdvice;
import org.springframework.web.bind.annotation.ExceptionHandler;
import org.springframework.web.bind.annotation.ResponseBody;
import java.util.HashMap;
@ControllerAdvice
public class ErrorAdive {
@ExceptionHandler(Exception.class)
@ResponseBody
public HashMap<String, Object> exceptionAdvie(Exception e) {
HashMap<String, Object> result = new HashMap<>();
result.put("code", "-1");
result.put("msg", e.getMessage());
return result;
}
@ExceptionHandler(ArithmeticException.class)
@ResponseBody
public HashMap<String, Object> arithmeticAdvie(ArithmeticException e) {
HashMap<String, Object> result = new HashMap<>();
result.put("code", "-2");
result.put("msg", e.getMessage());
return result;
}
}
|
方法名和返回值可以⾃定义,重要的是 @ControllerAdvice 和 @ExceptionHandler 注解。
以上⽅法表示,如果出现了异常就返回给前端⼀个 HashMap 的对象,其中包含的字段如代码中定义的那样。
可以针对不同的异常,返回不同的结果,⽐以下代码所示:
1
2
3
4
5
6
7
8
9
10
11
12
13
14
15
16
17
18
19
20
21
22
23
24
| import org.springframework.web.bind.annotation.ControllerAdvice;
import org.springframework.web.bind.annotation.ExceptionHandler;
import org.springframework.web.bind.annotation.ResponseBody;
import java.util.HashMap;
@ControllerAdvice
@ResponseBody
public class ExceptionAdvice {
@ExceptionHandler(Exception.class)
public Object exceptionAdvice(Exception e) {
HashMap<String, Object> result = new HashMap<>();
result.put("success", -1);
result.put("message", "总的异常信息:" + e.getMessage());
result.put("data", null);
return result;
}
@ExceptionHandler(NullPointerException.class)
public Object nullPointerexceptionAdvice(NullPointerException e) {
HashMap<String, Object> result = new HashMap<>();
result.put("success", -1);
result.put("message", "空指针异常:" + e.getMessage());
result.put("data", null);
return result;
}
}
|
当有多个异常通知时,匹配顺序为当前类及其子类向上依次匹配,案例演示:
在 UserController 中设置⼀个空指针异常,实现代码如下:
1
2
3
4
5
6
7
8
9
10
| @RestController
@RequestMapping("/u")
public class UserController {
@RequestMapping("/index")
public String index() {
Object obj = null;
int i = obj.hashCode();
return "Hello,User Index.";
}
}
|
以上程序的执⾏结果如下:

此时若出现异常就不会报错了,代码会继续执行,但是会把自定义的异常信息返回给前端!
统一完数据返回格式后:
1
2
3
4
5
6
7
8
9
10
11
12
13
14
15
16
17
18
19
| package com.example.demo.common;
import org.springframework.web.bind.annotation.ControllerAdvice;
import org.springframework.web.bind.annotation.ExceptionHandler;
import org.springframework.web.bind.annotation.ResponseBody;
@ControllerAdvice
@ResponseBody
public class ExceptionAdvice {
@ExceptionHandler(Exception.class)
public Object exceptionAdvice(Exception e) {
return AjaxResult.fail(-1, e.getMessage());
}
}
|
统一异常处理不用配置路径,是拦截整个项目中的所有异常。
三、统一数据返回格式
3.1 为什么需要统一数据返回格式?
统⼀数据返回格式的优点有很多,比如以下几个:
- ⽅便前端程序员更好的接收和解析后端数据接⼝返回的数据。
- 降低前端程序员和后端程序员的沟通成本,按照某个格式实现就⾏了,因为所有接⼝都是这样返回的。
- 有利于项⽬统⼀数据的维护和修改。
- 有利于后端技术部⻔的统⼀规范的标准制定,不会出现稀奇古怪的返回内容。
3.2 统一数据返回格式的实现
统⼀的数据返回格式可以使用 @ControllerAdvice + ResponseBodyAdvice接口 的方式实现,具体实现代码如下:
1
2
3
4
5
6
7
8
9
10
11
12
13
14
15
16
17
18
19
20
21
22
23
24
25
26
27
28
29
30
31
32
33
34
35
36
37
38
39
40
| import org.springframework.core.MethodParameter;
import org.springframework.http.MediaType;
import org.springframework.http.server.ServerHttpRequest;
import org.springframework.http.server.ServerHttpResponse;
import org.springframework.web.bind.annotation.ControllerAdvice;
import org.springframework.web.servlet.mvc.method.annotation.ResponseBodyA
dvice;
import java.util.HashMap;
@ControllerAdvice
public class ResponseAdvice implements ResponseBodyAdvice {
@Override
public boolean supports(MethodParameter returnType, Class converterType) {
return true;
}
@Override
public Object beforeBodyWrite(Object body, MethodParameter returnType,
MediaType selectedContentType,
Class selectedConverterType,
ServerHttpRequest request,
ServerHttpResponse response) {
HashMap<String, Object> result = new HashMap<>();
result.put("state", 1);
result.put("msg", "");
result.put("data", body);
return result;
}
}
|
统一处理后,此时所有返回的都是 json 格式的数据了。
若方法的返回类型为 String,统一数据返回格式封装后,返回会报错!?
转换器的问题,解决方案:

实际开发中这种统一数据返回格式的方式并不常用。因为它会将所有返回都再次进行封装,过于霸道了 ~
而通常会写一个统一封装的类,让程序猿在返回时统一返回这个类 (软性约束),例如:
1
2
3
4
5
6
7
8
9
10
11
12
13
14
15
16
17
18
19
20
21
22
23
24
25
26
27
28
29
30
31
32
33
34
35
36
37
38
39
40
41
42
43
44
45
46
47
48
49
50
51
52
53
54
55
56
57
58
59
60
61
62
63
64
65
66
| package com.example.demo.common;
import java.util.HashMap;
public class AjaxResult {
public static HashMap<String, Object> success(Object data) {
HashMap<String, Object> result = new HashMap<>();
result.put("code", 200);
result.put("msg", "");
result.put("data", data);
return result;
}
public static HashMap<String, Object> success(String msg, Object data) {
HashMap<String, Object> result = new HashMap<>();
result.put("code", 200);
result.put("msg", msg);
result.put("data", data);
return result;
}
public static HashMap<String, Object> fail(int code, String msg) {
HashMap<String, Object> result = new HashMap<>();
result.put("code", code);
result.put("msg", msg);
result.put("data", "");
return result;
}
public static HashMap<String, Object> fail(int code, String msg, Object data) {
HashMap<String, Object> result = new HashMap<>();
result.put("code", code);
result.put("msg", msg);
result.put("data", data);
return result;
}
}
|
同时搭配统一数据返回格式:
1
2
3
4
5
6
7
8
9
10
11
12
13
14
15
16
17
18
19
20
21
22
23
24
25
26
27
28
29
30
31
32
33
34
35
36
| package com.example.demo.common;
import com.fasterxml.jackson.databind.ObjectMapper;
import lombok.SneakyThrows;
import org.springframework.core.MethodParameter;
import org.springframework.http.MediaType;
import org.springframework.http.server.ServerHttpRequest;
import org.springframework.http.server.ServerHttpResponse;
import org.springframework.web.bind.annotation.ControllerAdvice;
import org.springframework.web.servlet.mvc.method.annotation.ResponseBodyAdvice;
import java.util.HashMap;
@ControllerAdvice
public class ResponseAdvice implements ResponseBodyAdvice {
@Override
public boolean supports(MethodParameter returnType, Class converterType) {
return true;
}
@SneakyThrows
@Override
public Object beforeBodyWrite(Object body, MethodParameter returnType, MediaType selectedContentType, Class selectedConverterType, ServerHttpRequest request, ServerHttpResponse response) {
if (body instanceof HashMap) {
return body;
}
if (body instanceof String) {
ObjectMapper objectMapper = new ObjectMapper();
return objectMapper.writeValueAsString(AjaxResult.success(body));
}
return AjaxResult.success(body);
}
}
|
3.3 @ControllerAdvice 源码分析
通过对 @ControllerAdvice 源码的分析可以知道上⾯统⼀异常和统⼀数据返回的执⾏流程,先从 @ControllerAdvice 的源码看起,点击 @ControllerAdvice 实现源码如下:
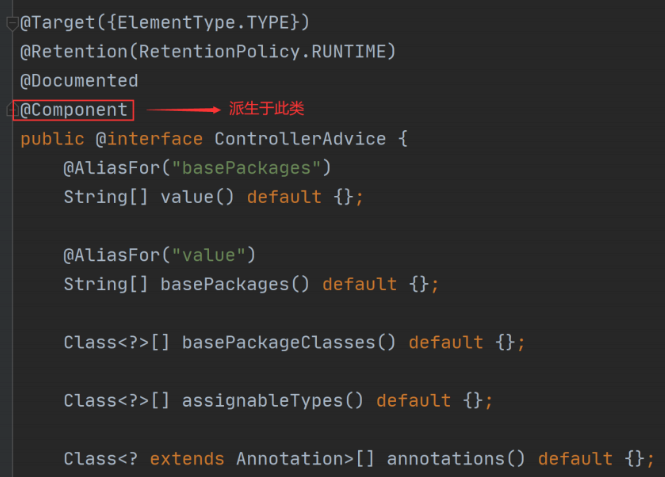
从上述源码可以看出 @ControllerAdvice 派⽣于 @Component 组件,⽽所有组件初始化都会调用 InitializingBean 接⼝。
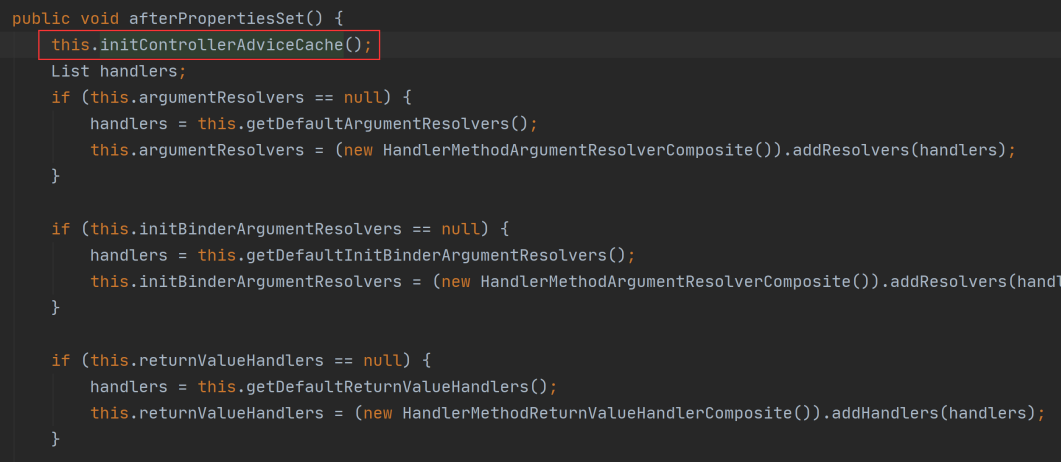
所以接下来来看 InitializingBean 有哪些实现类?在查询的过程中发现了,其中 Spring MVC中的实现⼦类是 RequestMappingHandlerAdapter,它⾥⾯有⼀个⽅法 afterPropertiesSet() ⽅法,表示所有的参数设置完成之后执⾏的⽅法,如下图所示:
⽽这个⽅法中有⼀个 initControllerAdviceCache ⽅法,查询此⽅法的源码如下:
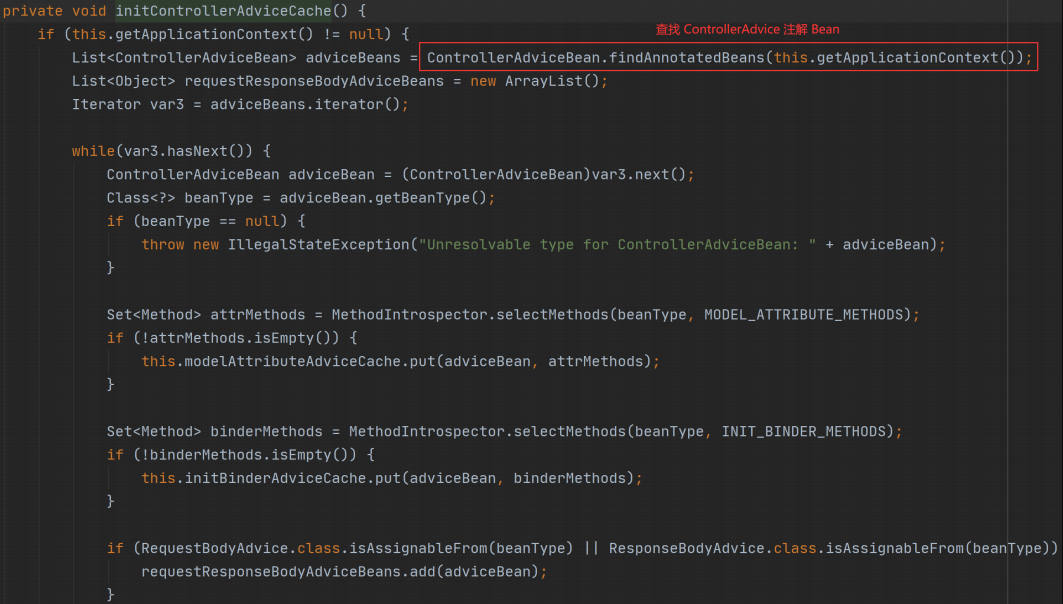
发现这个⽅法在执⾏是会查找使⽤所有的 @ControllerAdvice 类,这些类会被容器中,但发⽣某个事件时,调⽤相应的 Advice ⽅法,⽐如返回数据前调⽤统⼀数据封装,⽐如发⽣异常是调⽤异常的 Advice ⽅法实现。
