参考资料:
技术栈:
前端:vue3 + vite4 + ElementPlus2
后端:jdk17 + Maven3.6.3 + SpringBoot2.7 + MyBatis + 蚂蚁地理空间数据可视化2.x
1. 前端架构搭建
1.1 创建项目
vite 创建项目:npm create vite@4.4.0
npm 安装依赖:npm i
npm 启动项目:npm run dev
App.vue
1
2
3
4
5
6
7
8
9
10
11
12
13
14
15
16
| <template>
<div>
<!-- 路由容器:路径匹配则自动加载 -->
<router-view></router-view>
</div>
</template>
<script setup>
</script>
<style>
*{
margin: 0;
padding: 0;
}
</style>
|
main.js
1.2 目录结构
1
2
3
4
5
6
7
8
9
10
11
12
13
14
15
16
17
18
19
20
21
22
23
24
| public/
src/
assets/
components/
moduleA/
Xxx.vue
router/
index.js
store/
xxStrore.js
util/
xxx.js
views/
moduleA/
Xxx.vue
App.vue
main.js
style.css
.gitignore
index.html
package-lock.json
package.json
README.md
vite.config.js
|
1.3 创建路由
安装路由:npm i vue-router
router/index.js
- 创建路由并导出、通过 ConfigRouter 动态添加路由
- 重定向、404等配置
- 路由拦截校验登陆鉴权的配置,重定向到登陆页
- 判断用户路由权限菜单
项目使用路由 main.js:
1
2
3
4
5
6
7
8
| import { createApp } from 'vue'
import App from './App.vue'
import router from './router'
createApp(App)
.use(router)
.mount('#app')
|
App.vue
1
2
3
4
5
6
7
| <template>
<div>
<!-- 路由容器:路径匹配则自动加载 -->
<router-view></router-view>
</div>
</template>
...
|
1.3.1 配置动态路由
router/config.js
1.4 引入状态管理 pinia
安装:npm i pinia
使用:
store/useRouterStore.js
1
2
3
4
5
6
7
8
9
10
11
12
13
| import {defineStore} from 'pinia'
import { ref } from 'vue'
export const useRouterStore = defineStore("router", () => {
const isGetterRouter = ref(false)
const changeRouter = (value) => {
isGetterRouter.value = value
}
return {
isGetterRouter,
changeRouter
}
})
|
1.5 引入 pinia 持久化插件
安装:npm i pinia-plugin-persistedstate
引入:main.js
1
2
3
4
5
| import { createPinia } from 'pinia'
import piniaPluginPersistedstate from 'pinia-plugin-persistedstate'
const pinia = createPinia()
pinia.use(piniaPluginPersistedstate)
|
开启持久化:useUserStore.js - { persist: true }
1
2
3
4
5
6
7
8
9
10
11
12
13
14
15
16
| import {defineStore} from 'pinia'
import { ref } from 'vue'
export const useUserStore = defineStore("user", () => {
const user = ref({})
const changeUser = (value) => {
user.value = value
}
return {
user,
changeUser
}
}, {
persist: true
})
|
触发持久化 store 时,会将公共状态数据 user 存储在 localStorage 中。
1.6 登陆&退出登陆
Login.vue - 登陆与退登
MainBox.vue - 核心容器
1.7 登录页 - 引入element-plus
组件库:element-Plus
安装:npm i element-plus
引入:
1
2
3
4
5
6
7
8
9
| import { createApp } from 'vue'
import ElementPlus from 'element-plus'
import 'element-plus/dist/index.css'
import App from './App.vue'
const app = createApp(App)
app.use(ElementPlus)
app.mount('#app')
|
Login.vue 完善。
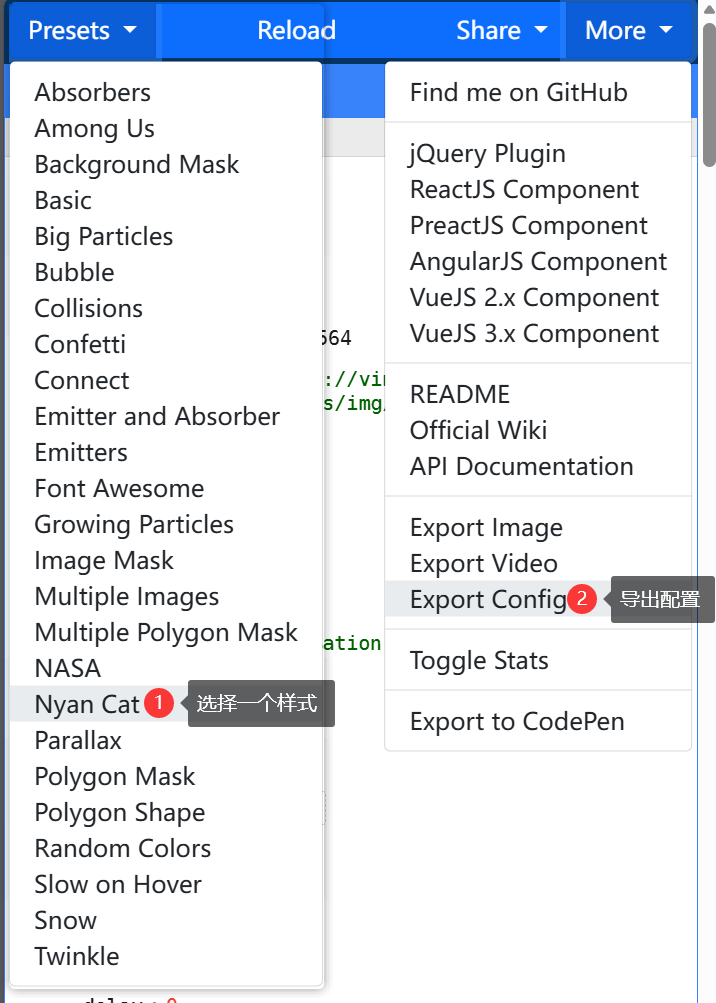
1.8 引入粒子库 particles
particles 粒子库官网:https://particles.js.org/

点击跳转 github 对应 vue3 文档:https://github.com/tsparticles/vue3
安装:npm i @tsparticles/vue3 和 npm i tsparticles
1.8.1 使用默认粒子效果
main.js - 导入和使用
1
2
3
4
5
6
7
8
9
10
11
| import Particles from "@tsparticles/vue3";
import { loadFull } from "tsparticles";
createApp(App)
.use(Particles, {
init: async engine => {
await loadFull(engine);
},
})
.mount('#app')
|
Login.vue - 复制 github 说明文档中的 <vue-particles ...> 标签内容,放在 form 表单外即可。将 options 单独维护为 xxxConfig.js 文件进行导入。
1
2
3
4
5
6
7
8
9
10
11
| <template>
<vue-particles id="tsparticles" @particles-loaded="particlesLoaded" :options="tsparticlesConfig" />
</template>
<script setup>
import { tsparticlesConfig } from '../util/tsparticlesConfig'
const particlesLoaded = async container => {
console.log("粒子库 Particles container loaded", container);
};
...
</script>
|
src/util/tsparticlesConfig.js
效果

1.8.2 使用其他粒子效果
从 particles 粒子库官网:https://particles.js.org/
跳转到

拷贝其配置内容,替换掉 src/util/tsparticlesConfig.js 即可。
- 其中修改背景图,在属性 background - image 中修改,图片文件放在 public/bg.jpg 目录下
1
2
3
4
5
6
7
8
9
10
11
12
13
14
| export const tsparticlesConfig = {
"autoPlay": true,
"background": {
"color": {
"value": "#043564"
},
"image": "url('./bg.jpg')",
"position": "center",
"repeat": "no-repeat",
"size": "cover",
"opacity": 1,
"attachment": "fixed"
},
...
|
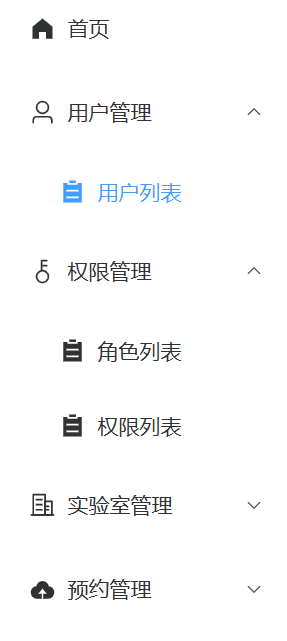
1.9 布局
目录
1
2
3
4
5
6
7
| src/
components/
MainBox/
SideMenu.vue
TopHeader.vue
views/
MainBox.vue
|
MainBox.vue - 涉及布局组件 Container
SideMenu.vue
TopHeader.vue - 主要支持标题、欢迎语、用户名显示,以及退出 或 跳转个人中心等
SideMenu.vue
height: 100vh 可以解决侧边栏滚动条没有占满上下屏幕:router=true 在 el-menu 中开启后可以基于 index 配置的 path 路径跳转- icon图标:使用动态组件
<component> 的 :is 属性动态绑定图标组件实例对象,不是字符串,因此需要 map 映射取值
route.fullPath 当前相对路径,如 /user-manage/list 用于 :default-active 动态绑定实现当前菜单高亮
依赖权限菜单 json 数据(临时准备)。
权限菜单 json 数据结构 -(从后端接口获取)
1
2
3
4
5
6
7
8
9
10
11
12
13
14
15
16
17
18
19
20
21
22
23
24
25
26
27
28
29
30
31
32
33
34
35
36
37
38
39
40
41
42
43
44
45
46
47
48
49
50
51
52
53
54
55
56
57
58
59
60
61
62
63
64
65
66
67
68
69
70
71
72
73
74
75
76
| [
{
"title": "首页",
"path": "/index",
"icon": "HomeFilled",
"children": []
},
{
"title": "用户管理",
"path": "/user-manage",
"icon": "User",
"children": [
{
"title": "用户列表",
"path": "/user-manage/list",
"icon": "List"
}
]
},
{
"title": "权限管理",
"path": "/right-manage",
"icon": "Key",
"children": [
{
"title": "角色列表",
"path": "/right-manage/rolelist",
"icon": "List"
},
{
"title": "权限列表",
"path": "/right-manage/rightlist",
"icon": "List"
}
]
},
{
"title": "实验室管理",
"path": "/lab-manage",
"icon": "OfficeBuilding",
"children": [
{
"title": "实验室列表",
"path": "/lab-manage/lablist",
"icon": "List"
},
{
"title": "添加实验室",
"path": "/lab-manage/addlab",
"icon": "List"
}
]
},
{
"title": "预约管理",
"path": "/book-manage",
"icon": "UploadFilled",
"children": [
{
"title": "审核列表",
"path": "/book-manage/auditlist",
"icon": "List"
},
{
"title": "预约列表",
"path": "/book-manage/booklist",
"icon": "List"
},
{
"title": "预约实验室",
"path": "/book-manage/addbook",
"icon": "List"
}
]
}
]
|
效果
TopHeader.vue
assets/avatar.png - 头像
效果
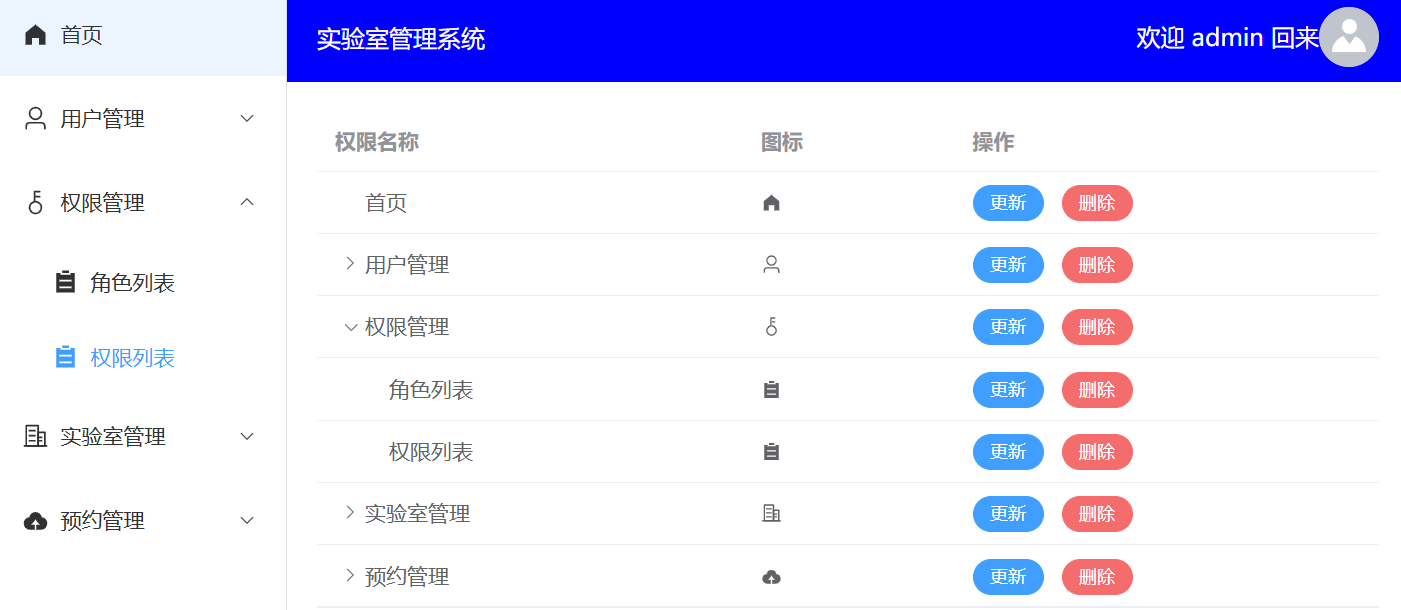
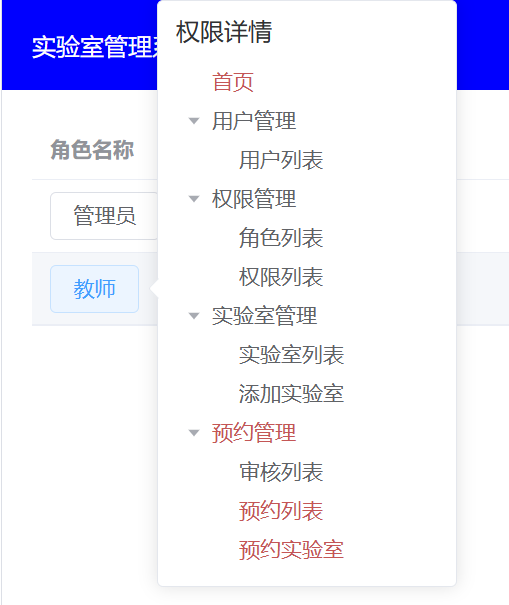
1.12 RightList 权限列表
RightList.vue
- Table 表格组件: 要支持
树形展开子级只需要设置 row-key="唯一属性"
scope.row 在 el-table 组件中默认取 tableData 的一行数据,直接用 . 取值
效果
更新 - 弹窗和Message提示;删除 - 气泡确认框和Message提示
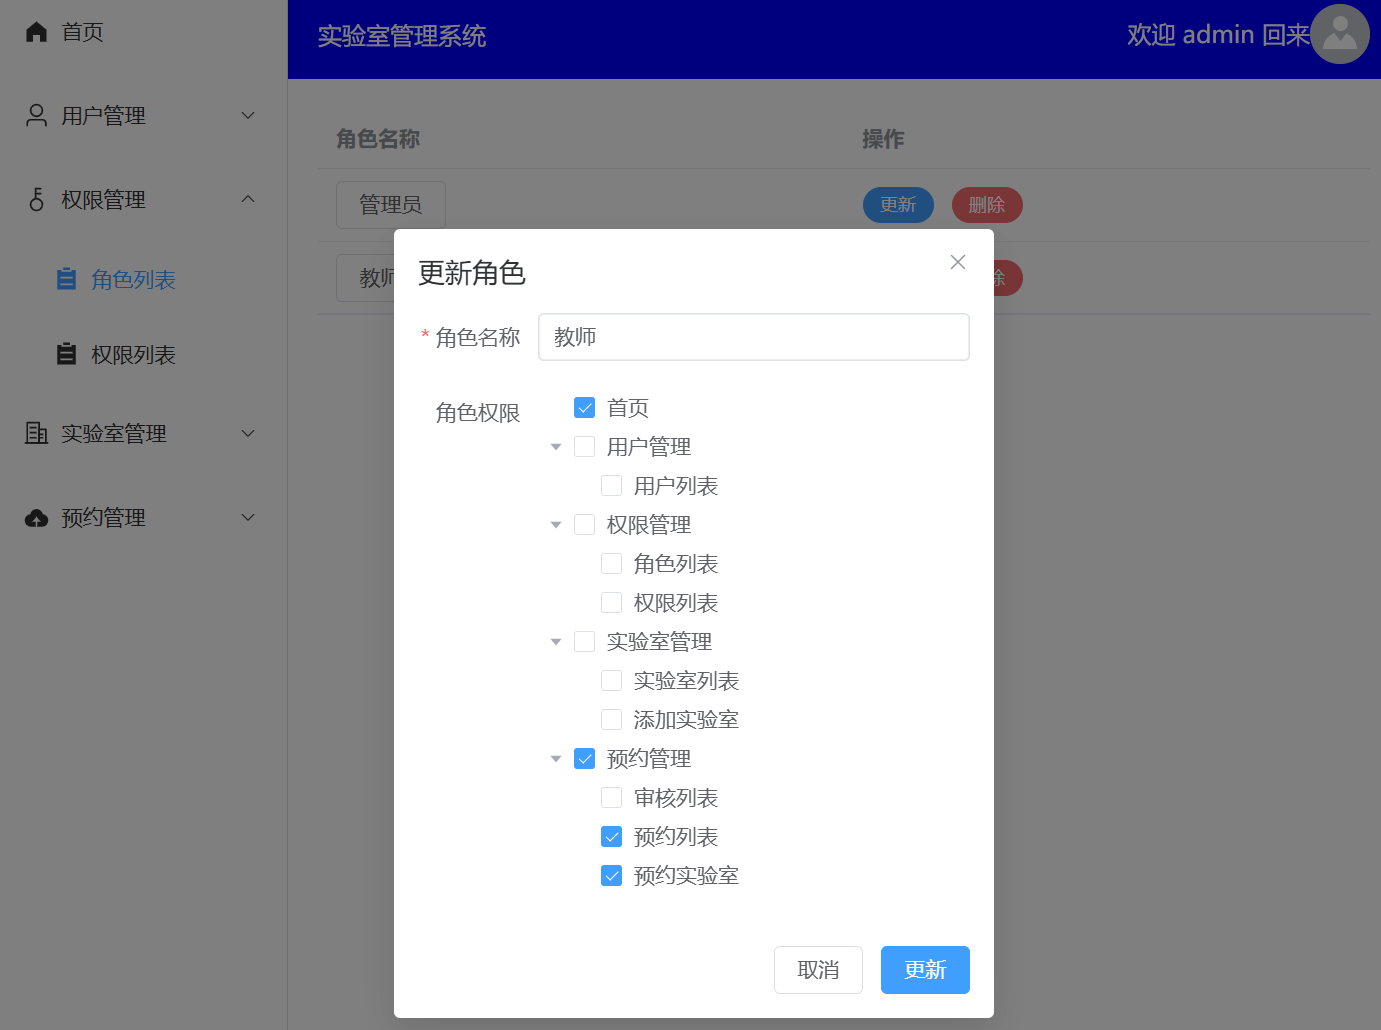
1.13 RoleList 角色列表
RoleList.vue
Popover 弹出框组件,鼠标移入悬浮树形显示权限列表- 更新角色权限的树形可选显示
- Tree 树形控件:
show-checkbox 变成可选节点,做默认选中必须设置 node-key 值唯一; :check-strictly="true" 父子不关联
- Tree 树形控件:自定义节点 的渲染方法 renderContent
效果
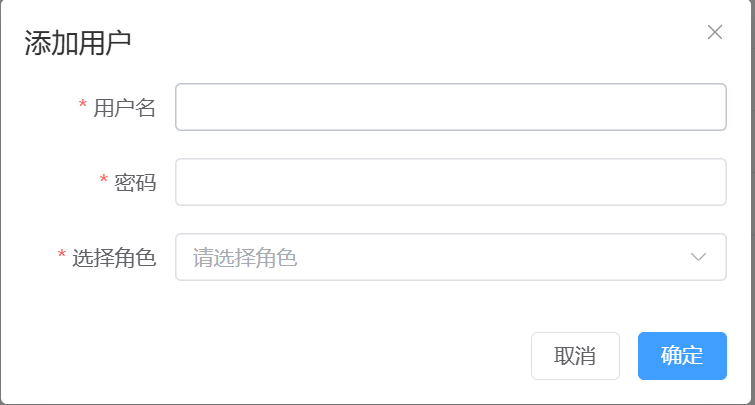
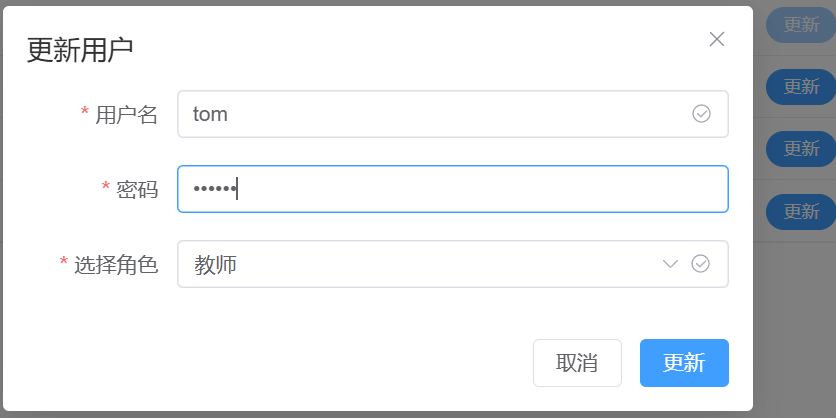
1.14 UserList 用户列表
UserList.vue - 增删改查完整逻辑。
效果

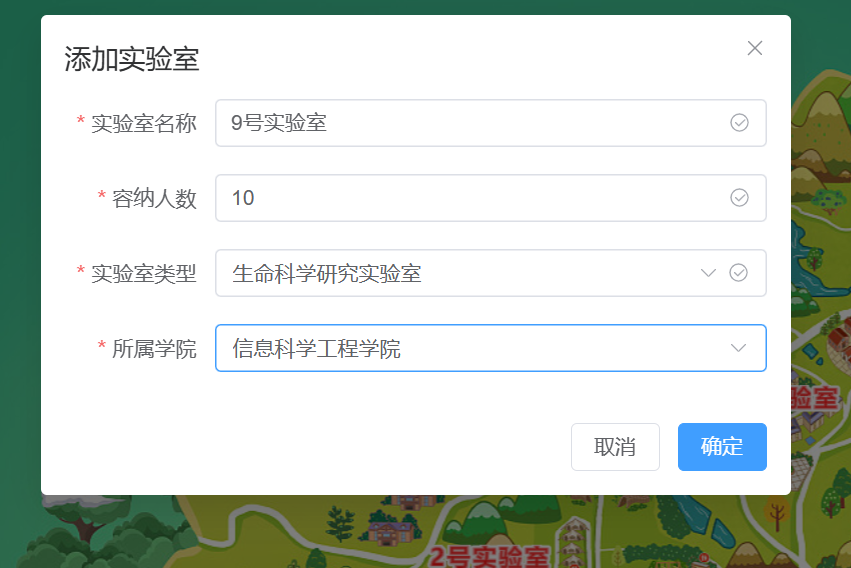
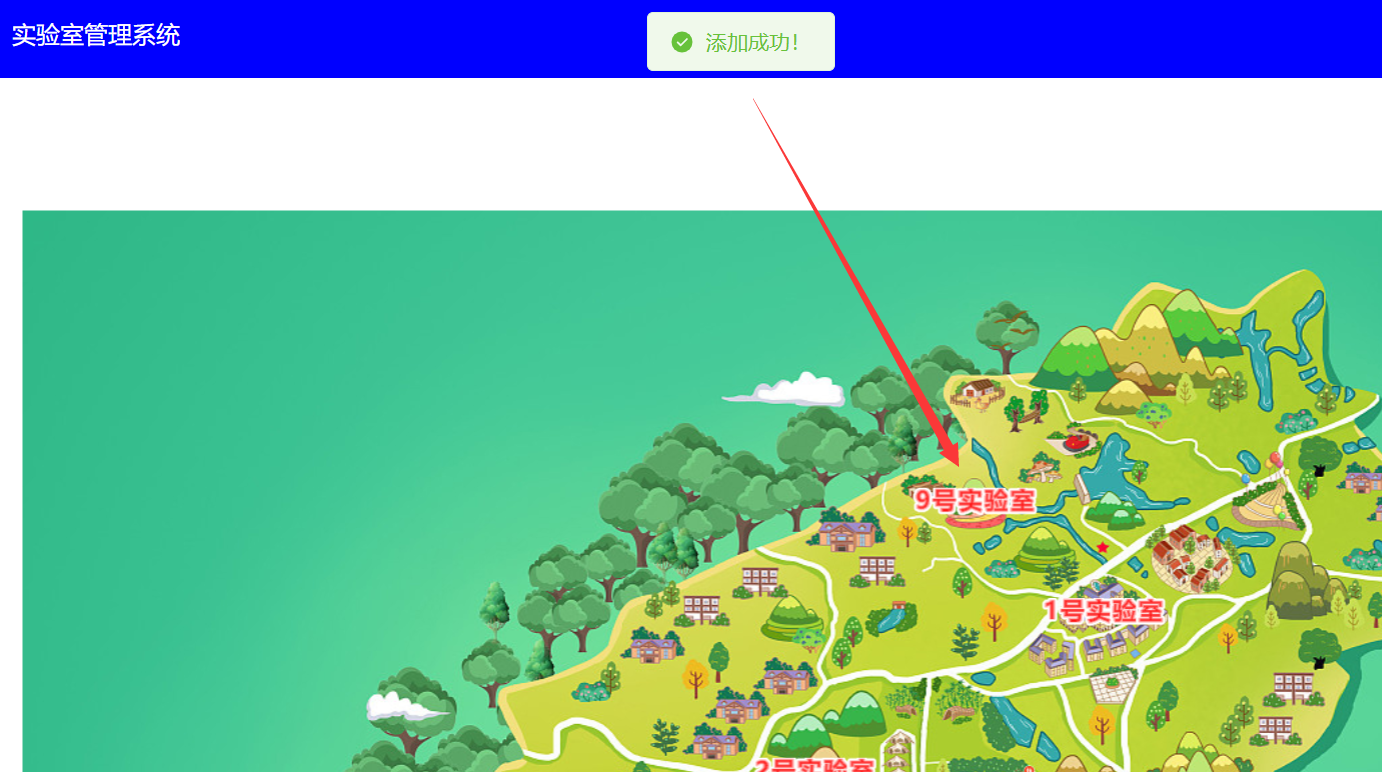
1.15 AddLab 添加实验室-蚂蚁地理空间
AddLab.vue
- 蚂蚁地理空间
平面区域标注 图表的基本使用
- 修改背景图、点击弹出
Popup 信息窗、弹出 Form 表单提交窗、遍历添加文本标注、**坐标位置定位(鼠标点击位置 x,y 倍数计算)**等
- 数据流的处理逻辑
效果
点击地图任意位置
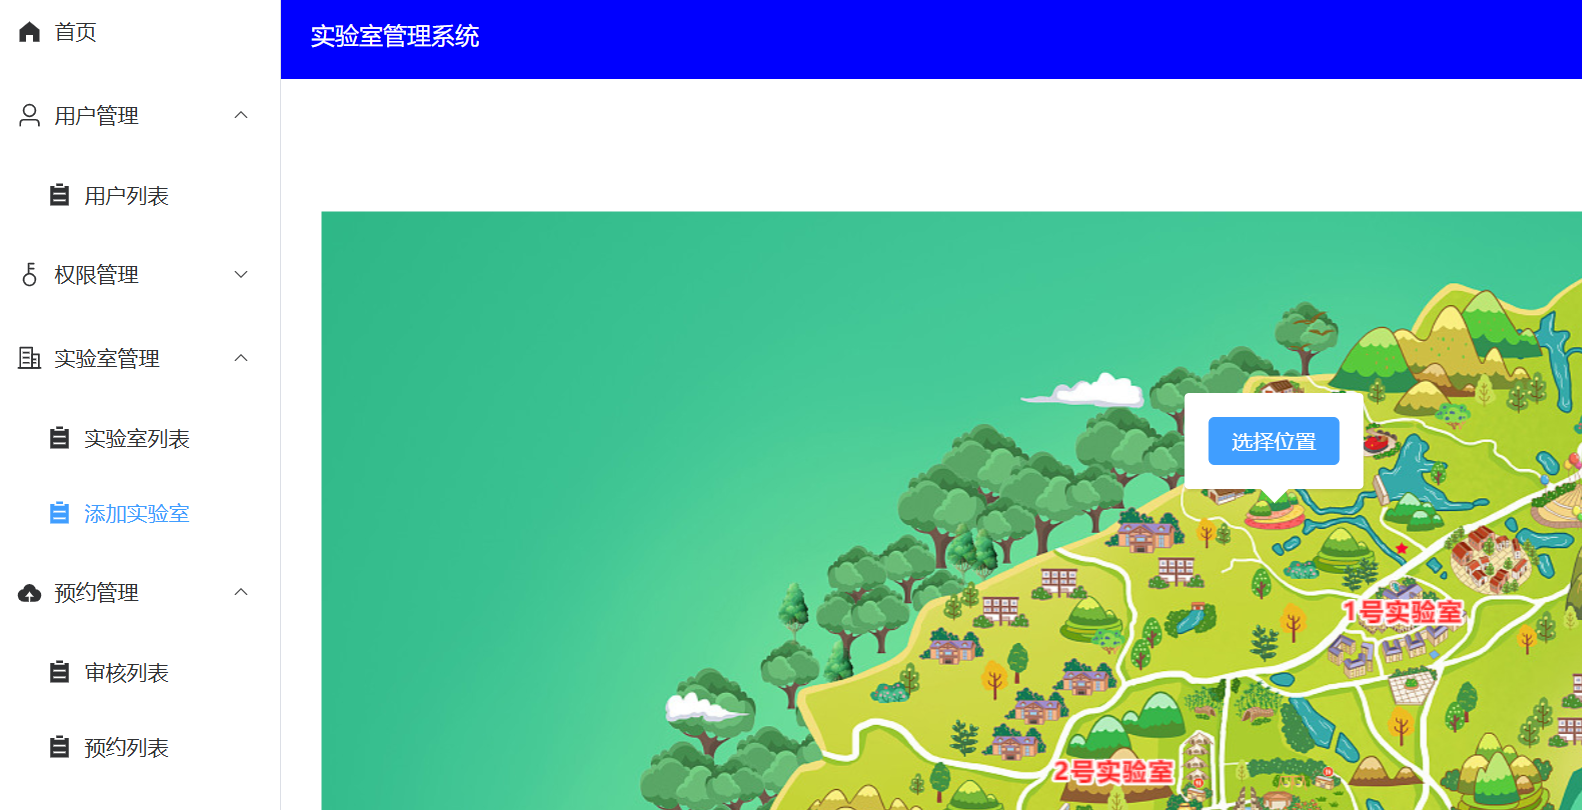
【选择位置】
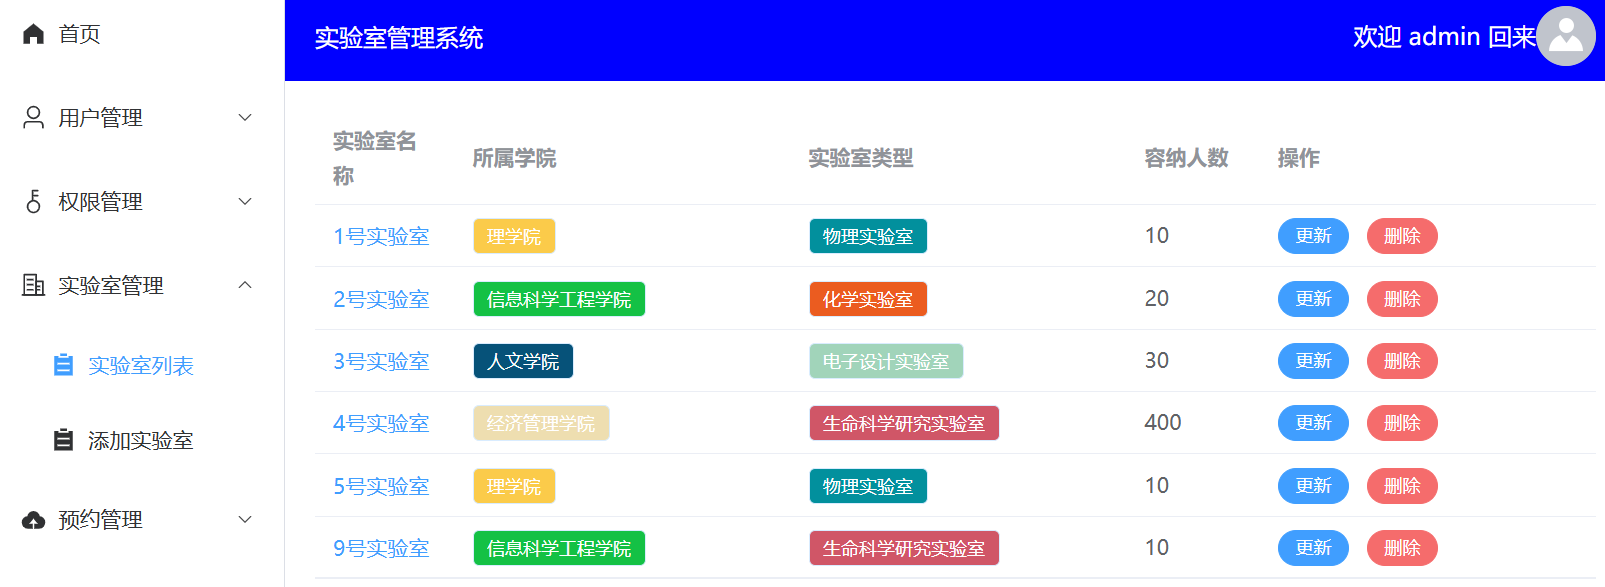
1.16 LabList 实验室列表
LabList.vue
- 增删改查的基本显示逻辑、数据流
- el-tag 组件,
动态控制不同的颜色显示
- dialog 对话框组件中
封装自定义组件、全屏显示、v-if完全创建和销毁(防止数据残留)
效果
1.17 LabMap 自定义组件
LabMap.vue
- 复用 添加实验室 AddLab 组件的蚂蚁地理空间代码,注意:
在 dialog 对话框中弹窗出来的,所以 onMounted 时还不能获取到宽度,会导致变形,需要 nextTick() 即 dom 渲染完就可以解决问题
- 父传子:进行全屏回显、显示具体实验室标注文本
父(LabList.vue):
1
2
3
4
5
| <!-- dialog 对话框组件- v-if 对数据进行完全创建和删除,防止数据残留 -->
<el-dialog v-model="dialogVisible" title="实验室位置" :fullscreen="true" v-if="dialogVisible">
<!-- 封装自定义组件 -->
<LabMap :x="currentItem.x" :y="currentItem.y" :t="currentItem.title"></LabMap>
</el-dialog>
|
效果

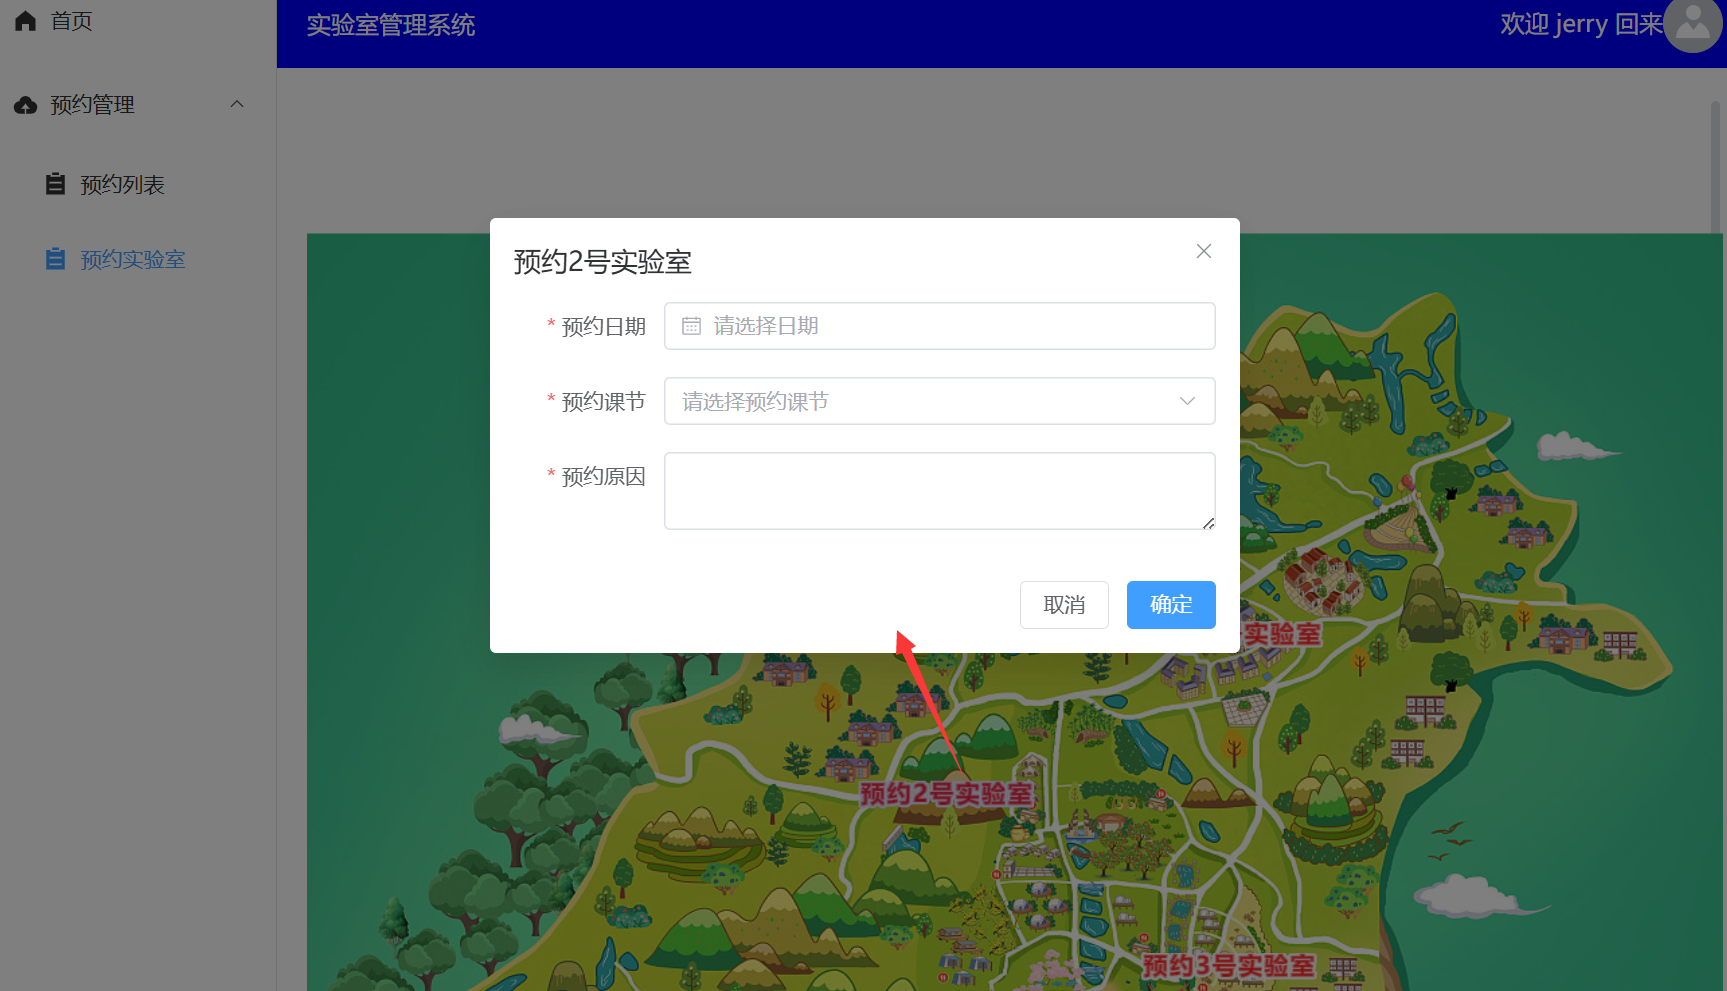
1.18 AddBook 预约实验室
AddBook.vue
- 获取已创建在数据库中的数据遍历标注在图中
- 绑定点击标注文字的事件,弹出 dialog 对话框(对话框中处理对 DatePicker 日期组件的国际化、可选日期范围、select选项的关联禁用)
- 添加预约的数据组装
效果
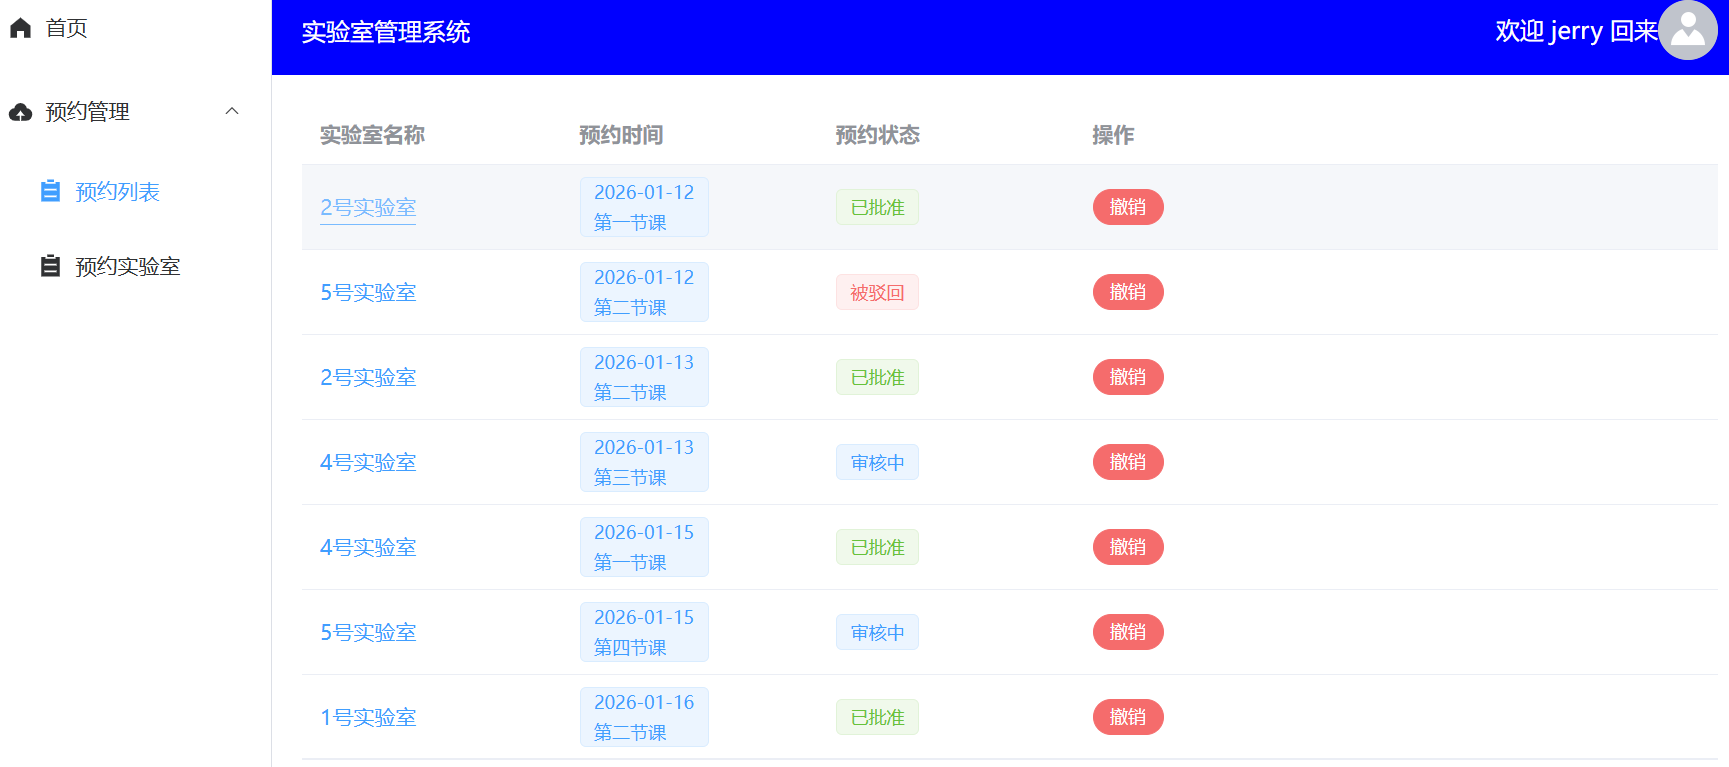
1.19 BookList 预约列表
BookList.vue
- 使用自定义指令 v-admin 和 v-teacher 控制展示不同的列在不同的用户预约列表
- el-table 中自定义表头,实现在表头输入后直接过滤列表数据
- moment 库做时间格式化
效果
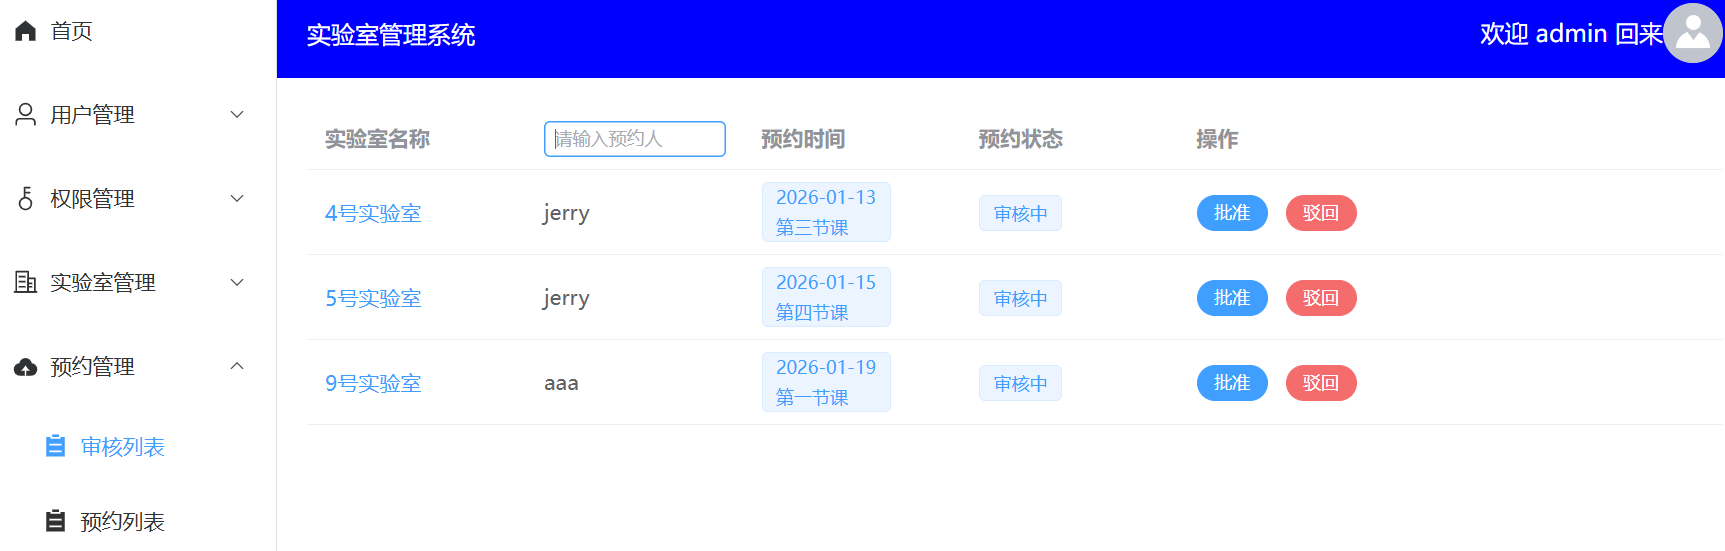
1.20 AuditList 审核列表
AuditList.vue
- 主要涉及预约状态的业务逻辑,只展示审核中的数据,对其进行批准和驳回操作
效果
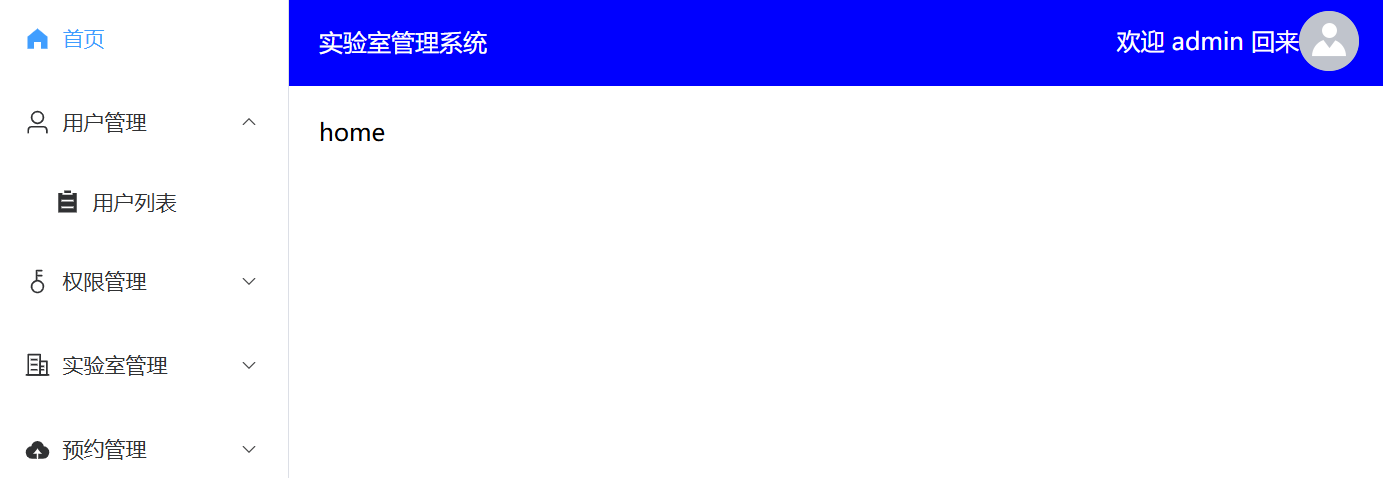
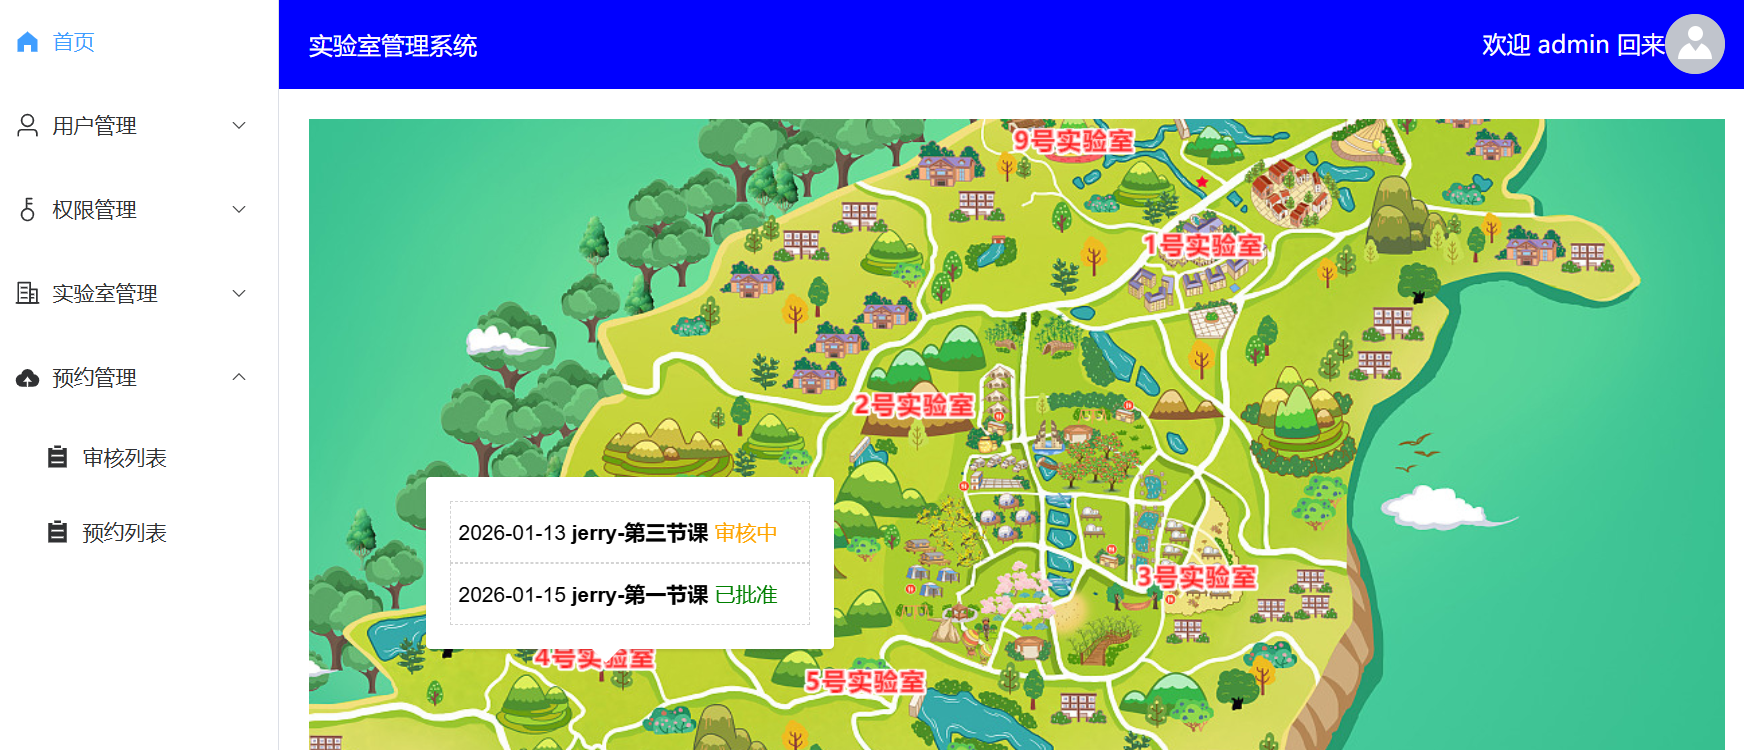
1.21 Home 首页大数据预览
Home.vue
- 对文本标注绑定点击事件,点击弹出 popup 弹窗,聚合请求并组装预约列表数据 html 渲染显示
聚合请求:
1
2
3
4
5
6
7
8
9
10
11
| textlayer.on("click", async (e) => {
console.log(e);
let url = `/admin/books/list?labId=${e.feature.id}`
const res = await Promise.all([
axios.get(url + `&bookState=0`),
axios.get(url + `&bookState=1`)
])
let list = [...res[0].data, ...res[1].data]
...
|
效果
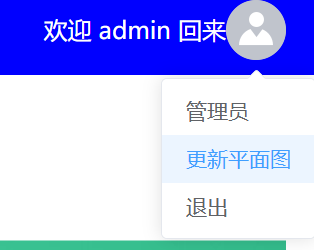
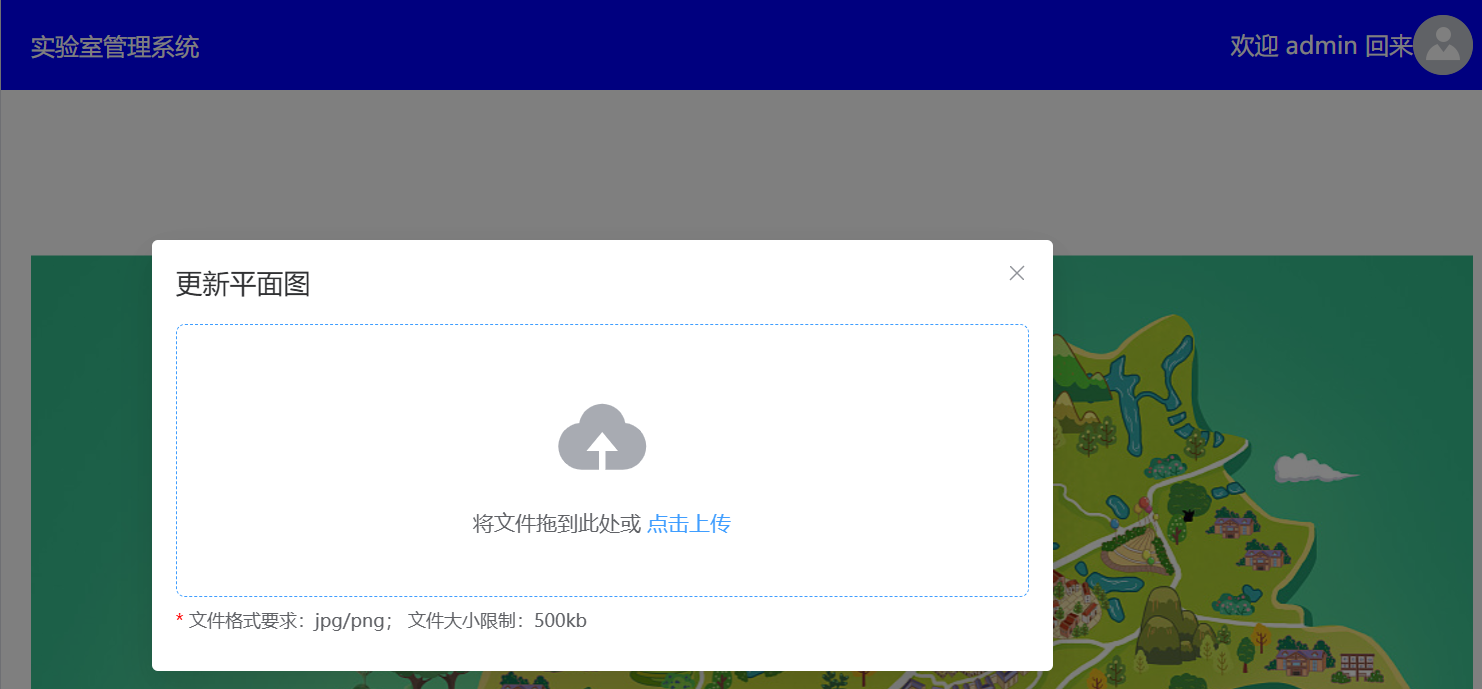
1.22 Upload 组件
TopHeader.vue
- 使用 el-dialog 包裹 el-upload 上传器组件
- drag 支持拖拽;:data 支持携带参数(如token);:on-success 支持上传成功回调事件(如重新载入页面)
1
2
|
window.location.reload()
|
效果
1.99 通用封装
util/type.js
- 作为写死的常量值(或维护在后端数据库通过接口交互)
2. 后端架构搭建
1
2
| > java --version
java 17.0.7
|
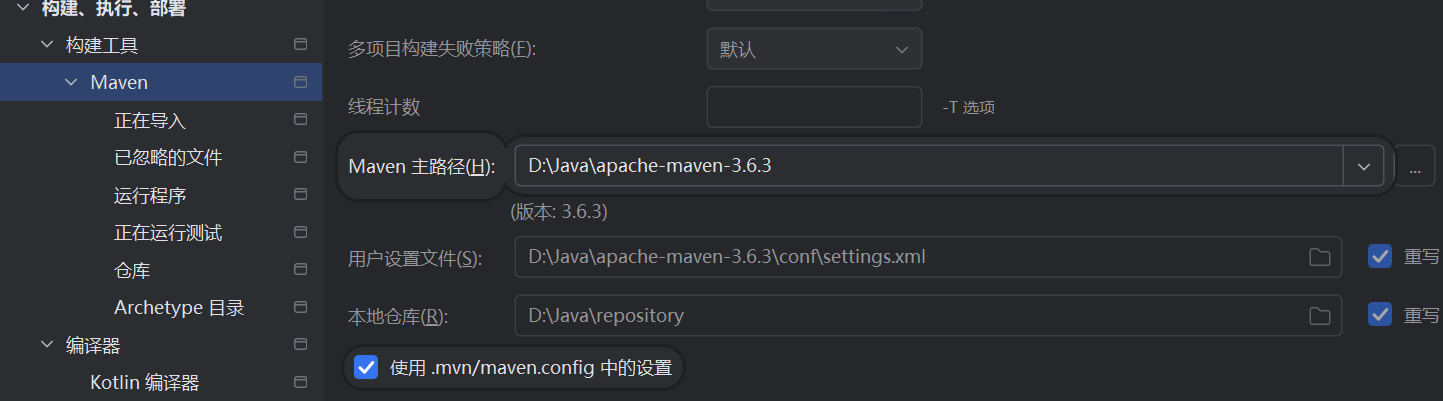
jdk17 兼容 springboot2 和 springboot3,且确保 maven 的 settings.xml 中使用阿里云镜像仓库,以及对 profile 已切换至 jdk17。
1.1 创建项目
IDEA - 新建项目
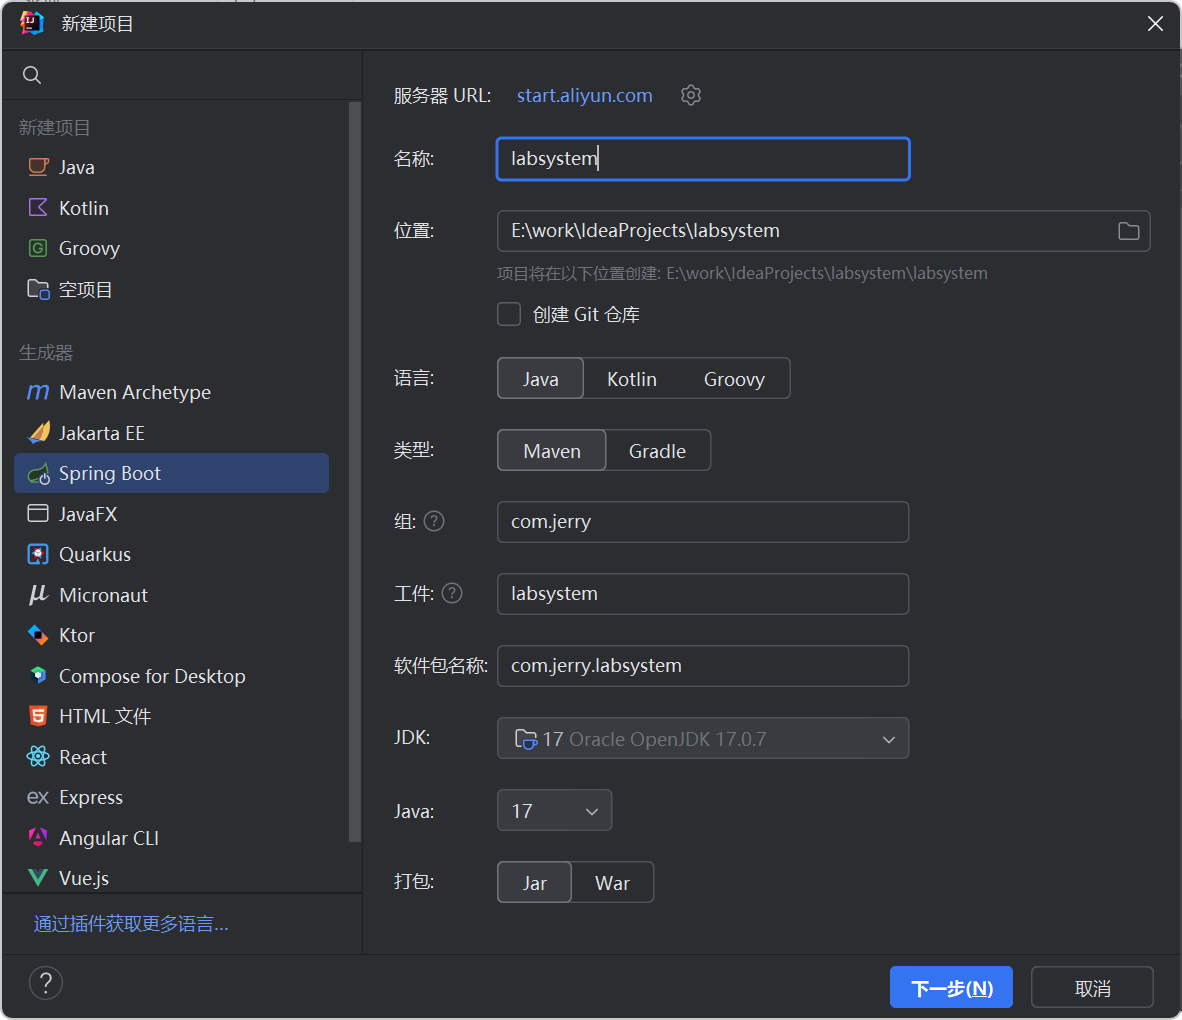
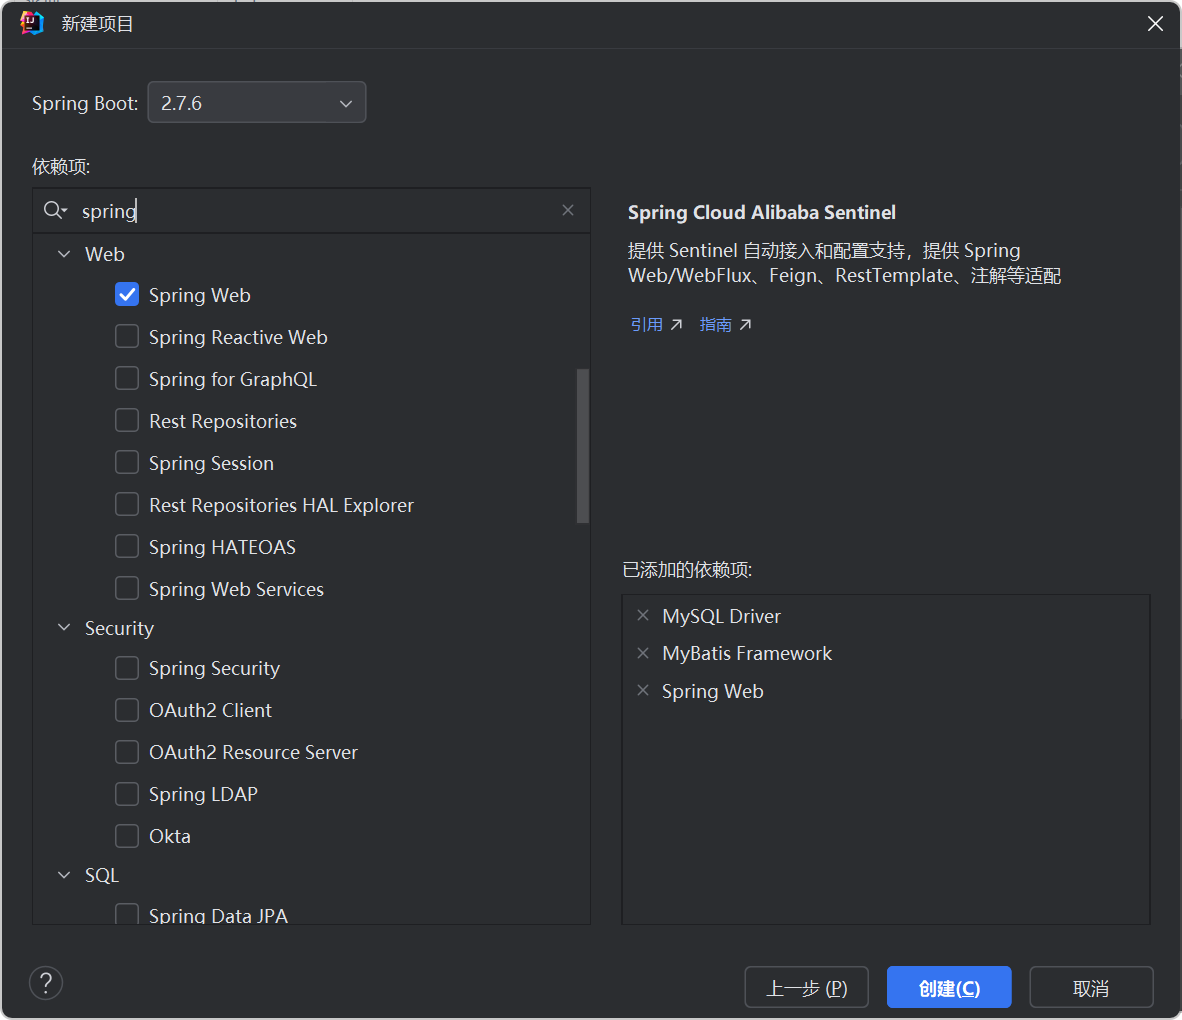
注意 maven 仓库路径的设置:
配置文件 application.yml (将 .properties 修改为 .yml 配置文件) - 配置服务启动端口和本地数据库
1
2
3
4
5
6
7
8
9
10
11
12
13
14
15
16
| server:
port: 5000
spring:
datasource:
driver-class-name: com.mysql.cj.jdbc.Driver
url: jdbc:mysql://localhost:3306/lab_system
username: root
password: 123456
mybatis:
mapper-locations: classpath:mapper/*Mapper.xml
configuration:
log-impl: org.apache.ibatis.logging.stdout.StdOutImpl
|
1.2 数据库 sql
基于本地数据库: mysql57 (localhost:3306, root, 123456)
mysql57 服务器的启动和停止:
net start mysql57 - 启动服务
net stop mysql57 - 停止服务
tasklist | findstr /i "mysql" - 查询 mysqld 进程是否存在(启动才会存在)
添加初始化数据 sql:mysql.sql
1.3 通用 Result 封装示例
pom.xml - 手动添加 lombok
1
2
3
4
5
|
<dependency>
<groupId>org.projectlombok</groupId>
<artifactId>lombok</artifactId>
</dependency>
|
utils/SysConstant.java
1
2
3
4
5
6
7
8
9
10
11
12
| public interface SysConstant {
Integer CODE_SUCCESS = 0;
Integer CODE_ERROR = -1;
String ADD_SUCCESS = "添加成功";
String ADD_ERROR = "添加失败";
String UPDATE_SUCCESS = "更新成功";
String UPDATE_ERROR = "更新失败";
String DELETE_SUCCESS = "删除成功";
String DELETE_ERROR = "删除失败";
String LOGIN_SUCCESS = "登陆成功";
String LOGIN_ERROR = "登录失败";
}
|
utils/ResultObj.java
1
2
3
4
5
6
7
8
9
10
11
12
13
14
15
16
17
18
19
20
21
22
23
24
25
26
27
28
29
30
31
32
| import lombok.Data;
@Data
public class ResultObj {
private Integer code;
private String msg;
private Object data;
public ResultObj(Integer code) {
this.code = code;
}
public ResultObj(Integer code, String msg) {
this.code = code;
this.msg = msg;
}
public ResultObj(Integer code, String msg, Object data) {
this.code = code;
this.msg = msg;
this.data = data;
}
public static final ResultObj ADD_SUCCESS = new ResultObj(SysConstant.CODE_SUCCESS, SysConstant.ADD_SUCCESS);
public static final ResultObj ADD_ERROR = new ResultObj(SysConstant.CODE_ERROR, SysConstant.ADD_ERROR);
public static final ResultObj UPDATE_SUCCESS = new ResultObj(SysConstant.CODE_SUCCESS, SysConstant.UPDATE_SUCCESS);
public static final ResultObj UPDATE_ERROR = new ResultObj(SysConstant.CODE_ERROR, SysConstant.UPDATE_ERROR);
public static final ResultObj DELETE_SUCCESS = new ResultObj(SysConstant.CODE_SUCCESS, SysConstant.DELETE_SUCCESS);
public static final ResultObj DELETE_ERROR = new ResultObj(SysConstant.CODE_ERROR, SysConstant.DELETE_ERROR);
}
|
1.4 接口代码
接口规范化:Apifox接口文档一体化协作平台
已推github项目代码:https://github.com/janycode/lab-system-admin
1.5 上传接口&拦截器
接口
1
2
3
4
5
6
7
8
9
10
11
12
13
14
15
16
| @RestController
@RequestMapping("/admin/upload")
public class UploadController {
@Autowired
private UploadService uploadService;
@PostMapping
public ResultObj upload(@RequestParam("file") MultipartFile file) {
try {
uploadService.upload(file);
return new ResultObj(SysConstant.CODE_SUCCESS, "上传成功");
} catch (IOException e) {
return new ResultObj(SysConstant.CODE_ERROR, "上传失败");
}
}
}
|
service:
1
2
3
4
5
6
7
8
9
10
11
12
13
14
15
16
17
18
19
20
21
22
23
24
| @Service
public class UploadServiceImpl implements UploadService {
@Override
public void upload(MultipartFile file) throws IOException {
String fileName = "bg.jpg";
String filePath = ResourceUtils.getURL("classpath:").getPath() + "static/upload/";
String fullFilePath = filePath + fileName;
System.out.println("fullFilePath = " + fullFilePath);
File dist = new File(fullFilePath);
if (!dist.getParentFile().exists()) {
dist.getParentFile().mkdirs();
}
file.transferTo(dist);
}
}
|
拦截器
WebConfig.java - 校验 token 拦截器放行静态资源路径 /static/**
1
2
3
4
5
6
7
8
9
10
11
12
13
14
15
16
17
18
19
20
21
22
23
24
25
26
27
28
29
30
31
32
| @Configuration
public class WebConfig implements WebMvcConfigurer {
@Autowired
private TokenInterceptor tokenInterceptor;
@Override
public void addInterceptors(InterceptorRegistry registry) {
String[] staticPath = {"/static/**"};
registry.addInterceptor(tokenInterceptor)
.addPathPatterns("/**")
.excludePathPatterns(staticPath);
}
@Override
public void addCorsMappings(CorsRegistry registry) {
registry.addMapping("/static/**")
.allowedOrigins("*")
.allowedMethods("GET");
}
}
|
application.yml - 暴露 static 静态资源可访问
1
2
3
4
5
| spring:
...
mvc:
static-path-pattern: /static/**
|
3. 核心涉及
3.1 反向代理 vite.config.js
vite.config.js - 前后端均可解决跨域,在前端可以配置如下反向代理,让请求模拟从本域请求本域,就不会有跨域问题。
1
2
3
4
5
6
7
8
9
10
11
12
13
14
15
| import { defineConfig } from 'vite'
import vue from '@vitejs/plugin-vue'
export default defineConfig({
plugins: [vue()],
server: {
proxy: {
"/admin": {
target: "http://localhost:5000",
changeOrigin: true
}
}
}
})
|
3.2 蚂蚁地理空间数据可视化
官网:https://l7.antv.antgroup.com/
官网:https://antv-2018.alipay.com/zh-cn/l7/1.x/index.html
官方教程文档:https://www.yuque.com/antv/l7/yzkq8e
安装L7依赖:npm install –save @antv/l7
安装第三方底图依赖:npm install –save @antv/l7-maps
示例图表:
demo
1
2
3
4
5
6
7
8
9
10
11
12
13
14
15
16
17
18
19
20
21
22
23
24
25
26
27
28
29
30
31
32
33
34
35
36
37
38
39
40
41
42
43
44
45
46
47
48
49
50
51
52
53
54
55
56
57
58
59
60
61
62
63
64
65
66
67
68
69
70
71
| <template>
<div>
<div style="min-height: 500px; justify-content: center; position: relative" id="map" />
</div>
</template>
<script setup>
import { onMounted } from "vue"
import { ImageLayer, PointLayer, Scene } from "@antv/l7"
import { Map } from "@antv/l7-maps"
onMounted(() => {
const scene = new Scene({
id: "map",
map: new Map({
center: [500, 500],
zoom: 3,
version: "SIMPLE",
mapSize: 1000,
maxZoom: 5,
minZoom: 2,
pitchEnabled: false,
rotateEnabled: false,
}),
})
scene.setBgColor("rgb(94, 182, 140)")
const imagelayer = new ImageLayer({}).source(
"https://gw.alipayobjects.com/mdn/rms_816329/afts/img/A*I0X5R4jAUQ4AAAAAAAAAAAAAARQnAQ",
{
parser: {
type: "image",
extent: [360, 400, 640, 600],
},
}
)
scene.on("loaded", () => {
fetch("https://gw.alipayobjects.com/os/bmw-prod/7dc0d454-fabc-4461-a5d5-d404dadb49a9.json")
.then(res => res.json())
.then(data => {
const textlayer = new PointLayer({ zIndex: 2 })
.source(data, {
parser: {
type: "json",
x: "x",
y: "y",
},
})
.shape("t", "text")
.size(12)
.active({
color: "#00f",
mix: 0.9,
})
.color("rgb(86, 156, 214)")
.style({
textAnchor: "center", // 文本相对锚点的位置 center|left|right|top|bottom|top-left
spacing: 2, // 字符间距
fontWeight: "800",
padding: [1, 1], // 文本包围盒 padding [水平,垂直],影响碰撞检测结果,避免相邻文本靠的太近
stroke: "#ffffff", // 描边颜色
strokeWidth: 2, // 描边宽度
textAllowOverlap: true,
})
scene.addLayer(textlayer)
})
scene.addLayer(imagelayer)
})
})
</script>
|
3.3 i18n 国际化
参考官网:https://element-plus.org/zh-CN/guide/i18n#%E5%85%A8%E5%B1%80%E9%85%8D%E7%BD%AE
element-Plus 只需要 main.js 引入 i18n 中文支持即可,比如用于 日历组件中周几的 中文 显示(而非英文)。
main.js
1
2
3
4
5
6
7
8
9
10
11
| import { createApp } from 'vue'
import App from './App.vue'
import ElementPlus from 'element-plus'
import 'element-plus/dist/index.css'
import zhCn from 'element-plus/es/locale/lang/zh-cn'
createApp(App)
.use(ElementPlus, {
locale: zhCn,
})
.mount('#app')
|
3.4 JWT - 登陆鉴权 token
JWT,Json Web Token. 官网:https://www.jwt.io/
后端 token 拦截
pom.xml 引入依赖
- 如果
jdk版本>1.8 时需要引入 jaxb-api 依赖(≤1.8时不需要)
1
2
3
4
5
6
7
8
9
10
11
12
13
14
15
16
|
<dependency>
<groupId>io.jsonwebtoken</groupId>
<artifactId>jjwt</artifactId>
<version>0.7.0</version>
</dependency>
<dependency>
<groupId>com.auth0</groupId>
<artifactId>java-jwt</artifactId>
<version>3.11.0</version>
</dependency>
<dependency>
<groupId>javax.xml.bind</groupId>
<artifactId>jaxb-api</artifactId>
</dependency>
|
application.yml 添加加盐配置
1
2
3
4
5
6
7
8
9
|
config:
jwt:
secret: jerry_define_code
expire: 60
header: token
|
添加拦截器配置:
config/ - 核心拦截器配置
–JwtConfig.java
–TokenInterceptor.java
–WebConfig.java
controller/UserController.java 中 /login 接口逻辑中调用 jwtConfig 创建 token 并返回
pojo/User.java 中新增 token 字段用于登陆时返回
前端 axios 拦截
axios 源码文档拦截器:https://github.com/axios/axios#interceptors
src/util/axios.config.js - axios请求拦截器
main.js 引入
1
2
3
4
5
6
| ...
import './util/axios.config'
createApp(App)
...
.mount('#app')
|
3.5 loading 与 nprogress
两者选其一,nprogress 进度条 用户体验更优秀。
loading 加载中
elementPlus 中 Loading 加载框,以服务的方式来调用
src/util/axios.config.js - axios请求拦截器
1
2
3
4
5
6
7
8
9
10
11
12
13
14
15
16
17
18
19
20
21
22
| import axios from "axios"
import { ElLoading } from 'element-plus'
let loadingInstance = null
axios.interceptors.request.use(function (config) {
loadingInstance = ElLoading.service({ fullscreen: true })
...
return config;
}, function (error) {
return Promise.reject(error);
});
axios.interceptors.response.use(function (response) {
...
loadingInstance?.close()
return response;
}, function (error) {
...
return Promise.reject(error);
});
|
效果:触发接口请求时,全屏的屏幕中间转圈的 loading 加载效果。
nprogress 进度条(★)
文档:https://github.com/rstacruz/nprogress
安装:npm i nprogress
引入:(在路由 router/index.js 中使用和引入)
1
2
3
4
5
6
7
8
9
10
11
12
13
14
15
16
17
| import { createRouter, createWebHashHistory } from 'vue-router'
import NProgress from 'nprogress'
import 'nprogress/nprogress.css'
const routes = [...]
const router = createRouter({
history: createWebHashHistory(),
routes
})
router.beforeEach((to, from, next) => {
NProgress.start()
...
})
router.afterEach(() => {
NProgress.done()
})
|
效果:每个页面浸入时,顶部从左向右一条很细的加载进度条。
3.6 前后端分页逻辑融合
