约定优于配置,这是SpringBoot中的一个很重要特性,此特性让可以在几秒中之内完成一个项目的搭建,无需任何配置。
为什么要自动配置
手动配置很麻烦且容易出问题
构建一个一样的项目耗时长且复杂
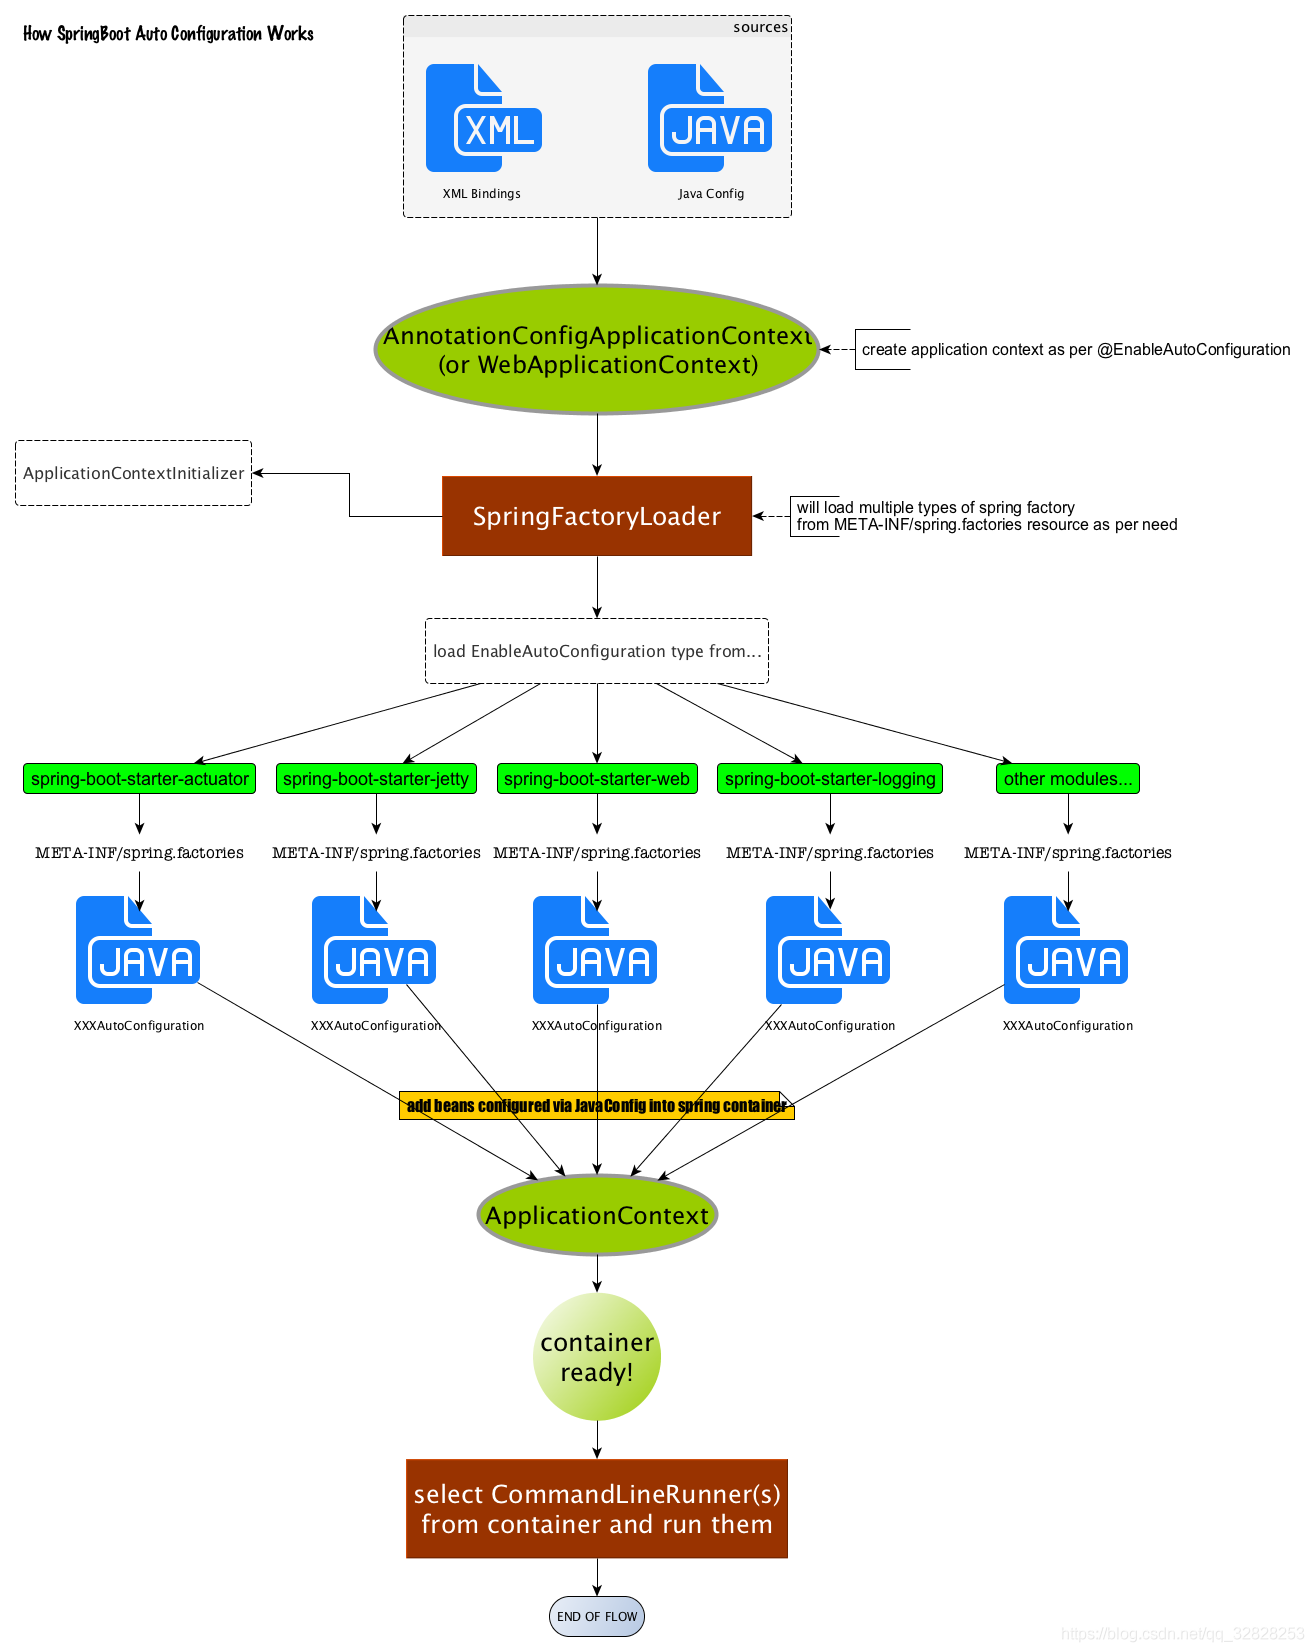
Overview 概括来说,就是借助@Import的支持,收集和注册特定场景相关的bean定义来进行自动配置
eg:
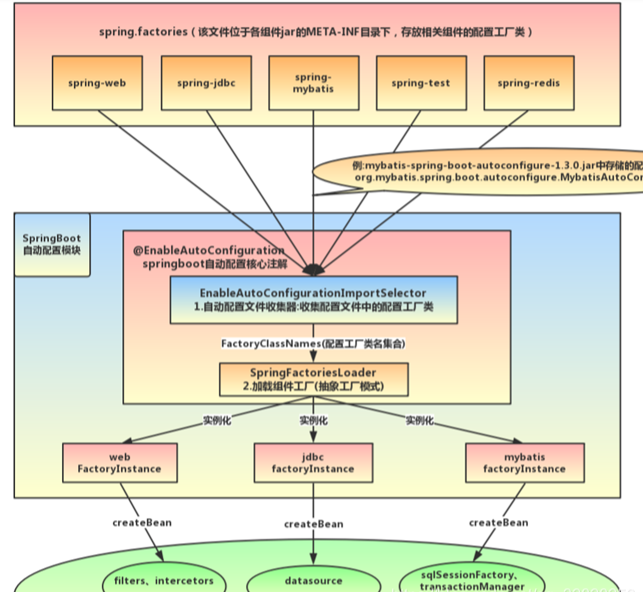
@EnableAutoConfiguration 是通过@Import将**Spring自动配置相关的bean定义都加载到IoC容器,对应组件为: AutoConfigurationImportSelector** @EnableScheduling 是通过@Import将**Spring调度框架相关的bean定义都加载到IoC容器,对应的组件为: SchedulingConfiguration**@EnableMBeanExport 是通过@Import将**JMX相关的bean定义加载到IoC容器,对应的组件为: MBeanExportConfiguration**
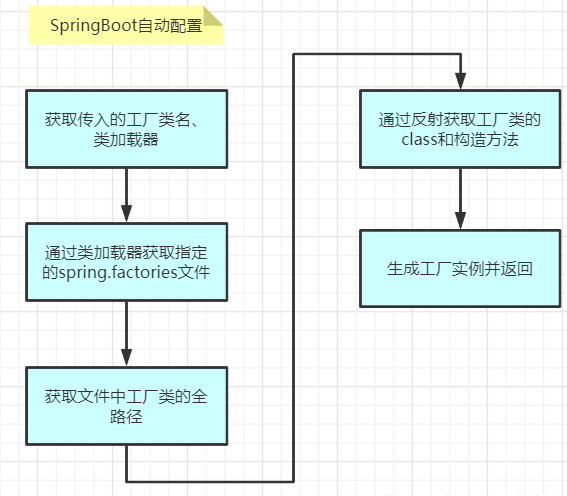
自动配置基本流程
加载示意图,关键的是SpringFactoryLoader类:
源码解析 在构建SpringBoot项目的时候,启动类是这样的
1
2
3
4
5
6
@SpringBootApplication public class SpringDemoApplication {public static void main (String[] args) {
其中@SpringBootApplication注解是关键所在,接下来来看看为什么,进入到这个注解中
1
2
3
4
5
6
7
8
9
10
11
12
13
@Target(ElementType.TYPE) @Retention(RetentionPolicy.RUNTIME) @Documented @Inherited @SpringBootConfiguration @EnableAutoConfiguration @ComponentScan(excludeFilters = { @Filter(type = FilterType.CUSTOM, classes = TypeExcludeFilter.class), @Filter(type = FilterType.CUSTOM, classes = AutoConfigurationExcludeFilter.class) }) public @interface SpringBootApplication {
可以发现@SpringBootApplication注解其实是对@SpringBootConfiguration、@EnableAutoConfiguration、@ComponentScan三个注解的封装,也就是它们之间具有相互替代性。关注@EnableAutoConfiguration这个注解 @EnableAutoConfiguration主要是标记需要导入哪些配置,这个就是一个key(factoryType),之后依据key获取spring.facteries文件中的配置信息。
1
2
3
4
5
6
7
8
9
10
11
@Target(ElementType.TYPE) @Retention(RetentionPolicy.RUNTIME) @Documented @Inherited @AutoConfigurationPackage @Import(AutoConfigurationImportSelector.class) public @interface EnableAutoConfiguration {
有两个需要注意的地方,那就是@AutoConfigurationPackage、@Import(AutoConfigurationImportSelector.class),先来看下@AutoConfigurationPackage
1
2
3
4
5
6
7
8
9
@Target(ElementType.TYPE) @Retention(RetentionPolicy.RUNTIME) @Documented @Inherited @Import(AutoConfigurationPackages.Registrar.class) public @interface AutoConfigurationPackage {
进入到组件AutoConfigurationPackages.Registrar
1
2
3
4
5
6
7
8
9
10
11
12
13
static class Registrar implements ImportBeanDefinitionRegistrar , DeterminableImports {@Override public void registerBeanDefinitions (AnnotationMetadata metadata, BeanDefinitionRegistry registry) {new PackageImports (metadata).getPackageNames().toArray(new String [0 ]));@Override public Set<Object> determineImports (AnnotationMetadata metadata) {return Collections.singleton(new PackageImports (metadata));
这个地方可能比较难以理解,主要有几个步骤:
获取注解的类,这里是SpringDemoApplication
获取同级的package以及子package
扫描这些package,并将组件导入到spring管理的容器中,之后可以被用作spring.factories配置文件的key
接下来看下@Import(AutoConfigurationImportSelector.class),通过Spring底层注解@Import,给容器导入一个组件,这个组件就是AutoConfigurationImportSelector.class,它实现了DeferredImportSelector,关键方法是selectImports(),来具体看看它的实现
1 2 3 4 5 6 7 8 9 10 11 12 13 14 15 16 17 18 19 20 21 22 23 24 25 26 27 28 29 30 @Override public String[] selectImports(AnnotationMetadata annotationMetadata) {if (!isEnabled(annotationMetadata)) {return NO_IMPORTS;AutoConfigurationEntry autoConfigurationEntry = getAutoConfigurationEntry(annotationMetadata);return StringUtils.toStringArray(autoConfigurationEntry.getConfigurations());protected boolean isEnabled (AnnotationMetadata metadata) {if (getClass() == AutoConfigurationImportSelector.class) {return getEnvironment().getProperty(EnableAutoConfiguration.ENABLED_OVERRIDE_PROPERTY, Boolean.class, true );return true ;
通过getAutoConfigurationEntry方法来获取的配置
1 2 3 4 5 6 7 8 9 10 11 12 13 14 15 16 17 18 19 20 21 22 23 24 25 26 27 protected AutoConfigurationEntry getAutoConfigurationEntry (AnnotationMetadata annotationMetadata) {if (!isEnabled(annotationMetadata)) {return EMPTY_ENTRY;AnnotationAttributes attributes = getAttributes(annotationMetadata);return new AutoConfigurationEntry (configurations, exclusions);
获取原始的配置集合方法是getCandidateConfigurations
1 2 3 4 5 6 7 8 9 10 11 12 13 14 15 16 17 18 19 20 21 22 23 24 25 26 27 28 protected List<String> getCandidateConfigurations (AnnotationMetadata metadata, AnnotationAttributes attributes) {"No auto configuration classes found in META-INF/spring.factories. If you " "are using a custom packaging, make sure that file is correct." );return configurations;protected Class<?> getSpringFactoriesLoaderFactoryClass() {return EnableAutoConfiguration.class;
SpringFactoriesLoader类属于Spring框架私有的一种扩展方案,其主要功能就是从指定的配置文件 META-INF/spring.factories加载配置,来加载到需要自动配置的类的全限定名列表,接下来到Spring框架中去看下SpringFactoriesLoader.loadFactoryNames()静态方法。
1 2 3 4 5 6 7 8 9 10 11 12 13 14 15 16 17 18 19 public static List<String> loadFactoryNames (Class<?> factoryType, @Nullable ClassLoader classLoader) {ClassLoader classLoaderToUse = classLoader;if (classLoaderToUse == null ) {String factoryTypeName = factoryType.getName();return loadSpringFactories(classLoaderToUse).getOrDefault(factoryTypeName, Collections.emptyList());
关键方法在loadSpringFactories:
1 2 3 4 5 6 7 8 9 10 11 12 13 14 15 16 17 18 19 20 21 22 23 24 25 26 27 28 29 30 31 32 33 34 35 36 37 38 39 40 41 42 43 44 45 46 47 48 49 50 51 52 53 private static Map<String, List<String>> loadSpringFactories (ClassLoader classLoader) {if (result != null ) {return result;new HashMap <>();try {while (urls.hasMoreElements()) {URL url = urls.nextElement();UrlResource resource = new UrlResource (url);Properties properties = PropertiesLoaderUtils.loadProperties(resource);for (Map.Entry<?, ?> entry : properties.entrySet()) {String factoryTypeName = ((String) entry.getKey()).trim();for (String factoryImplementationName : factoryImplementationNames) {new ArrayList <>())catch (IOException ex) {throw new IllegalArgumentException ("Unable to load factories from location [" +"]" , ex);return result;
获取配置集合,主要流程如下:
先在cache缓存中找,如果有则直接返回配置集合结果
在cache缓存中没有找到,依据classLoader.getResources(“META-INF/spring.factories”)获取文件
解析出文件的key、value保存到集合中
然后将结果保存到缓存cache中
返回结果,格式为Map<String, List>,其中key为factoriesType(比如org.springframework.boot.autoconfigure.EnableAutoConfiguration),value为配置的value
1
2
3
4
5
# key
总结 配合@EnablAutoConfiguration使用的话,它主要是提供一种配置查找的功能,即根据@EnablAutoConfiguration的完整类名org.springframework.boot.autoconfigure.EnableAutoConfiguration作为查找的Key,获取对应的一组@Configuration类。 所以,@EnableAutoConfiguration大致的自动配置过程为:
从classpath中搜寻所有的META-INF/spring.factories配置文件
获取所有key为org.springframework.boot.autoconfigure.EnableautoConfiguration的配置项(也可能是Enablexxx)
通过反射来实例化对应标有@Configuration注解的JavaConfig形式的IoC容器配置类,然后统一汇总到IoC容器中