在使用SpringBoot启动项目的时候,可能只需加一个注解,然后启动main,整个项目就运行了起来,但事实真的是所见即所得吗,还是SpringBoot在背后默默做了很多?
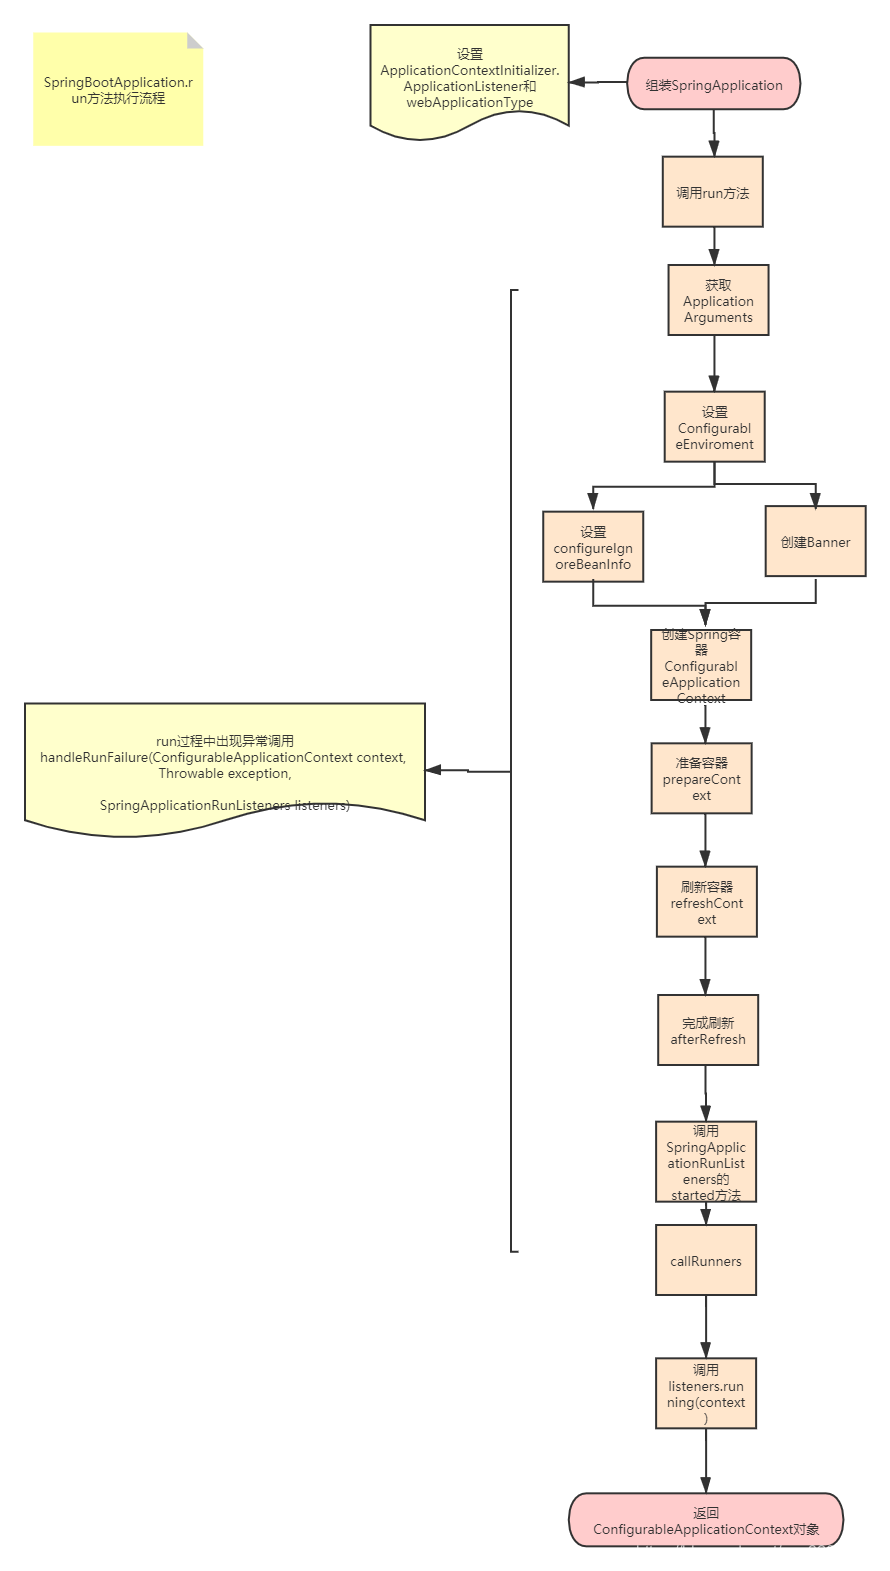
SpringBoot启动过程流程图
源码解析 首先,先来看下SpringBoot项目的启动类
1
2
3
4
5
6
@SpringBootApplication public class SpringDemoApplication {public static void main (String[] args) {
一个是@SpringBootApplication,可以参考下一篇文章 SpringBoot自动配置实现原理及源码解析 另一个关键点是SpringApplication.run()方法,这是一个静态方法,详细看下代码:
1 2 3 4 5 6 7 8 9 10 11 12 13 14 15 16 17 public static ConfigurableApplicationContext run (Class<?> primarySource, String... args) {return run(new Class <?>[]{public static ConfigurableApplicationContext run (Class<?>[] primarySources, String[] args) {return new SpringApplication (primarySources).run(args);
可以看到代码new SpringApplication(),new了一个这个对象,然后调用run,先看看SpringApplication构造函数:
1
2
3
4
5
6
7
8
9
10
11
12
13
14
15
16
17
18
19
20
public SpringApplication (Class<?>... primarySources) {this (null , primarySources);public SpringApplication (ResourceLoader resourceLoader, Class<?>... primarySources) {this .resourceLoader = resourceLoader;"PrimarySources must not be null" );this .primarySources = new LinkedHashSet <>(Arrays.asList(primarySources));this .webApplicationType = WebApplicationType.deduceFromClasspath();this .bootstrappers = new ArrayList <>(getSpringFactoriesInstances(Bootstrapper.class));this .mainApplicationClass = deduceMainApplicationClass();
基本就是做如下几件事情:
配置primarySources
配置环境是否为web环境
创建初始化构造器setInitializers
创建应用监听器
配置应用主方法所在类(就是main方法所在类)
基本上就是做一些必要的属性初始化和赋值,接下来看下关键方法run
1 2 3 4 5 6 7 8 9 10 11 12 13 14 15 16 17 18 19 20 21 22 23 24 25 26 27 28 29 30 31 32 33 34 35 36 37 38 39 40 41 42 43 44 45 46 47 48 49 50 51 52 53 54 55 56 57 58 59 60 61 62 63 public ConfigurableApplicationContext run (String... args) {StopWatch stopWatch = new StopWatch ();DefaultBootstrapContext bootstrapContext = createBootstrapContext();ConfigurableApplicationContext context = null ;SpringApplicationRunListeners listeners = getRunListeners(args);this .mainApplicationClass);try {ApplicationArguments applicationArguments = new DefaultApplicationArguments (args);ConfigurableEnvironment environment = prepareEnvironment(listeners, bootstrapContext, applicationArguments);Banner printedBanner = printBanner(environment);this .applicationStartup);if (this .logStartupInfo) {new StartupInfoLogger (this .mainApplicationClass).logStarted(getApplicationLog(), stopWatch);catch (Throwable ex) {throw new IllegalStateException (ex);try {catch (Throwable ex) {null );throw new IllegalStateException (ex);return context;
基本流程如下:
启动一个计时器,启动完成后会打印耗时
获取并启动监听器 SpringApplicationRunListeners
配置环境 ConfigurableEnvironment
Banner配置,就是控制台的那个spirng
应用上下文模块(前置处理、刷新、后置处理) ConfigurableApplicationContext
发出启动结束事件并结束计时
这里的每一个方法都是做了很多事情,接下来一步步深入看下
run方法第一步:获取并启动监听器 这里的启动监听就是需要监听SpringBoot的启动流程监听,实现SpringApplicationRunListener类即可监听
1 2 3 4 5 6 7 8 9 10 11 12 13 private SpringApplicationRunListeners getRunListeners (String[] args) {new Class <?>[]{return new SpringApplicationRunListeners (logger,this , args),this .applicationStartup);
SpringApplicationRunListener类如下:
1
2
3
4
5
6
7
8
9
10
11
12
13
14
15
16
17
18
19
20
21
22
23
24
25
26
27
28
29
30
31
32
33
34
35
36
37
38
39
40
41
42
43
44
45
46
47
48
49
50
51
52
53
54
55
56
57
public interface SpringApplicationRunListener {default void starting (ConfigurableBootstrapContext bootstrapContext) {default void environmentPrepared (ConfigurableBootstrapContext bootstrapContext, ConfigurableEnvironment environment) {default void contextPrepared (ConfigurableApplicationContext context) {default void contextLoaded (ConfigurableApplicationContext context) {default void started (ConfigurableApplicationContext context) {default void running (ConfigurableApplicationContext context) {default void failed (ConfigurableApplicationContext context, Throwable exception) {
run方法第二步:准备环境 1 2 3 4 5 6 7 8 9 10 11 12 13 14 15 16 17 18 19 20 21 22 23 24 25 26 27 28 29 30 31 32 33 private ConfigurableEnvironment prepareEnvironment (SpringApplicationRunListeners listeners, DefaultBootstrapContext bootstrapContext, ApplicationArguments applicationArguments) {ConfigurableEnvironment environment = getOrCreateEnvironment();if (!this .isCustomEnvironment) {new EnvironmentConverter (getClassLoader()).convertEnvironmentIfNecessary(environment,return environment;
这里主要有如下过程:
创建配置环境 ConfigurableEnvironment
加载属性文件资源
配置监听
run方法第三步:打印banner 1 2 3 4 5 6 7 8 9 10 11 12 13 14 15 16 17 18 19 20 21 22 private Banner printBanner (ConfigurableEnvironment environment) {if (this .bannerMode == Banner.Mode.OFF) {return null ;ResourceLoader resourceLoader = (this .resourceLoader != null ) ? this .resourceLoadernew DefaultResourceLoader (null );SpringApplicationBannerPrinter bannerPrinter = new SpringApplicationBannerPrinter (resourceLoader, this .banner);if (this .bannerMode == Mode.LOG) {return bannerPrinter.print(environment, this .mainApplicationClass, logger);return bannerPrinter.print(environment, this .mainApplicationClass, System.out);
基本就是依据不同情况打印banner而已,比较简单
run方法第四步:创建spring容器 最终获取到ConfigurableApplicationContext上下文对象
run方法第五步:spring容器前置处理 1 2 3 4 5 6 7 8 9 10 11 12 13 14 15 16 17 18 19 20 21 22 23 24 25 26 27 28 29 30 31 32 33 34 35 36 37 38 39 40 41 42 43 44 45 private void prepareContext (DefaultBootstrapContext bootstrapContext, ConfigurableApplicationContext context, ConfigurableEnvironment environment, SpringApplicationRunListeners listeners, ApplicationArguments applicationArguments, Banner printedBanner) {if (this .logStartupInfo) {null );ConfigurableListableBeanFactory beanFactory = context.getBeanFactory();"springApplicationArguments" , applicationArguments);if (printedBanner != null ) {"springBootBanner" , printedBanner);if (beanFactory instanceof DefaultListableBeanFactory) {this .allowBeanDefinitionOverriding);if (this .lazyInitialization) {new LazyInitializationBeanFactoryPostProcessor ());"Sources must not be empty" );new Object [0 ]));
run方法第六步:刷新容器【关键】 1 2 3 4 5 6 7 8 9 10 11 12 13 14 15 16 17 18 19 20 21 22 23 24 25 26 27 28 29 30 31 32 33 34 private void refreshContext (ConfigurableApplicationContext context) {if (this .registerShutdownHook) {try {catch (AccessControlException ex) {protected void refresh (ApplicationContext applicationContext) {protected void refresh (ConfigurableApplicationContext applicationContext) {
调用应用上下文对象的refresh()方法,接下来我i门到ConfigurableApplicationContext类中去看下这个方法
1 2 3 4 public interface ConfigurableApplicationContext extends ApplicationContext , Lifecycle, Closeable {void refresh () throws BeansException, IllegalStateException;
这是一个接口,且这个类是在spring框架中,非springboot,它的实现类共有三个
AbstractApplicationContext是一个抽象类,其余两个类都继承了它,来看看这个抽象类的代码:
1 2 3 4 5 6 7 8 9 10 11 12 13 14 15 16 17 18 19 20 21 22 23 24 25 26 27 28 29 30 31 32 33 34 35 36 37 38 39 40 41 42 43 44 45 46 47 48 49 50 51 52 53 54 55 56 57 58 59 60 61 62 63 64 65 66 67 68 69 70 71 @Override public void refresh () throws BeansException, IllegalStateException {synchronized (this .startupShutdownMonitor) {StartupStep contextRefresh = this .applicationStartup.start("spring.context.refresh" );ConfigurableListableBeanFactory beanFactory = obtainFreshBeanFactory();try {StartupStep beanPostProcess = this .applicationStartup.start("spring.context.beans.post-process" );catch (BeansException ex) {if (logger.isWarnEnabled()) {"Exception encountered during context initialization - " +"cancelling refresh attempt: " + ex);throw ex;finally {
这里有非常多的步骤,上下文对象主要的bean也是在这里进行处理的,具体的说明可以看注释
其中,这里是web应用,所以实现类是ServletWebServerApplicationContext,看下这个类refresh()的代码:
1 2 3 4 5 6 7 8 9 10 11 12 13 14 15 16 17 @Override public final void refresh () throws BeansException, IllegalStateException {try {super .refresh();catch (RuntimeException ex) {WebServer webServer = this .webServer;if (webServer != null ) {throw ex;
主要还是调用父类方法,没有什么特殊的
run方法/第七步:spring容器后置处理 afterRefresh() 1 2 3 protected void afterRefresh (ConfigurableApplicationContext context, ApplicationArguments args) {
这是一个空的方法。
run方法启动后 主要做如下几件事情:
发出启动结束事件
执行实现ApplicationRunner、CommandLineRunner的run方法
发布应用程序已启动(ApplicationStartedEvent)事件
run方法异常处理 如果run方法的处理过程中发生异常,则对exitCode进行相应处理
1 2 3 4 5 6 7 8 9 10 11 12 13 14 15 16 17 18 19 20 21 22 23 24 25 26 private void handleRunFailure (ConfigurableApplicationContext context, Throwable exception, SpringApplicationRunListeners listeners) {try {try {if (listeners != null ) {finally {if (context != null ) {catch (Exception ex) {"Unable to close ApplicationContext" , ex);
至此,所有SpringBoot的启动流程已经完成,你的项目也顺利的跑起来了。